
Formstack Document:
Managing your legal practice from salesforce can keep your information organized and can streamline a lot of the day-to-day operations. But as with almost any business firm, there’s always paperwork – lots of paperwork. From generating documents, sending them to clients, or filing them away, you probably spend hours a day on paperwork. With Formstack Documents, we can set up templates for all our documents and easily (and automatically) populate those templates with data from Salesforce.
In this example, we’re going to show you how you can generate a word document/pdf that you can send to a client and capture sign right from your Salesforce account.
Prerequisite:-
- We have webmerge login account first and integrated with salesforce.
- If not so we need to signup first into the formstack webmerge and then integrate with salesforce.
Login
Signup
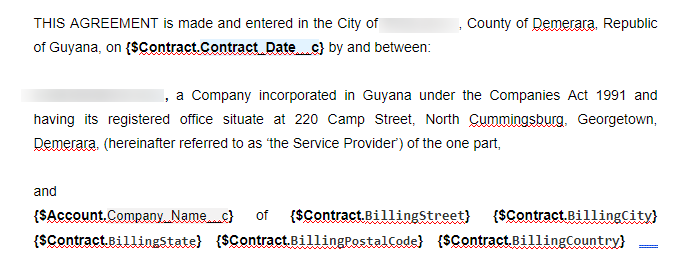
To get started, let’s set up our Representation template. For the template, we’re going to use a Word document so go ahead and create your letter in Microsoft Word. We’re going to add merge tags in the template where were want the client’s information to go like {$Contract.StartDate}, {$Contract.BillingCity}, {$Address},etc.
Here’s what our document template looks like:
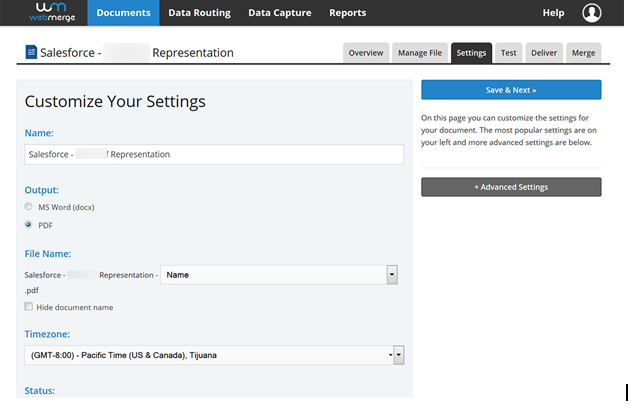
Once we have the template finished, let’s upload it to Formstack Documents. From the Documents page in Formstack Documents, click the New Document button and enter “Document Name Title” for the name, and click Next. Here we’re going to want to pick the Office Document type and then pick the file from your computer to upload.
After you upload the template, you’ll be taken to the Settings tab where you can update things like the type of file that we want to generate as well as the name of the file. For this example, we’re going to generate a PDF document or Word Document and we’re going to add the name of our client in the name of the file.
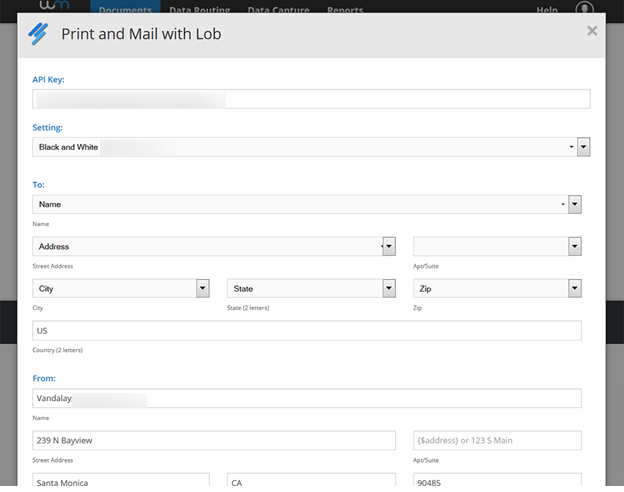
Once you save the settings, let’s set up the integration so that our letter can be automatically printed and mailed to our client. Jump over to the Deliver tab and click New Delivery then choose. You’ll be asked for your API Key and then you’ll see the settings for To and From.
For the “To” address, we’re going to use merge fields. If the fields do not exist in your document, you can click <<other>> then type in the fields there like: {$Address}, {$City}, {$State}, etc.
For the “From” address, we’re just going to use a static address, so again we’ll pick the <<other>> option, but then we’ll just type in the normal text instead of merge fields.
We’re all finished with the setup inside Formstack Documents. Now, let’s jump over to Salesforce and set up the integration so that we can click a button on the contract record and generate the letter.
If you haven’t already, please make sure to install the Formstack Documents managed package from the AppExchange and then follow the setup instructions.
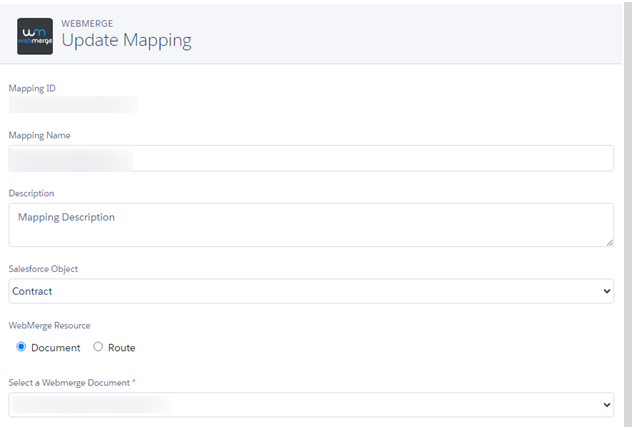
Inside Salesforce, let’s set up a new Mapping. This mapping tells the system how to send the Salesforce data over to WebMerge so that is matched up with the correct fields in your document. From the WebMerge Mappings page, click the New WebMerge Mapping button.
When setting up the new mapping, give it a name like “Document Name Title”. You’ll then select the Salesforce object that you want to pull data from. We’re going to generate this letter from the Contract object. The last piece is to select the Document that we just set up.
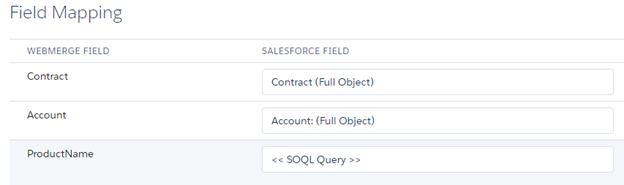
Go ahead and click Save and Next. You’ll be taken to a page that looks like it has a lot of the same settings at the top of the page, but we’re going to focus on the Field Mapping section of the page. This is where you’ll set up the “matching” between the merge fields and the Salesforce data.
For each of the merge fields in your document (listed on the left), you’ll need to select the corresponding Salesforce field.
After you have the field mapping done, go ahead and Save and Activate this mapping. This will make the mapping available from the Contract record when we click the WebMerge button.
Then open up one of your contract records and click the WebMerge button.
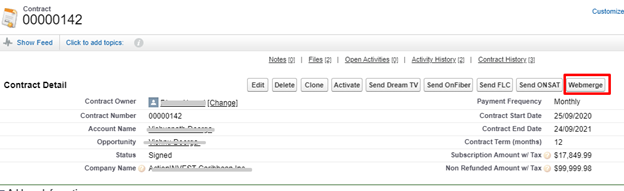
On the next screen, you’ll see a list of the other Mappings you have set up for the contract record. Go ahead and pick you have created one mapping and click Merge Now. Note: if you only have 1 mapping, it will be automatically selected/merged.

After a few seconds, you’ll be redirected back to the contract record, but behind the scenes, Formstack Documents has generated your document and sent it over to email as you mention at the time of mapping.
Formstack Sign:
Formstack Sign helps to make that possible! Formstack Sign’s easy-to-use technology makes getting documents eSigned simple and secure. Customer simply opens an email or text from Formstack Sign, inserts their eSignatures, and submits – all from a mobile device, or computer.
Add Formstack Documents to your processes and you can automate all of your paperwork with the click of a button!
Note: You will need a separate account with Formstack Sign in order to use it as a delivery integration with your Formstack Documents account!
For using formstack sign you just need to follow the below steps:
1. Click on webmerge documents tab inside the salesforce then click on the document which you have created and where you need customers to sign.

2. After that click on Deliver tab inside the selected webmerge document.
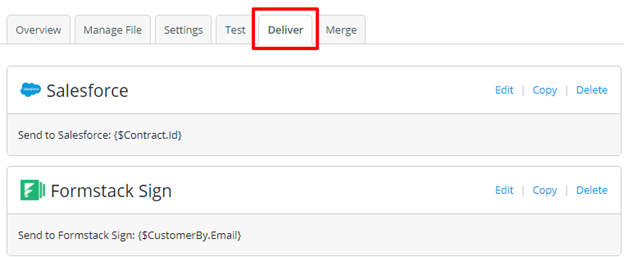
3. Then inside the deliver tab click on New Delivery. c Choose Formstack Sign
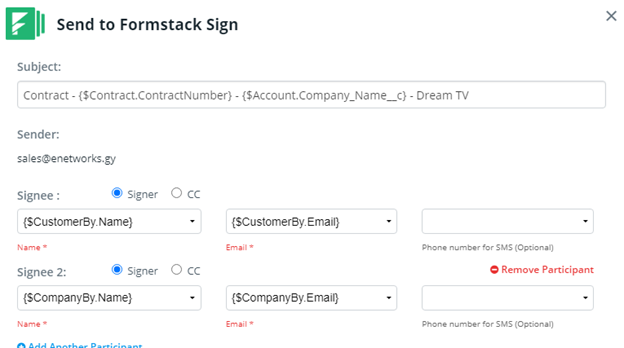
Here you have to integrate formstack sign with salesforce.
Note: You will need a separate account with Formstack Sign in order to use it as a delivery integration with your Formstack Documents account!
After successfully integrating salesforce with formstack sign some fields are populated you just need to mention all the recipients as your requirement.
To get started, we are going to set up our contract template using a Word document. Inside our Word document, we’re going to add our contract’s details and then we’re going to add merge fields for the spots in our document that we do like our deal information to go.
These merge fields are just like any other text in our document and look like {$Contract.Name}, {$Contract.CompanyName}, {$Contract.StartDate}, etc.
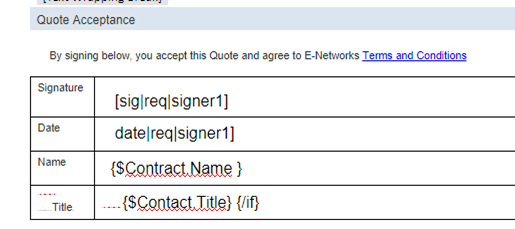
Since we will be collecting a signature for this contract using Formstack Sign, we need to define where we want the signature to go in the document. Formstack Sign has “Text Tags” that you can use to indicate the spot in the document that you want to place the signature.
These text tags are just text and they look like: [sig|req|signer1]
Note: You can use white text for your text tags to “hide” them inside of your document.
As you can see from the example, the text tags used by Formstack Sign have three parts: [sig|req|signer1]