
Salesforce Automates Tasks with Scheduled Flows
Introduction:-
Salesforce introduces scheduled flows. Now, you can schedule flows to run and create scheduled batch jobs declaratively, specifying when the date/time the flow will run and the frequency of the scheduled flow (once, daily, weekly and monthly) and provide additional filter conditions for the records.
Here are some things to note with scheduled flows:
- The start time of the scheduled flow reflects the time zone of the org (look a the Company Information screen). However, when you configure the flow, the start time will reflect the time zone of your user record. So, if your time zone is different than that of the org, account for that when you configure the start time in your scheduled flow.
- Scheduled flows will run under the user called “Automated Process User.”
- For conditions, when using date or date/time filters, you cannot currently use a formula. It needs to be *gasp* a hardcoded date or date/time. As a workaround, you need to create a custom field that has the date or date/time stamped so you can use it as a filter condition.
- Formula references do not work in filter conditions.
- If you need to reference attributes associated to the record in the scheduled flow, use the global variable called “$Record.”
- You cannot debug scheduled flows (i.e. use the Debug feature in Flow Builder). They are logged in debug logs. You can also create a version of your scheduled flow as a non-scheduled flow to use the Flow Builder debug feature.
- Once you create your scheduled flow, you will see it listed in the Scheduled Jobs page in Setup.
- According to Salesforce, scheduled flow limits are the same as Apex Scheduler limits.
Business Use Case:
Addison Dogster is the system administrator at Universal Containers. Addison received a requirement that for any contact that has “Jennifer Lee” as the assistant and the contact level is set to “Primary,” Salesforce creates a task and updates the Description field on the contact record to read “This was updated by the scheduled flow”. This process will only run daily at 2 pm.
Solution: Addison knows that this is a perfect candidate for the new scheduled flow feature where she can build a batch job using clicks, not code. She can set the schedule to run daily at 2pm and only for Contact records where the Assistant Name = “Jennifer Lee” and the Level = “Primary.”
However, she only wants it to run for Contact records that have not be processed previously versus having this run every day for the same records that meet the filter condition. Since there is no “IsChanged” feature that can be used in the filter condition, Addison will create a custom field called Trigger Scheduled Flow? with picklist values “Do Not Trigger” and “Trigger”, and create a process that will stamp this field with “Trigger” when the criteria condition is met for use in the scheduled flow. However, once the record is processed in the scheduled flow, we want to clear the record from being picked up by updating the Trigger Scheduled Flow? field to “Do Not Trigger.”
Quick Steps:
Pre-requisites:
- Create a custom picklist field to determine whether or not to kick off the scheduled flow.
1. Let’s create the process that stamps the “Trigger Scheduled Flow?” custom field for use in the scheduled flow. In Setup, go to Create | Workflows & Approvals | Process Builder in Salesforce Classic or Process Automation | Process Builder in Lightning Experience.
A. Provide a process name “Stamp Contact Record,” API name (auto-populated via tab key), and description and select the process starts when “A record changes.”
B. Choose “Contact” as the object and to start the process when “when a record is created or edited.”
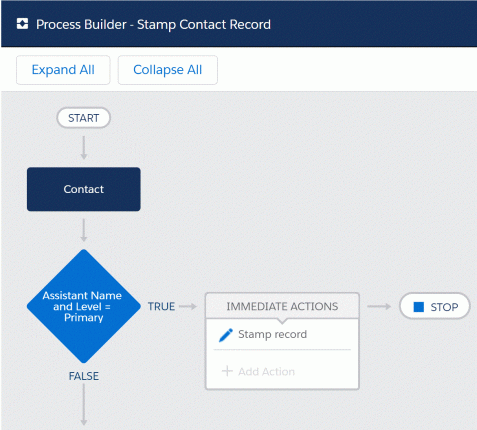
C. Specify the first criterion “Assistant Name and Level = Primary” where the condition will use the formula:
(ISCHANGED ([Contact].AssistantName ) || ISCHANGED ([Contact].Level__c)|| ISNEW())
&& [Contact].AssistantName = “Jennifer Lee”
&& ISPICKVAL([Contact].Level__c, “Primary”)
We have to use the formula here because you cannot use the point and click to specify a new record. This formula will evaluate to true if (the Contact’s Assistant Name is changed OR the Level has changed OR the record is new) AND the Assistant’s Name is “Jennifer Lee” and the Level is “Primary.”
For the immediate action, we are going to update the record on the Contact Object that started the process:
- Action Name: Stamp Record
- Record: [Contact]
- Criteria for Updating Records: Updated records meets all conditions
- Set new field values for the records you update
- Field: Trigger Scheduled Flow?
- Operator: Formula
- Value: IF (
([Contact].AssistantName = “Jennifer Lee”
&& ISPICKVAL([Contact].Level__c, “Primary”)), “Trigger”, “Do Not Trigger”
)
D. Activate the process.
2. Now, let’s create the flow. In Setup, for Classic, go to Create | Workflows & Approvals | Flows. In Lightning Experience, it is found under Process Automation | Flows.
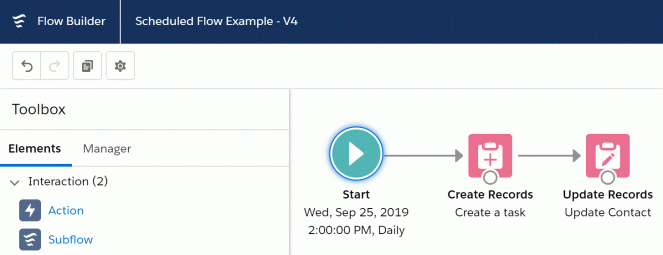
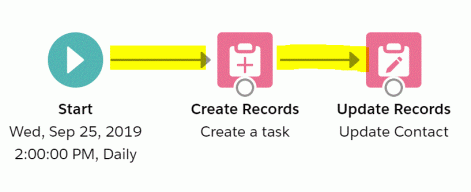
Here is the flow we are going to create.
- This will start on a specific day (I picked the day I created the flow) at 2 pm daily with the filter conditions: Assistant Name = “Jennifer Lee” and Level =” Primary” and the Trigger Scheduled Flow. = “Trigger.”
- We will create a task associated assigned to the contact owner and associated with the contact and account.
- Lastly, we will update the contact record’s description field in the scheduled flow to “This was updated by the scheduled flow.” and the Scheduled_Flow_Trigger__c to “Do Not Trigger.” The last part is important. By updating the Scheduled_Flow_Trigger__c field, the contact record will not be picked up in the next scheduled flow unless changes were actively made to the record where the filter conditions are met again.
A. Click the “New Flow” button, click the “Auto launched Flow,” and click on the Create button.
B. Let’s set the schedule flow information by double-clicking on the Start button.
- Flow Trigger: Schedule
- Start Date: Sep 25, 2019
- Start Time: 2:00 PM
- Frequency: Daily
- Object: Contact
- Conditions are Met (AND)
- AssistantName Equals Jennifer Lee
- Level__c Equals Primary
- Scheduled_Flow_Trigger__c Equals Trigger
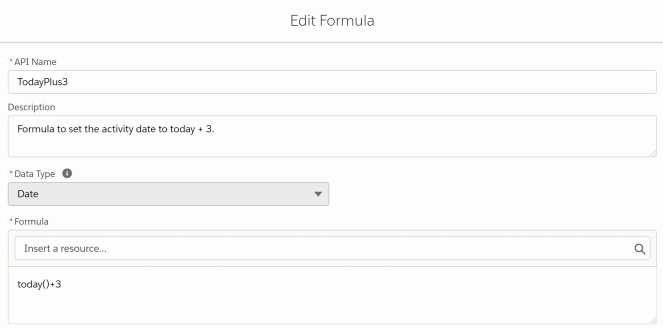
C. Create a Formula Resource that will store the formula to set the activity date on the Task record to 3 days from today. Go to the Manager tab, click on “New Resource.” Then provide the following:
- Resource Type: Formula
- API Name: TodayPlus3
- Data Type: Date
- Formula: today()+3
D. Next, we will add a Create Records flow element to create the new task assigned to the contact owner and associated to the contact and the contact’s account. In order to access the contact record’s field attributes in this flow, use the new $Record global variable. It is essentially a sobject record that gives you access to the field attributes.
Best practice tip: Provide a description so you and other/future admins know what this flow element is used for.
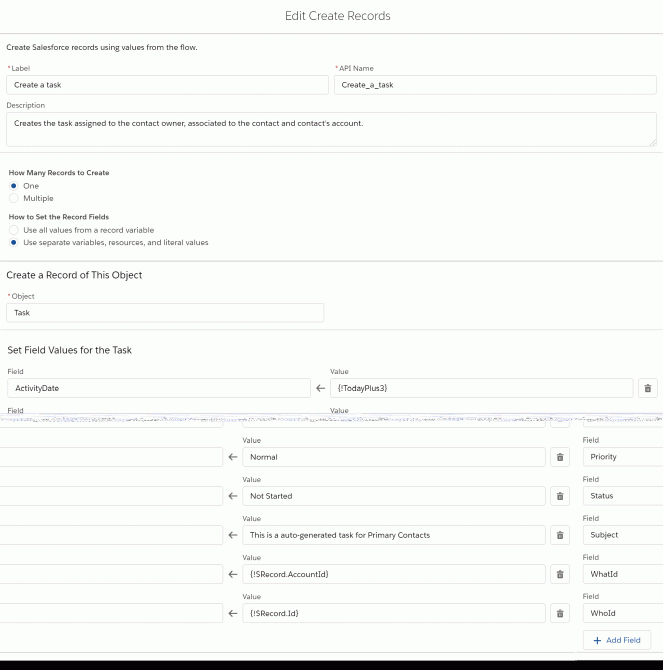
Configure the Create Records flow element to the following:
- How Many Records to Create: One
- How to Set the Record Fields: Use separate variables, resources and literal values
- Object: Task
- Set Field Values for the Task:
- ActivityDate: {!TodayPlus3}
- OwnerId: ${Record.OwnerId}
- Priority: Normal
- Status: Not Started
- Subject: This is an auto-generated task for Primary Contacts
- WhatId: {!$Record.AccountId}
- WhoId: {!$Record.Id}
E. Now, we will use an Update Records flow element to update the Description and Trigger Scheduled Flow? fields on the contact record.
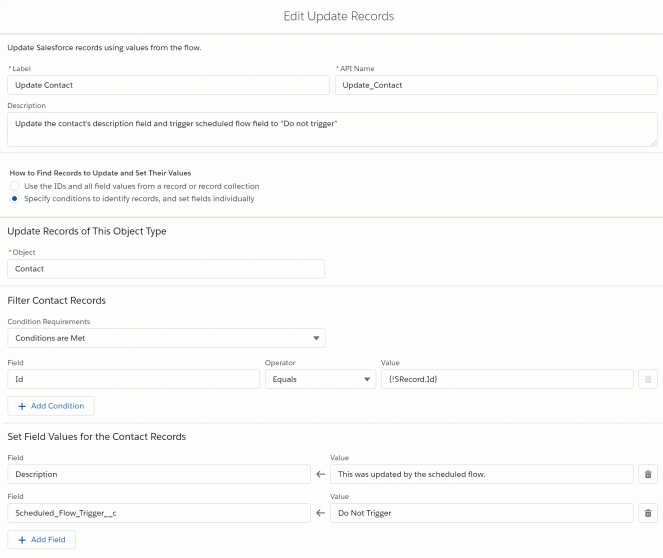
Set the information on the Update Records flow element:
- How to Find Records to Update and Set Their Values: Specify conditions to identify records, and set fields individually
- Object: Contact
- Filter Contact Records to:
- Condition Requirements: Conditions are Met
- Id Equals {!Record.Id} [Note: This can be found under Global Variables]
- Set Field Values for the Contact Records:
- Description: This was updated by the scheduled flow.
- Scheduled_Flow_Trigger__c: Do Not Trigger
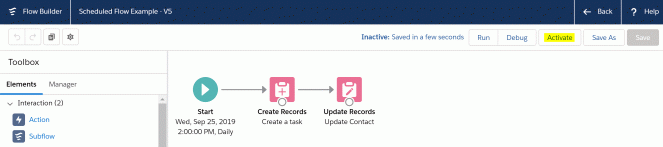
F. Connect the flow elements to match the below.
G. Save/Save As with the flow name and a description about the flow.
H. Click the “Activate” button to activate the flow. [This is a new Winter ’20 feature!]
That’s it! You’ve configured the changes.
Conclusion:
To summarise, schedule flow is an auto launched flow to start on a particular date and time and set the frequency to once, daily, or weekly. If you want that scheduled flow to run only for a set of records, you can specify an object and filter.