
1. Dynamic Forms on custom objects :-
Dynamic Forms is the next step in the evolution of Lightning record pages. It adds the ability to configure record detail fields and sections inside the Lightning App Builder.
Dynamic Forms give you the ability to create sub-sections of page layouts, placing them where ever you like on a lightning page. This gives you the ability to combine with visibility rules, allowing you to hide fields dependent on field values.
With Dynamic Forms, you can migrate the fields and sections from your page layout as individual components into the Lightning App Builder. Then, you can configure them just like the rest of the components on the page, and give users only the fields and sections that they needed.
Note : – With Summer ’20, Dynamic forms support custom objects only. It will be available for standard objects in a future release.
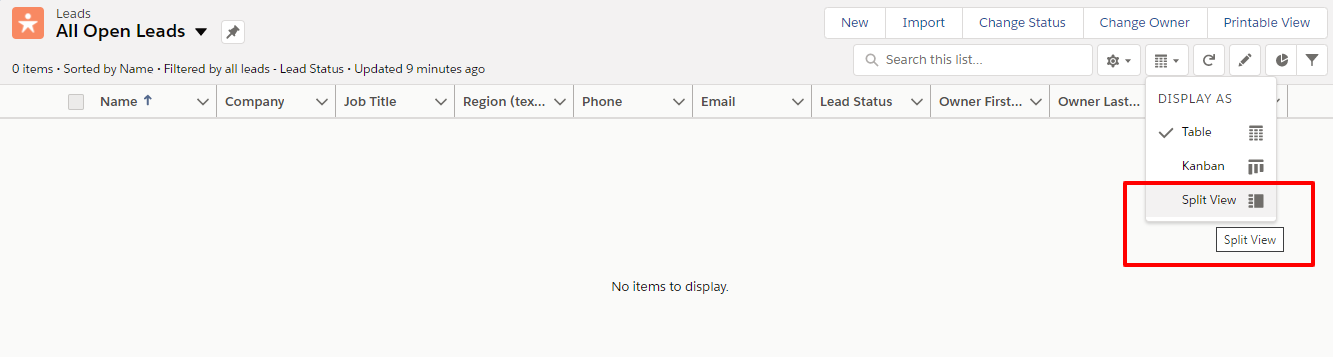
2. Split View for standard navigation
his feature gives the Salesforce standard List View layout a real boost, allowing users to see their list view data, as well as a selected record.
Split view is great for going through records in sequence or for quickly skimming through a set of records. The split view panel is collapsible for extra flexibility.
To access split view, select Split View from the Display as drop-down menu. If you select a split view for an object, that object automatically loads in a split view until you change its Display as view.
For more imformation click here
3. New In-App Guidance Builder
The In-App Guidance Builder has an improved interface for authoring in-app prompts and walkthroughs. Now there are more options for positioning and creating prompts. It’s easier and more intuitive to create prompts and walkthroughs. The user interface for authoring in-app guidance is now similar to other Salesforce builder tools.
Steps :- From Setup in Lightning Experience, enter In-App Guidance in the Quick Find box, and then select In-App Guidance. Click Add to open the In-App Guidance Builder in a new tab.
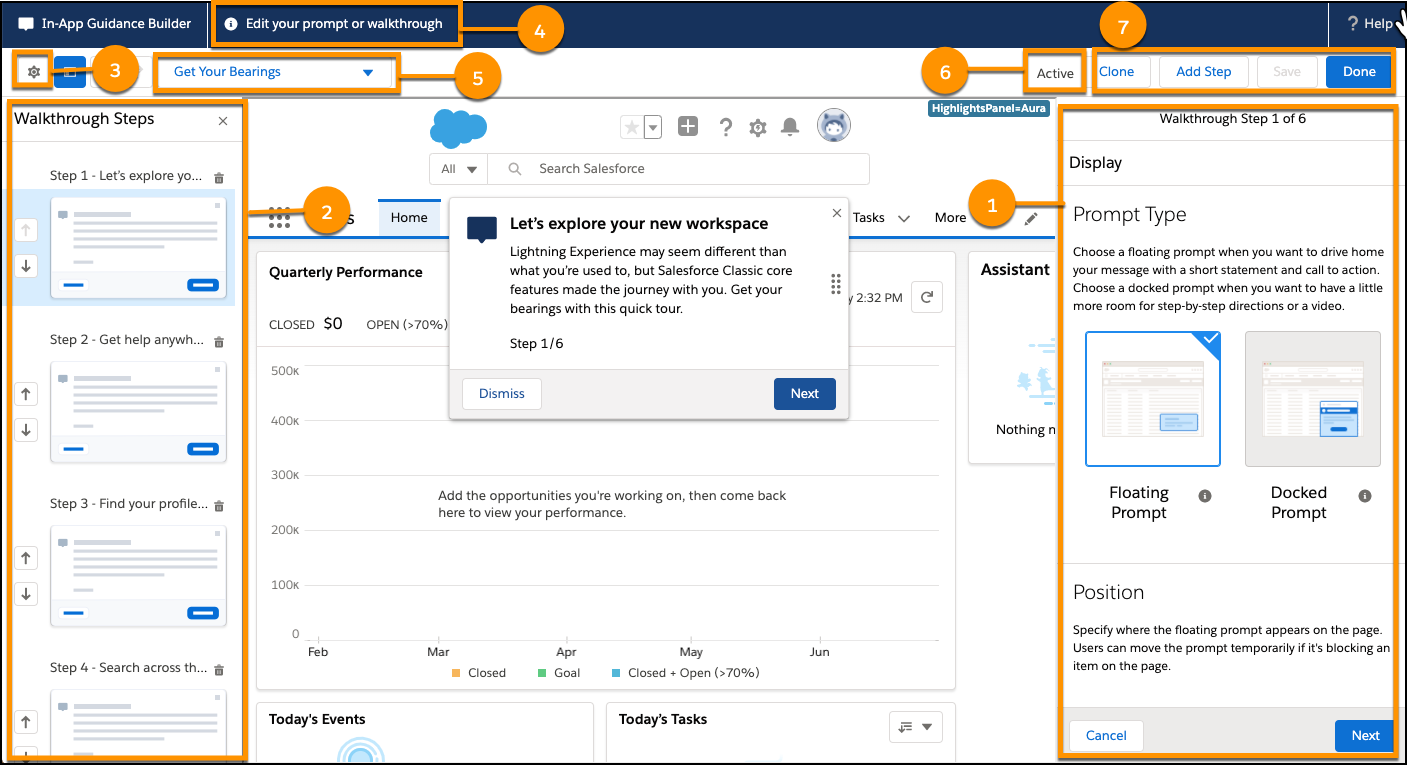
- The right sidebar is where you specify the in-app guidance type, prompt type, position, and content.
- When you create a walkthrough, a left sidebar appears to display all the steps of the walkthrough.
- Return to settings by clicking the settings icon in the builder header when editing a prompt.
- Helpful instructions are on the header.
- Access other in-app guidance on the page from the dropdown at the top.
- See the status of the in-app guidance you are editing on the top right.
- Use action buttons, depending on the in-app guidance type and if you’re previewing or authoring.
4. Attach CSV files to report subscriptions (beta)
When people subscribe to a report, a new option lets them choose to receive results as a .csv file attached to the subscription email. The email itself includes the report name in the subject line, but there is no email body. Row-level record details are included in the attached .csv file instead. And small changes to the Edit Subscription menu design include a new Attach File button and a refined layout.
In Setup, from Reports and Dashboards Settings, select Let users attach reports as files to report subscription emails in Lightning Experience, and save your changes.
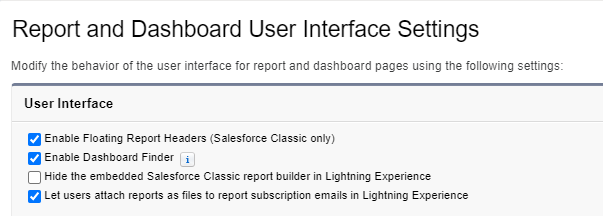
To attach files to a report subscription, subscribe to a report, click Attach File, choose Details Only. The attachment format is Comma Delimited .csv by default. Optionally change encoding or keep the default, and save your changes. The edit subscription dialog shows that the subscription includes an attachment. Finish setting other subscription criteria, such as frequency, and click Save.
5. Trigger a flow to run after a record is saved
Creating or updating a record can now trigger a richer flow to run after that record is saved to the database. A record-triggered flow could only run before the record was saved, and could only make updates to that new or updated record. After-save record-triggered flows can access other records, perform actions, and use more types of flow elements. These flows can even replace most workflow rules and record-change processes that are built in Process Builder.
Steps :- When creating a flow, select Record-Triggered Flow.
By default, new record-triggered flows are configured to run when a record is created and after the record is saved. You can check this configuration on the Start element in the canvas. Also from the Start element, choose the object whose records trigger the flow to run.
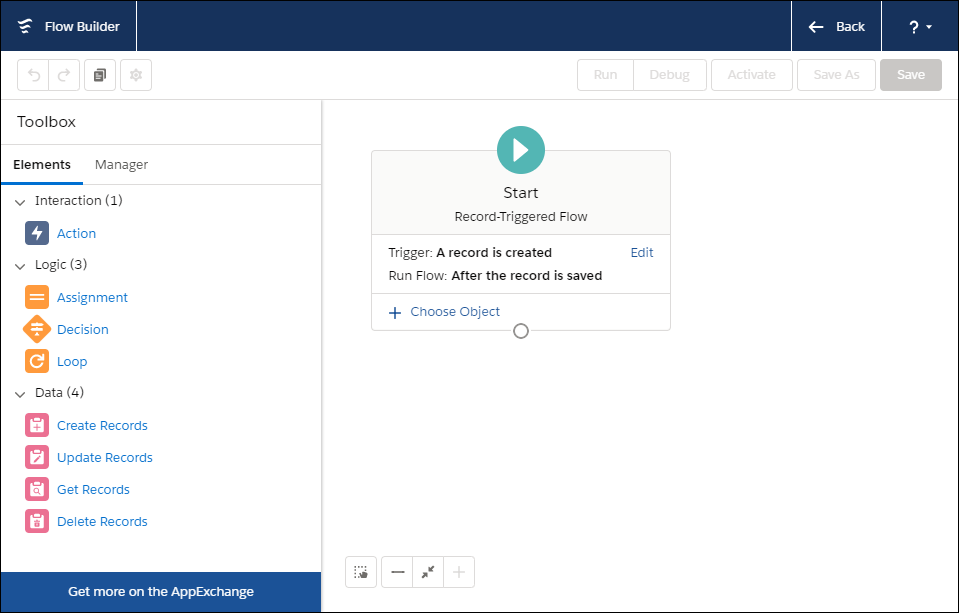
To trigger the flow to run when a record is updated, click Edit on the Start element. On the basis of selection, the flow will execute.
