Introduction
Salesforce Marketing Cloud is a comprehensive platform for marketing automation that enables businesses to create and deliver personalized customer journeys across multiple channels. One of the key features of Marketing Cloud is Cloud Pages, a powerful tool that enables businesses to create custom landing pages and microsites that can be used to promote products, capture leads, and engage with customers.
Cloud Pages is a drag-and-drop tool that enables businesses to create and publish custom landing pages and microsites quickly and easily. With Cloud Pages, businesses can create landing pages for email campaigns, social media ads, or search engine marketing campaigns, and customize them with dynamic content, personalized messaging, and engaging visuals.
To use Cloud Pages in Salesforce Marketing Cloud, businesses need to follow these steps:

What Are Cloud Pages in Salesforce Marketing Cloud?
Definition of Cloud Pages
Cloud Pages are a feature within Salesforce Marketing Cloud that allows marketers to create custom web pages without the need for deep technical expertise. These pages can be used for a variety of purposes, including hosting forms, surveys, and landing pages for email or social media campaigns. The key strength of Cloud Pages lies in their flexibility, enabling marketers to integrate them seamlessly into broader customer journeys, adding a dynamic and interactive element to their marketing efforts.
Common Use Cases for Cloud Pages
Marketers use Cloud Pages in several ways, depending on their campaign objectives. One popular use case is creating landing pages for email campaigns. These pages can be personalized based on customer data, increasing the relevance and impact of marketing messages. Another common application is for lead capture forms, where businesses collect customer data to fuel future campaigns. Additionally, Cloud Pages are useful for surveys, feedback forms, and other interactive content that helps brands better understand their audience.
How to Create Cloud Pages in Salesforce Marketing Cloud
Step-by-Step Guide to Building a Cloud Page
Creating a Cloud Page in Salesforce Marketing Cloud is a straightforward process, even for those with limited technical skills. Start by navigating to the Cloud Pages section within the platform. From there, select the type of page you want to create—whether it’s a landing page, a form, or another format. Once you choose your layout, you can begin customizing the content using Salesforce’s drag-and-drop editor. After you’ve built the page, integrate it into your customer journey and publish it. Monitoring the performance of the page can be done via Salesforce’s analytics tools.
Key Components of a Cloud Page
Every Cloud Page consists of several key components that ensure its functionality and effectiveness. These include the page layout, which dictates the visual structure of the page, and the content blocks, which hold elements like text, images, and forms. Personalization is another crucial component, allowing marketers to tailor the page experience based on customer data. Finally, Cloud Pages often integrate with other Marketing Cloud features like Journey Builder and Automation Studio to create a cohesive marketing flow.
Key Features of Cloud Pages in Salesforce Marketing Cloud
Integration with Other Salesforce Tools
One of the standout features of Cloud Pages in Salesforce Marketing Cloud is its seamless integration with other Salesforce tools. Cloud Pages can pull data from Salesforce CRM, Journey Builder, Email Studio, and other Marketing Cloud components, allowing marketers to create personalized content based on real-time customer information. This integration means that every touchpoint, whether it’s an email, web page, or social media interaction, can be tailored to the individual user’s journey. As a result, you can provide a consistent and unified experience across multiple channels, ultimately leading to better customer satisfaction and increased conversion rates.
Advanced Reporting and Analytics
Cloud Pages come equipped with robust analytics tools, enabling marketers to track the performance of their pages with precision. You can monitor key metrics such as page views, form submissions, bounce rates, and conversion rates. The integration with Salesforce’s broader analytics ecosystem means you can also track how Cloud Pages fit into the overall customer journey, providing insights into the effectiveness of each interaction. With these detailed reports, marketers can make data-driven decisions to optimize their campaigns in real-time, adjusting content or targeting strategies as necessary to achieve better outcomes.
Cloud Page Collection
To create a Cloud Page Collection in Salesforce Marketing Cloud, follow these steps:
- Access Content Builder: Log in to your Salesforce Marketing Cloud account and navigate to the Content Builder section.
- Create a Collection: In the Content Builder, click on the “Create” button and select “Collection” from the dropdown menu.
- Define Collection Properties: Provide a name for your Cloud Page Collection and optionally add a description to provide context.
- Configure Collection Settings: Specify the settings for your collection. This includes selecting the folder where the collection will be saved, determining the visibility (private or shared), and setting permissions for accessing and managing the collection.
- Add Cloud Pages to the Collection: Once your collection is created, you can start adding Cloud Pages to it. Click on the “Add Item” button and select the Cloud Pages you want to include. You can add multiple Cloud Pages to a single collection.
- Arrange and Customize the Collection: Arrange the order of the Cloud Pages within the collection by dragging and dropping them into the desired sequence. You can also customize the collection by adding a thumbnail image, providing a description, and configuring other display options.
- Publish the Collection: Once you have added and customized the Cloud Pages in the collection, click on the “Publish” button to make the collection available for use.
- Access the Collection: Your Cloud Page Collection is now created and published. You can access it by using the generated URL provided in the collection details. This URL can be shared with your audience or embedded in emails, landing pages, or other digital assets.
- Manage and Update the Collection: You can manage and update the Cloud Page Collection at any time. You can add new Cloud Pages, remove existing ones, change the order, or update the collection settings as needed.
Types of cloud pages
1. Landing Page
To create a landing page using Salesforce Marketing Cloud’s Content Builder, follow these steps:
1. Log in to your Salesforce Marketing Cloud account.
2. Go to the “Content Builder” section.
3. Click on “Create” in the top navigation menu and select “Landing Page.”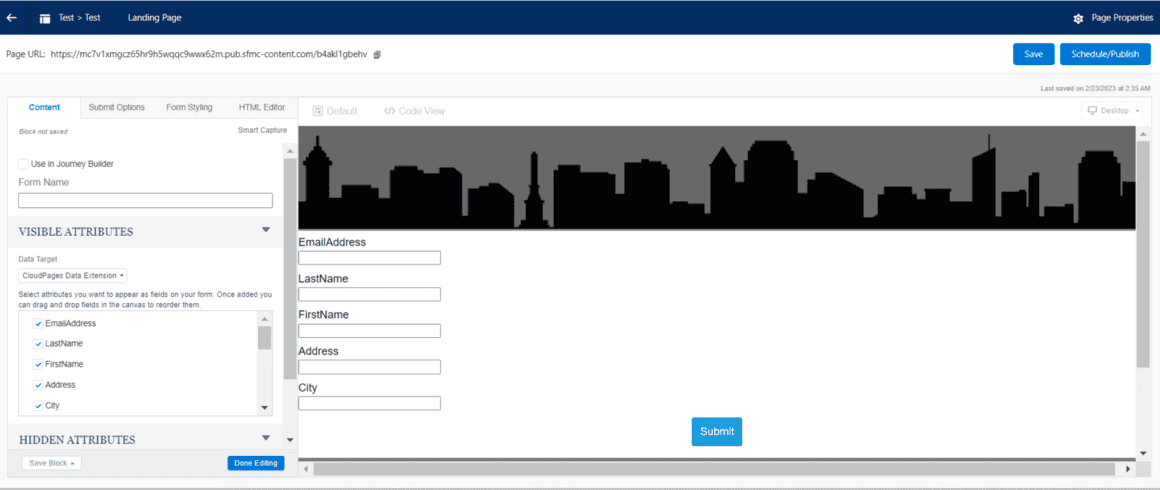
4. Choose a template or start with a blank canvas.
5. Give your landing page a name and optionally provide a description.
6. Customize the landing page by adding and arranging components such as text, images, forms, buttons, etc. You can use the drag-and-drop editor to modify the layout and design.
7. Configure the landing page settings, including the URL, page title, and meta tags.
8. Set up any tracking or analytics tools you want to use, such as Google Analytics or Marketing Cloud tracking.
9. Preview the landing page to ensure it looks and functions as intended.
10. Save the landing page.
11. Publish the landing page to make it accessible to your audience. You can choose to publish it immediately or schedule it for a specific date and time.
2. Mobile Push Page
To create a mobile push page in Salesforce Marketing Cloud, follow these steps:
1. Log in to your Salesforce Marketing Cloud account.
2. Navigate to the “Mobile Studio” section.
3. Click on “MobilePush” in the top navigation menu.
4. Select “MobilePush Messages” from the dropdown menu.
5. Click on “Create” and choose “MobilePush Page” as the message type.
Provide a name for your mobile push page.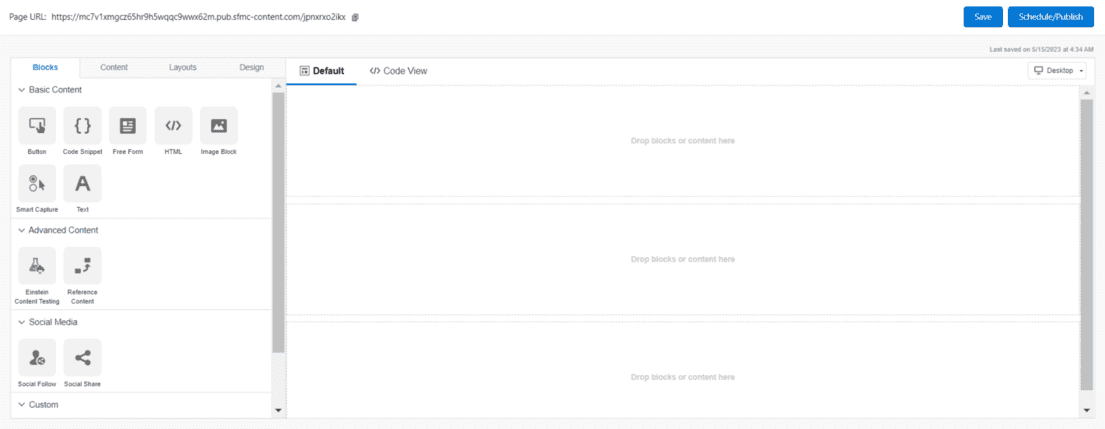
6. Customize the page content by adding text, images, buttons, and other components.
7. Configure the page settings, such as the page title, URL, and meta tags.
8. Set up any tracking or analytics tools you want to use, such as MobilePush Analytics or Google Analytics.
9. Preview the mobile push page to ensure it displays properly on mobile devices.
10. Save the mobile push page.
11. Configure the mobile push message settings, including the message title, message body, and target audience.
12. Link the mobile push page to the message by selecting it from the available options.
13. Set up any additional message settings, such as scheduling the message or adding message actions.
14. Save the mobile push message.
15. Review and confirm the message details.
16. Send the mobile push message to the desired audience.
3. Microsites
To create a microsite in Salesforce Marketing Cloud, follow these steps:
1. To create a content type, click Create.
2. Click Microsite.
3. Complete the Name field.
4. Optionally complete the Description field.
5. If want to use a private domain, select private domain from the URL drop-down
6. For a secure connection click on HTTP connection This option prevents access over HTTP, reducing security vulnerability.
7. Click Create.

8. In your Microsite’s Site Map, click on the Add page
9. To add pages to your microsite, click Add Pages under Site Navigation.
10. CloudPages, create a microsite and define a site map.
11. In the site map view, click the Schedule/Publish button.
12. Select the site map version from the drop-down.
13. Select the pages to publish
4. Interactive Email Page
To create an interactive email page, follow these steps:
1. Click on the interactive page
2. Name your page.
3. Optional: complete the Description field.
4. If using a My Domain or custom domain then fill URL field
5. Check the SSL box, if want to use secure HTTPS connections only.
6. Click Create.
7. Hover over the page you created and click Open Content.
8. From the layout section, in the editor click on the email form.
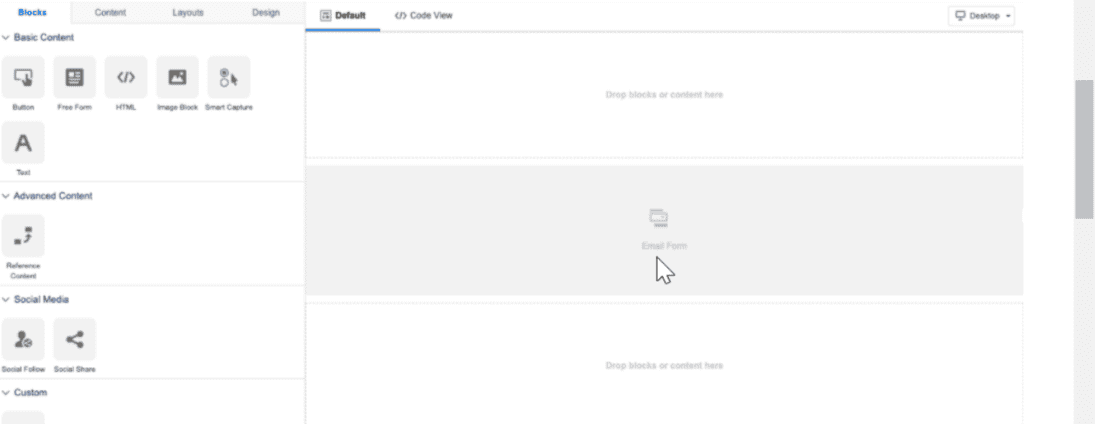
9. From the Confirmation Message Type of Content dropdown, select the type of content to display to the submitter.
10. Click Done Editing.
11. Use Content Blocks to create your content.
12. Optional: Use the Content tab to drag saved content into a content area.
13. Optional: Use the Layouts tab to drag a new layout configuration in a content area.
14. Use the design tab to set the style for the landing page
15. To change your editing experience, click Layout/Code View.
16. To see how your content displays in each view, click Desktop/Mobile.
17. To save your work but not publish, click Save. Submitters receive an error message and no data is captured.
18. To publish the page immediately or schedule the publish for later, click Schedule / Publish.
Cloud Pages can be a powerful tool for driving engagement and conversion rates in Salesforce Marketing Cloud. By creating personalized landing pages that are tailored to specific customer segments, businesses can improve their overall marketing performance and drive more revenue over time.
Application Uses of Cloud Pages
1. Lead Generation and Capture
- Event Registration Pages: Create custom landing pages for event registrations, webinars, or product launches, capturing attendee information efficiently.
- Promotional Campaigns: Develop promotional landing pages for special offers, discounts, or limited-time deals to attract new customers and drive sales.
- Contact Forms: Use Cloud Pages to create detailed contact forms that collect valuable customer information for future marketing efforts.
2. Customer Engagement and Interaction
- Surveys and Feedback Forms: Design interactive surveys and feedback forms to gather insights directly from customers.
- Content Downloads: Offer gated content like eBooks, whitepapers, or case studies through Cloud Pages, requiring users to provide their contact information to access the material.
- Interactive Quizzes: Engage users with interactive quizzes and assessments that provide personalized results and recommendations.
3. Personalized Customer Journeys
- Dynamic Landing Pages: Create personalized landing pages that adapt based on user data, ensuring each visitor receives relevant content.
- Account-Based Marketing: Design bespoke pages for key accounts with tailored content and messaging to strengthen relationships and drive conversions.
- Localized Content: Develop region-specific pages in multiple languages to cater to a global audience and improve user experience.
4. Product Promotion and Education
- Product Launch Microsites: Build comprehensive microsites for new product launches, showcasing features, benefits, and customer testimonials.
- How-To Guides and Tutorials: Provide step-by-step guides, tutorials, and video content to educate customers about your products or services.
- Case Studies and Success Stories: Highlight customer success stories and case studies on dedicated pages to build trust and credibility.
5. Support and Customer Service
- FAQ Pages: Create detailed FAQ pages to address common customer queries and reduce the burden on your support team.
- Support Portals: Develop support portals with resources, guides, and contact forms to assist customers in resolving their issues.
- Chatbot Integration: Integrate chatbots on Cloud Pages to provide instant support and improve customer satisfaction.
Benefits of Using Cloud Pages for Marketers
Why Choose Cloud Pages Over Other Tools?
Cloud Pages stand out from other landing page builders because of their seamless integration with the broader Salesforce ecosystem. This allows marketers to pull in valuable customer data from across Salesforce tools, creating more personalized and targeted campaigns. Additionally, Cloud Pages offer a high degree of flexibility, enabling marketers to easily create, update, and optimize pages without relying on developers. The result is faster campaign rollouts and improved customer experiences.
Increased Personalization and Engagement
Personalization is at the heart of what makes Cloud Pages so effective. Using Salesforce’s extensive customer data, you can create dynamic content that adapts to the individual viewing the page. For example, a returning customer might see different messaging or offers compared to a first-time visitor. This level of personalization not only improves engagement but also increases conversion rates by ensuring the content is highly relevant to the viewer’s needs.
Best Practices for Designing Effective Cloud Pages
Ensuring Mobile Optimization
With a significant portion of web traffic coming from mobile devices, ensuring your Cloud Pages are optimized for mobile is crucial. When designing your pages, use responsive templates that automatically adjust to different screen sizes. Keep content clear and concise, with large, tappable buttons for easy navigation. Test your pages on multiple devices to make sure they load quickly and maintain functionality on both mobile and desktop.
Leveraging Dynamic Content for Personalization
Dynamic content is one of the most powerful tools within Cloud Pages, allowing you to display different content to users based on their behavior or attributes. For instance, you can show a returning customer a tailored offer or suggest products based on their browsing history. This not only improves the customer experience but also drives higher conversions by making the content more relevant and timely.
Summary
In conclusion, Cloud Pages is a valuable tool for businesses that want to create custom landing pages and microsites in Salesforce Marketing Cloud. With its drag-and-drop interface and support for dynamic content, businesses can quickly and easily create personalized landing pages that engage customers and drive conversions. By leveraging Cloud Pages in their marketing campaigns, businesses can improve their overall marketing performance and drive more revenue over time.
