Introduction
Salesforce Screen Flows provide a powerful tool to guide users through multi-step processes. One useful feature to enhance these flows is dependent picklists.
Dependent picklists are drop-down lists where the available options in one field (the dependent field) are determined by the value selected in another field (the controlling field). In Screen Flows, this allows users to see only the relevant options based on their previous selections, ensuring cleaner data input and reducing errors.
Understanding how to set up and use dependent picklists can significantly improve the user experience and make complex flows more intuitive. Let’s explore the steps to configure this feature and the benefits it brings to Salesforce Screen Flows.
Why Use Dependent Picklists in Salesforce Screen Flows?
Using dependent picklists in Salesforce Screen Flows is crucial for creating dynamic user interactions. They simplify the decision-making process by reducing the number of options a user must sift through, improving both speed and accuracy.
For example, if you’re working with a flow that requires users to select a region, followed by a specific city, a dependent picklist allows them to choose the region first and then presents a list of cities based on that region. This ensures the list is more relevant, enhancing data quality and user satisfaction.
Ultimately, dependent picklists allow you to tailor the user experience to specific needs, reducing complexity in flows and ensuring that only applicable data is entered into Salesforce.
Key Considerations for Using Dependent Picklists in Screen Flows
While dependent picklists are a powerful feature, there are several important considerations to keep in mind when implementing them in Salesforce Screen Flows.
First, ensure that the controlling field has a manageable number of values. If your controlling picklist contains too many options, it can become overwhelming for users and defeat the purpose of improving the flow’s efficiency.
Second, dependent picklists work best when they are kept simple. If there are too many layers of dependency, the configuration process can become complex, making it difficult to maintain and troubleshoot.
Lastly, remember that dependent picklists don’t support all field types. Currently, they only work with standard picklist fields, so custom field types may require alternative solutions.
How to Configure Dependent Picklists in Salesforce
Configuring dependent picklists in Salesforce Screen Flows is a straightforward process. First, you need to define the relationship between the controlling and dependent fields. This is done in the object manager under the “Field Dependencies” section of the respective object.
Once the fields are linked, you can drag the dependent picklist into your Screen Flow. In the flow, configure the picklist to reference the controlling field. Salesforce will automatically handle the logic of filtering the dependent options based on the user’s previous selections.
Ensure that both fields are part of the same record or object, as dependent picklists only work when there’s a direct relationship. It’s also important to regularly test your setup to confirm that the correct dependencies are applied in various flow scenarios.
Business Use Case
In the Student__c object, there’s a picklist field called Degree__c. When a student selects “B.com” from the dropdown, another picklist field named Department B.com__c should become visible, offering the options “Applied Economics, Accountancy, Tax and Finance, and Marketing Management.”
Solution:
1. Creating Picklist Fields and Field Dependencies:
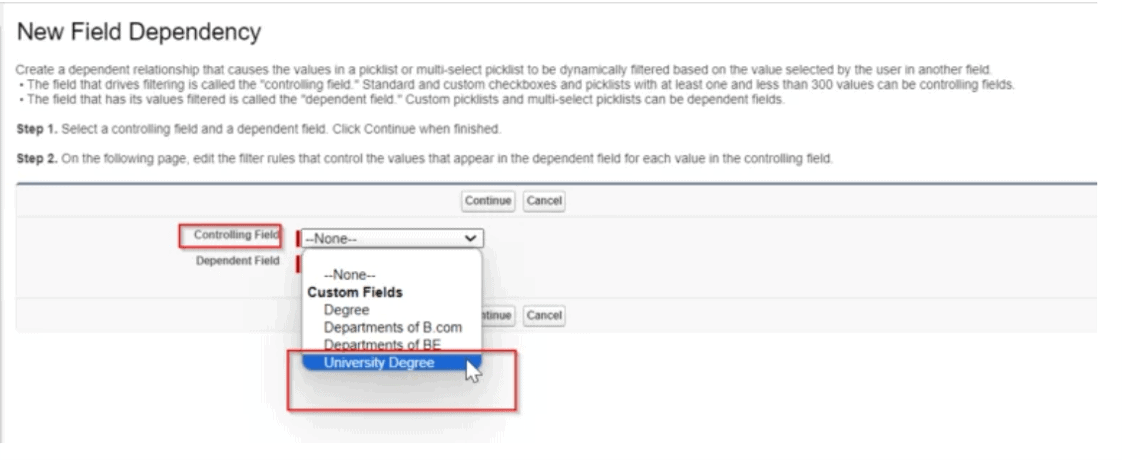
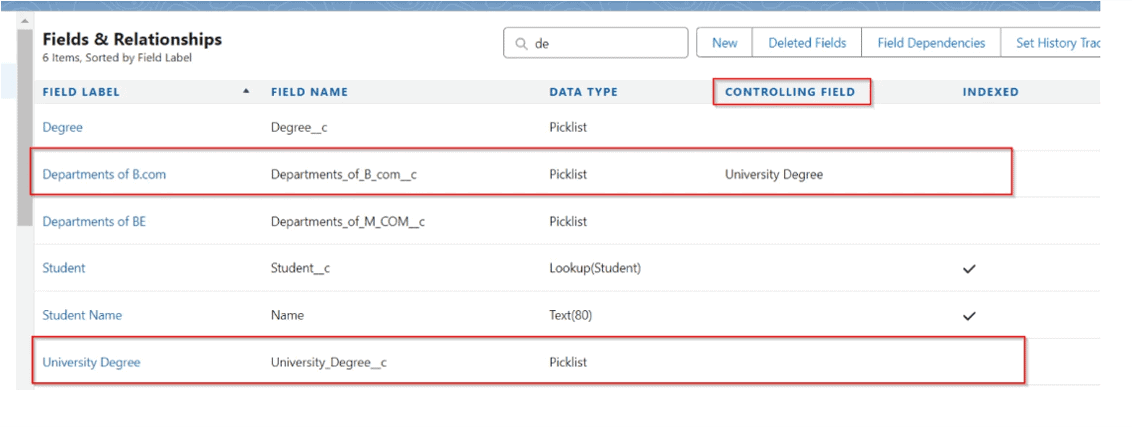
Go to Salesforce Setup, then navigate to Object Manager > Student__c > Fields & Relationships. Create the following fields:
- University_Degree__c (Picklist) with the options “Bachelor of Commerce” (Parent Picklist)
- DepartmentB.com__c (Picklist) with the options “Applied Economics” and “Tax” (Child Picklist)
- Establish a dependent picklist between them.
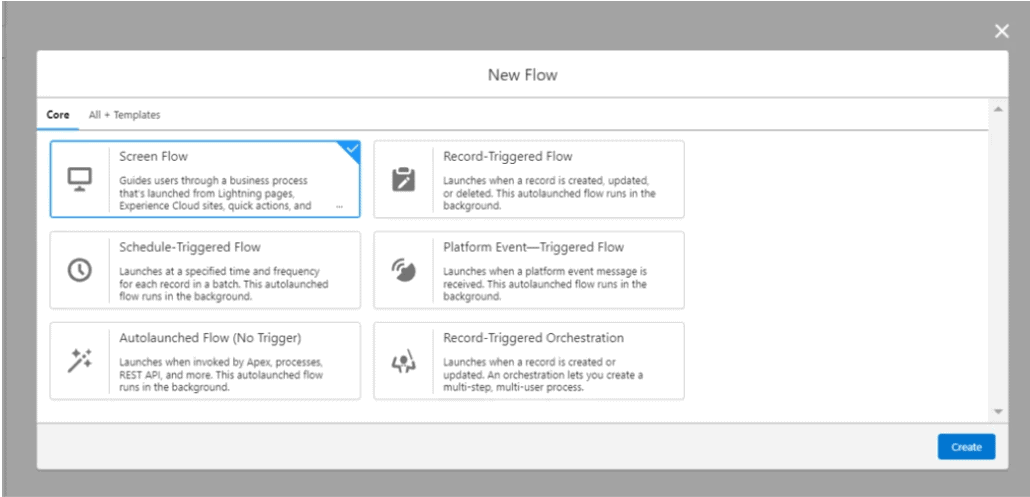
2. Building a Screen Flow:
From Setup, search for “Flow” using the Quick Find box. Open Flow Builder and create a new Screen Flow to configure the dependent picklist.
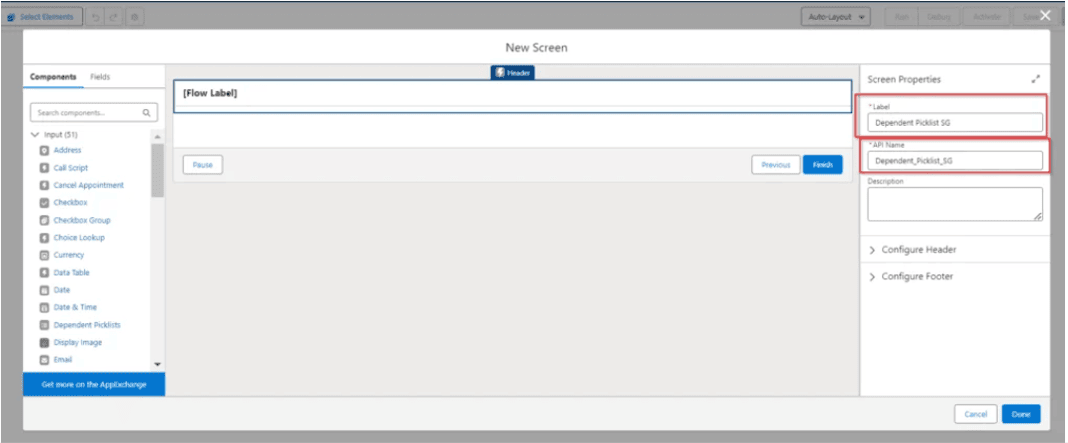
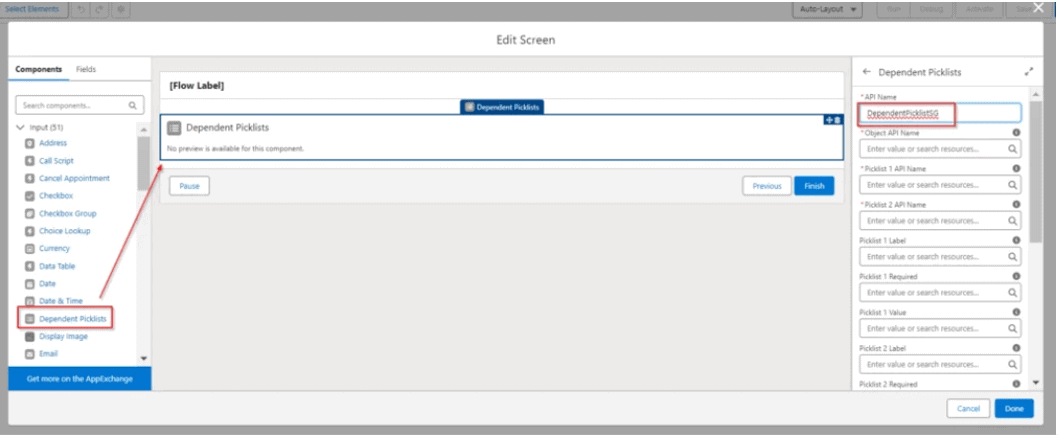
3. Adding a Screen Element:
From Setup, search for “Flow” using the Quick Find box. Open Flow Builder and create a new Screen Flow to configure the dependent picklist.

4. Configuring the Dependent Picklist:
In the Screen Properties section, assign a label. In the Dependent Picklist Component, provide these details:
- API Name: University_Degree__c (Parent Picklist)
- Picklist 1 Label: Add a label for the parent picklist (e.g., “University Degree”).
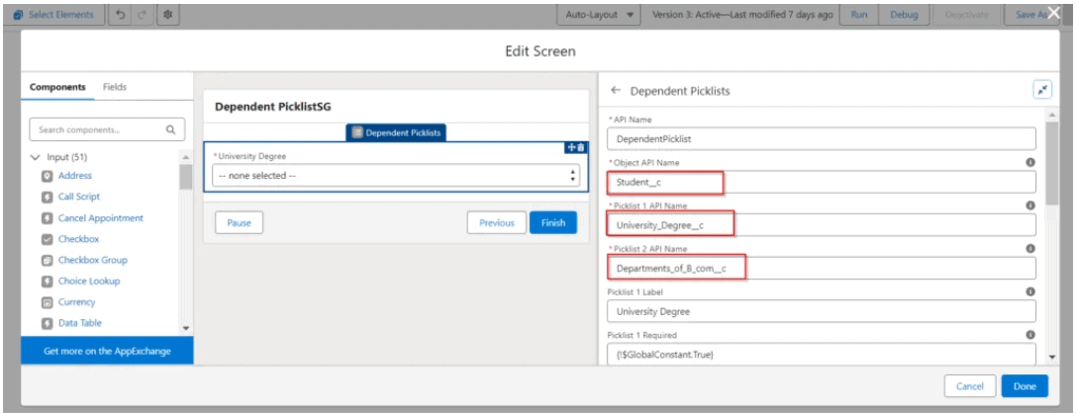
5. Setting Object and Picklist Details:
- Object API Name: Student__c (the object using the dependent picklist).
- Picklist 1 (Parent) API Name: University_Degree__c.
- Picklist 2 (Child) API Name: DepartmentB.com__c.
- Optionally, add labels for Picklist 1 and Picklist 2 (e.g., “Department (B.Com)”).

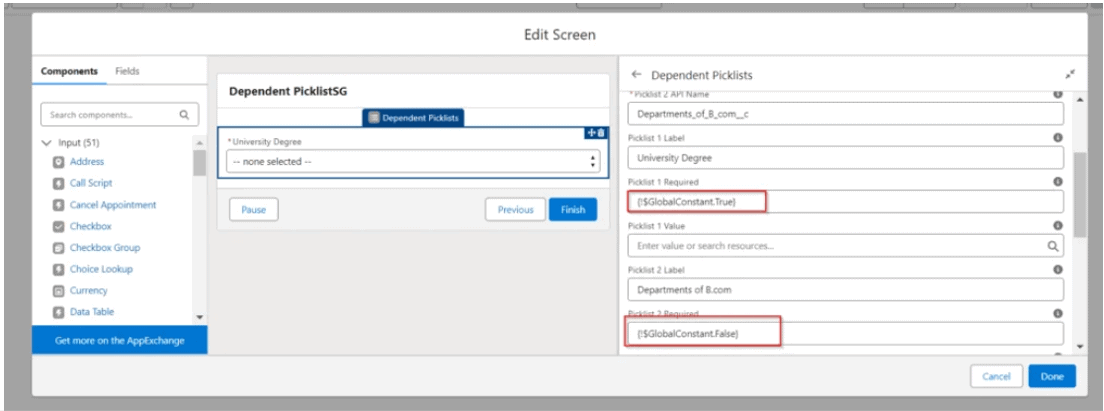
6. Making the Picklist Required:
- To set the picklist field as required, use the global constant:
- {!$GlobalConstant.True} – To require the field.
- {!$GlobalConstant.False} – To make it optional.
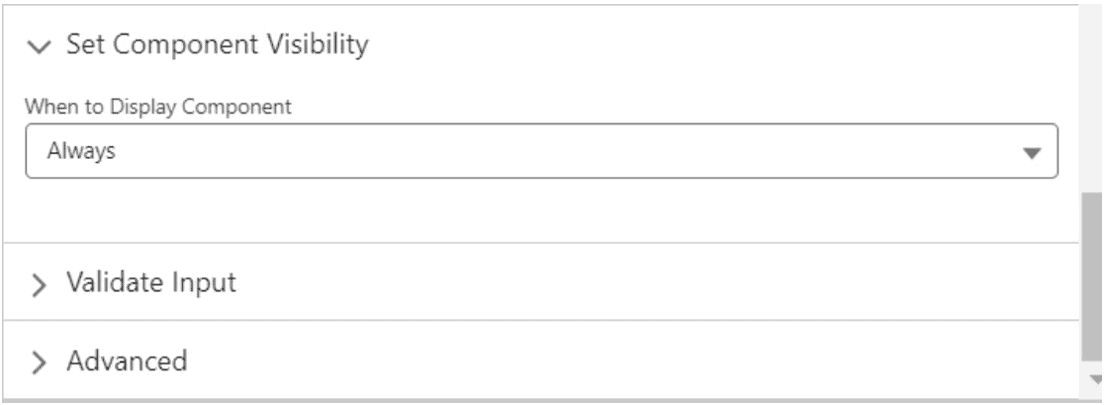
7. Component Visibility:
- Control when the component appears based on specific rules:
- Always: Displays the dependent picklist at all times.
- Specific Conditions: Shows the picklist when certain conditions are met (AND/OR logic).
- Custom Logic: Visibility can also be managed using custom code.
8. Assigning Variables for Output Values:
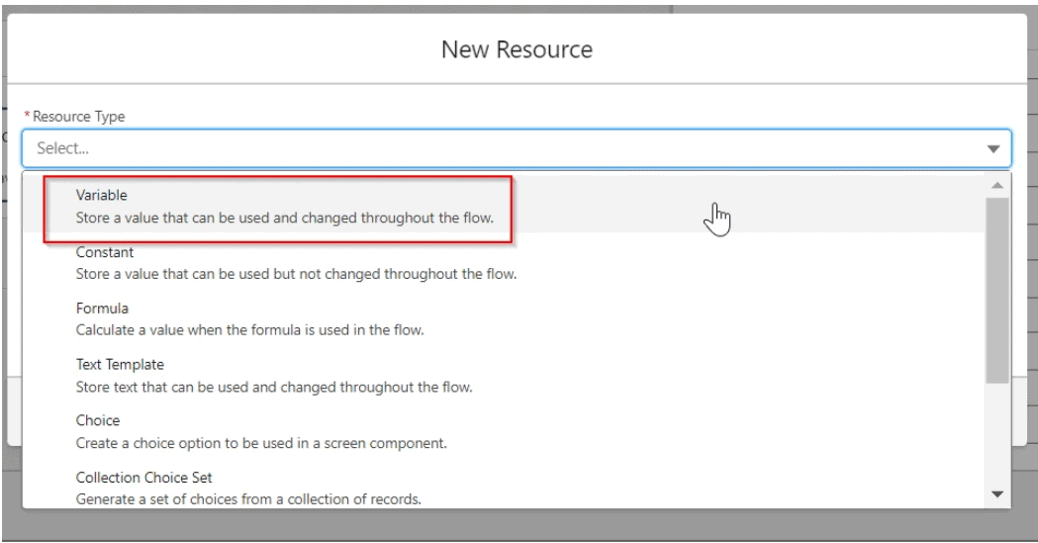
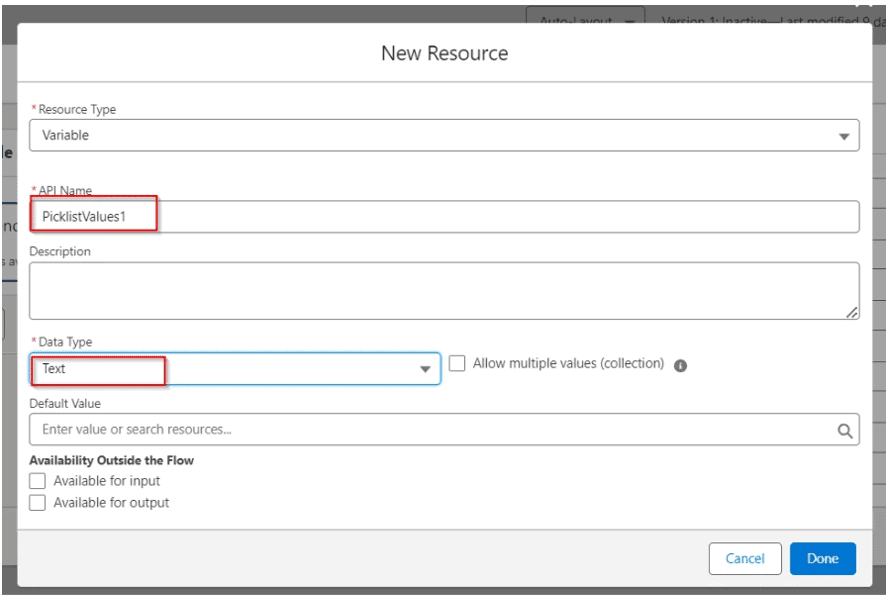
Click on the “Advanced” property, select “Manually assign variables,” and create a new variable to store values from Picklist 1:
- Create a new resource.
- Choose “Variable” and give it an API name like PicklistValues1.
- Set the data type to “Text.”
- Click “Done.”

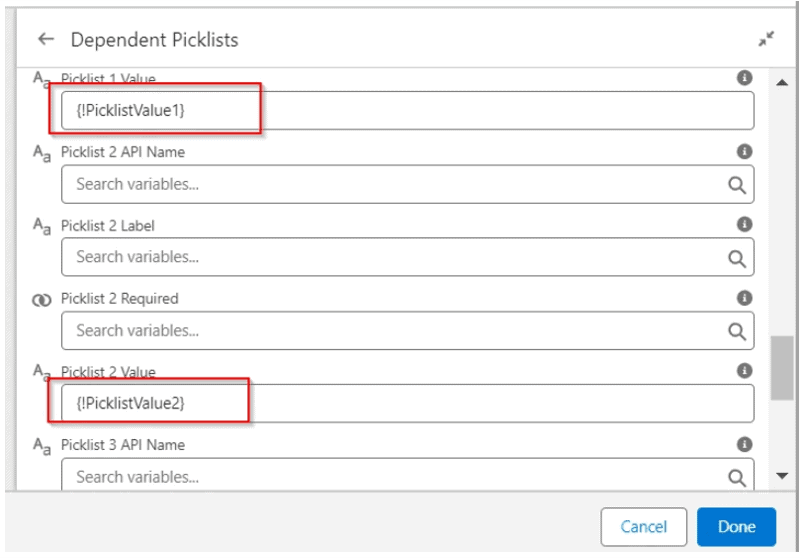
9. Creating a Variable for Picklist 2 Values:
Repeat Step 8 to create a variable for the child picklist (e.g., PicklistValues2) using the same process.
10. Testing the Flow:
Click “Debug” to test how the flow works.

11. Adding the Flow to the Student Record Page:
Edit the page layout for the Student record. Drag the flow component onto the layout canvas and select your flow from the dropdown menu.

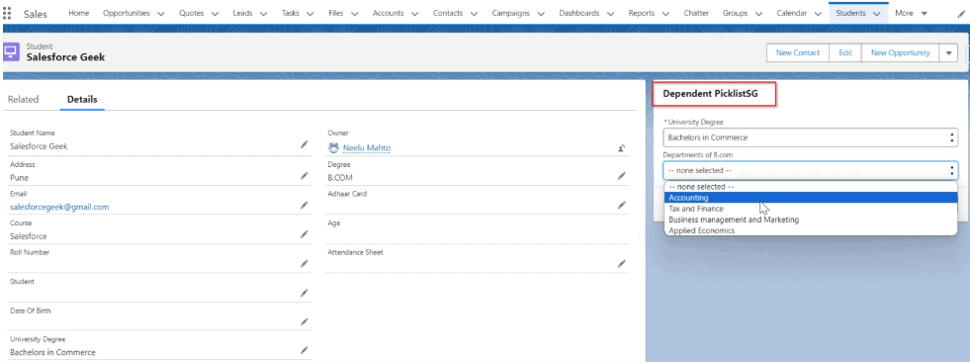
12. Viewing the Dependent Picklist in the Student Record:
Once added, you’ll see the dependent picklist on the student’s record. Choosing “Bachelor of Commerce” will reveal the corresponding department options.
Summary
Dependent picklists in Salesforce Screen Flows provide a streamlined way to create dynamic, user-friendly interactions. By reducing the complexity of data entry and ensuring that users only see relevant options, these picklists improve the accuracy and efficiency of your flows. Setting them up requires thoughtful configuration, but following best practices and understanding their limitations will help you leverage this feature effectively. With the right approach, dependent picklists can greatly enhance your Screen Flows, leading to better data collection and a smoother user experience.
