Salsa Engage
Optimizing Your Salesforce and Engage Integration – A Seamless Setup Guide
Unlock the full potential of Salesforce and Engage with this comprehensive integration setup guide tailored for subject matter experts. Whether you are setting up or maintaining the integration, this document is your go-to resource.
Key Integration Steps:
- Compatibility Overview: Understand the compatibility of Salesforce versions with the integration to ensure a seamless connection.
- Setup Recommendations: Receive expert recommendations on how Engage administrators can initiate the link setup between your Salesforce and Engage databases.
- User Permissions Establishment: Learn how to establish the necessary user permissions for smooth access to your connected Salesforce account.
- Custom App Installation Guidance: Explore the installation process for the custom Salesforce app that facilitates the integration, ensuring a hassle-free setup.
- Automated Sync Insights: Gain insights into automated and default synchronization aspects, including contact owners, record types, potential duplicate contact matching rules, data mapping, and Salesforce customization.
Salesforce Compatibility Requirements
Salsa Engage seamlessly integrates with Professional, Enterprise, Unlimited, and Performance editions of Salesforce. While the Nonprofit Success Pack is compatible, it is not mandatory. Note that, currently, Salsa Engage does not support integration with RoundCorner.
Configuration Settings in Engage
Before initiating the initial synchronization of Salesforce and Engage databases, here are essential steps recommended by Salsa Labs:
1. Connect Engage to Salesforce
- Establish permissions in Salesforce for the integration user to access the connected Salesforce account.
- Note: This step does not automatically install the application needed for the integration to run or initiate the integration. It allows Engage to access the connected Salesforce account to gather essential settings and custom fields required for configuring integration settings.
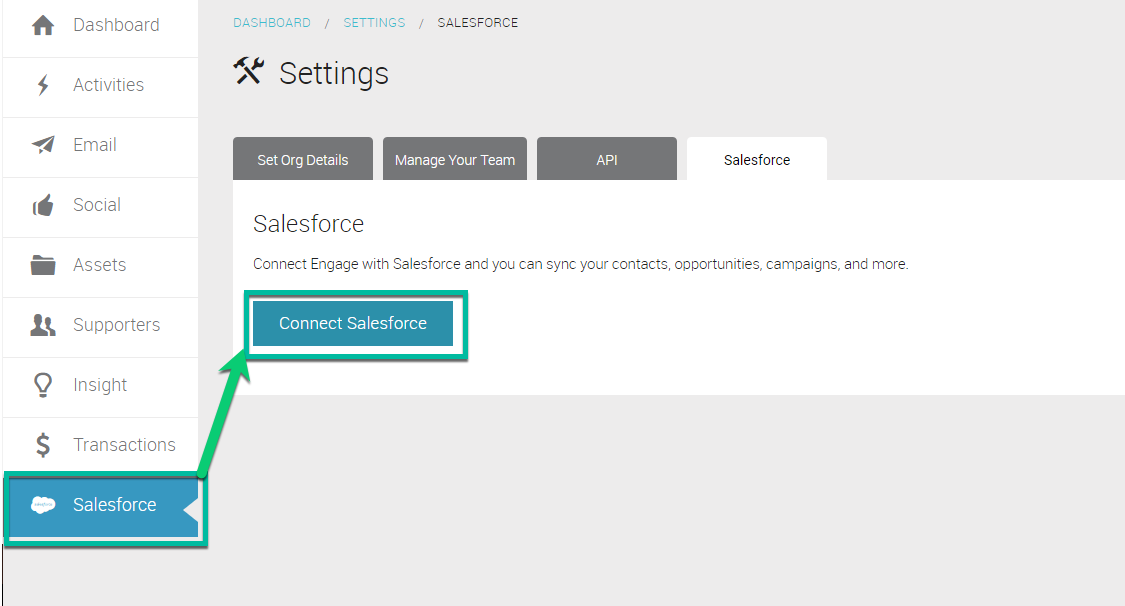
2. How to Connect:
- Navigate to the Salesforce menu.
- Click the “Salesforce menu” on the left.
- Click the “Connect Salesforce” button on the Salesforce tab.
4.Log in to your Salesforce.com database.

Install Salsa App in Salesforce
In order to connect Salsa Engage with Salesforce, the Engage admin needs to install a small app on the Salesforce side, which installs custom objects that are related to Contact records. Salsa Engage provides a link that, when clicked, installs the application in Salesforce, as seen below.
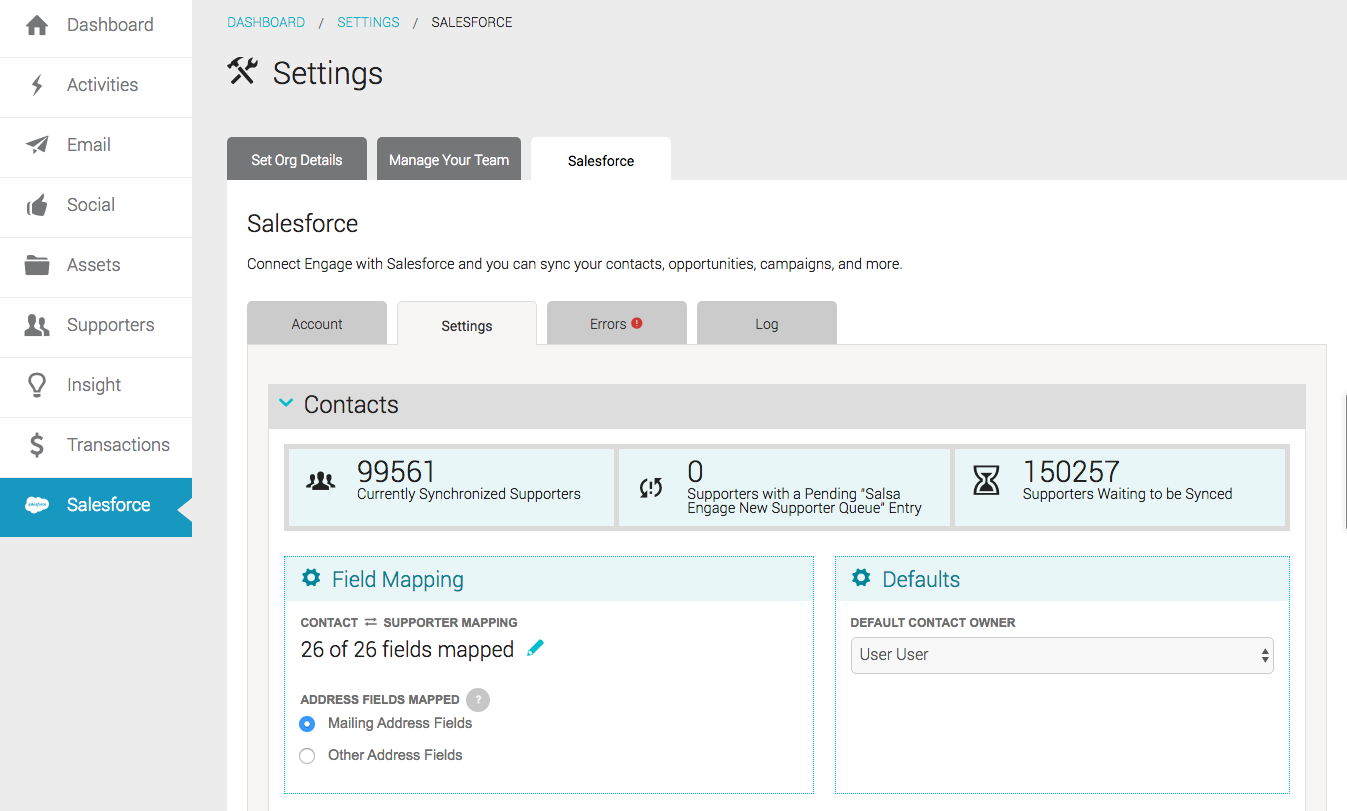
Streamlining Entry Creation and Duplicate Matching
For optimal performance and accurate data entry, Engage administrators must configure essential settings related to default contact owners, record types, and potential duplicate contact matching rules.
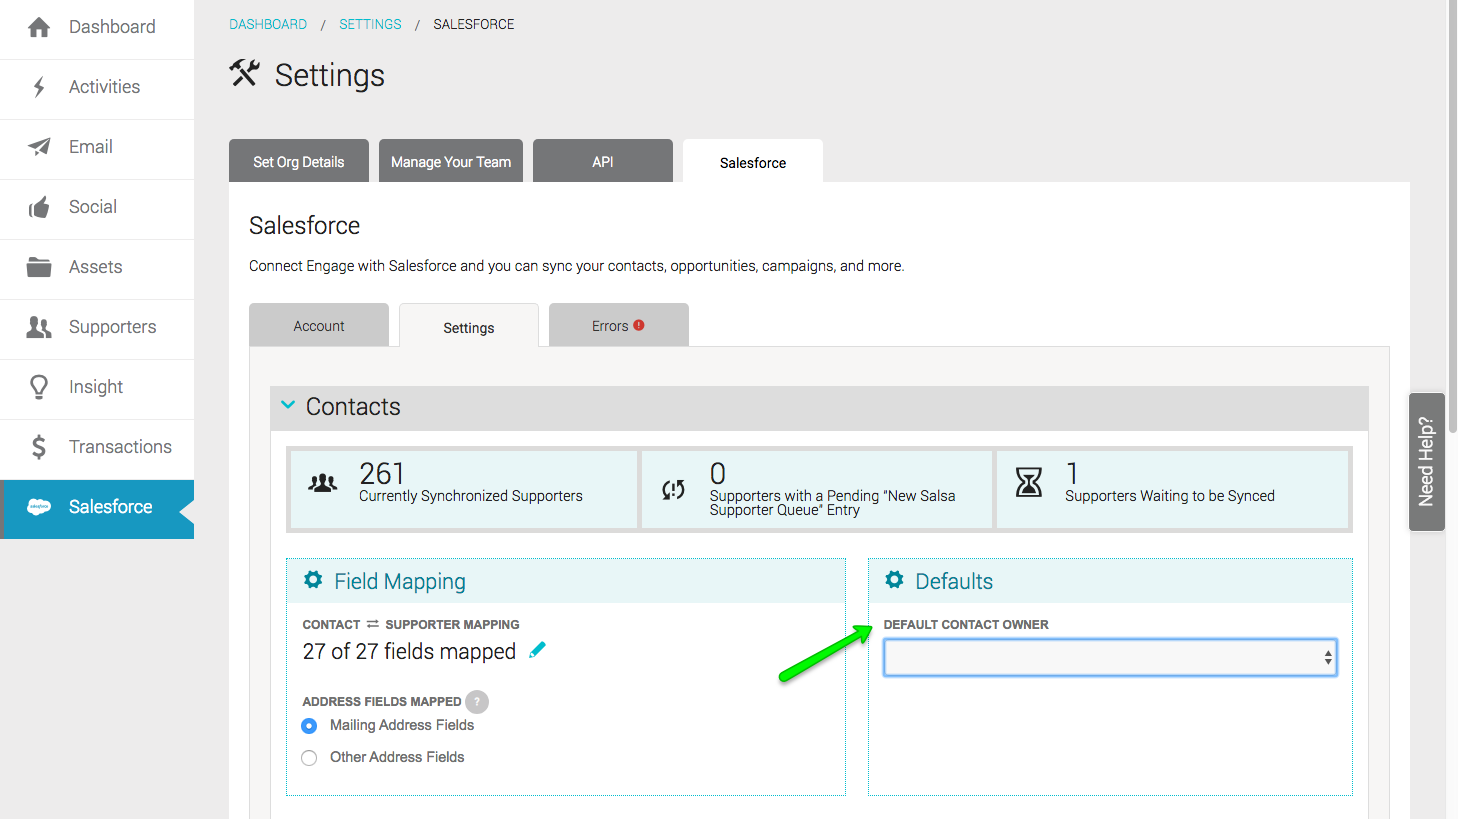
1. Default Contact Owner Configuration
- Salesforce mandates every contact to have an assigned owner.
- The integration typically defaults to the Salesforce user used during the integration authorization process. However, this user may not always be the preferred Contact Owner going forward.
- Engage administrators can easily adjust this setting to designate a different Salesforce user as the default Contact Owner, ensuring alignment with evolving business requirements.
Default Contact Record Type (Optional)
Record types are available in Salesforce Enterprise, Performance, Unlimited, and Developer Editions and the user account that authenticates to Salesforce needs the ‘Customize Application’ permission to create or change record types.
If Contact Record Types are in use, then the integration Defaults section displays the option to set the Default Contact Record type for newly synced records. A list of available Contact Record Types can be found in Salesforce.
Duplicate Contact Matching
Engage provides different configuration options that determine how the integration handles new records that are sent to Salesforce. When a new supporter is created in Engage, the integration looks up potential matches in Salesforce using certain rules defined for the initial sync, as seen in the Field Mapping Options section below. These rules use Salesforce’s native duplicate management tools to find potential matches. Read more about these options here. Setting up how the integration handles matches will impact both initial synchronizations as well as ongoing synchronizations.
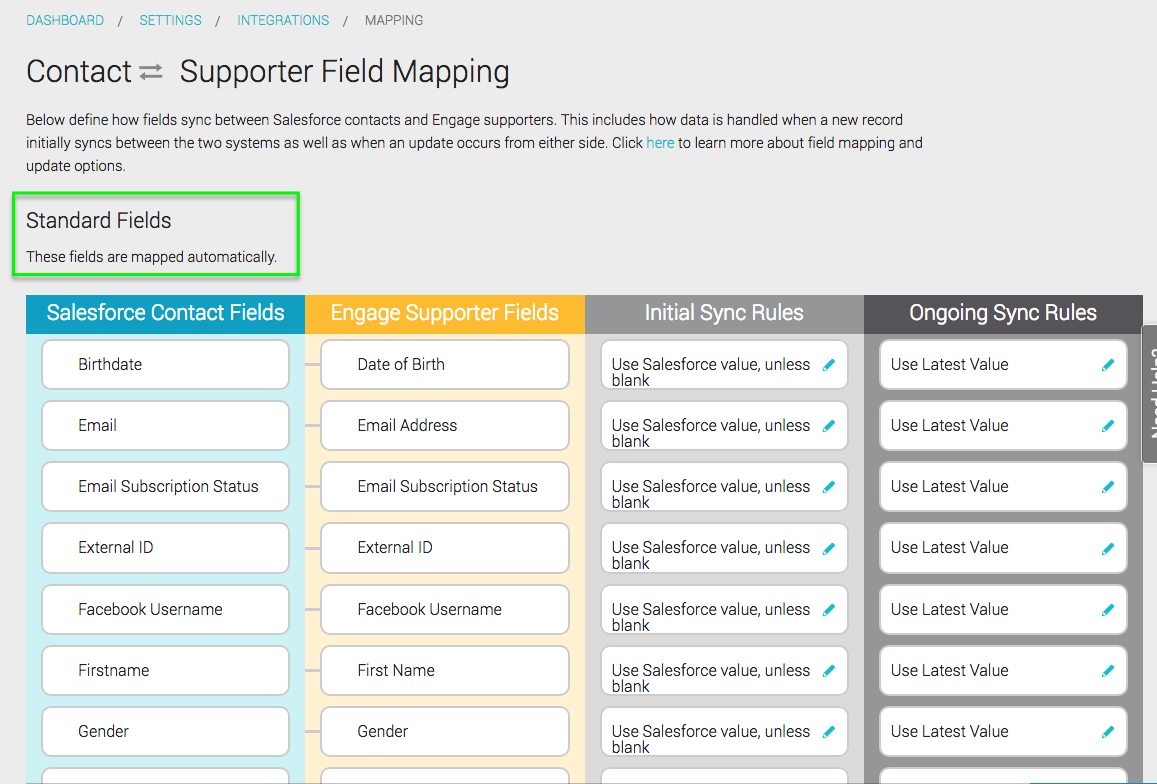
Contact Field Mapping
Engage supporters are your people with whom you engage in advocacy, fundraising, and emails. This section of the integration settings defines how the integration between Salesforce and Salsa Engage handles initial and ongoing updates between Salesforce contacts and Engage supporters. Separate definitions detail how data is handled when a new record initially syncs between the two systems as well as when an update occurs from either side.
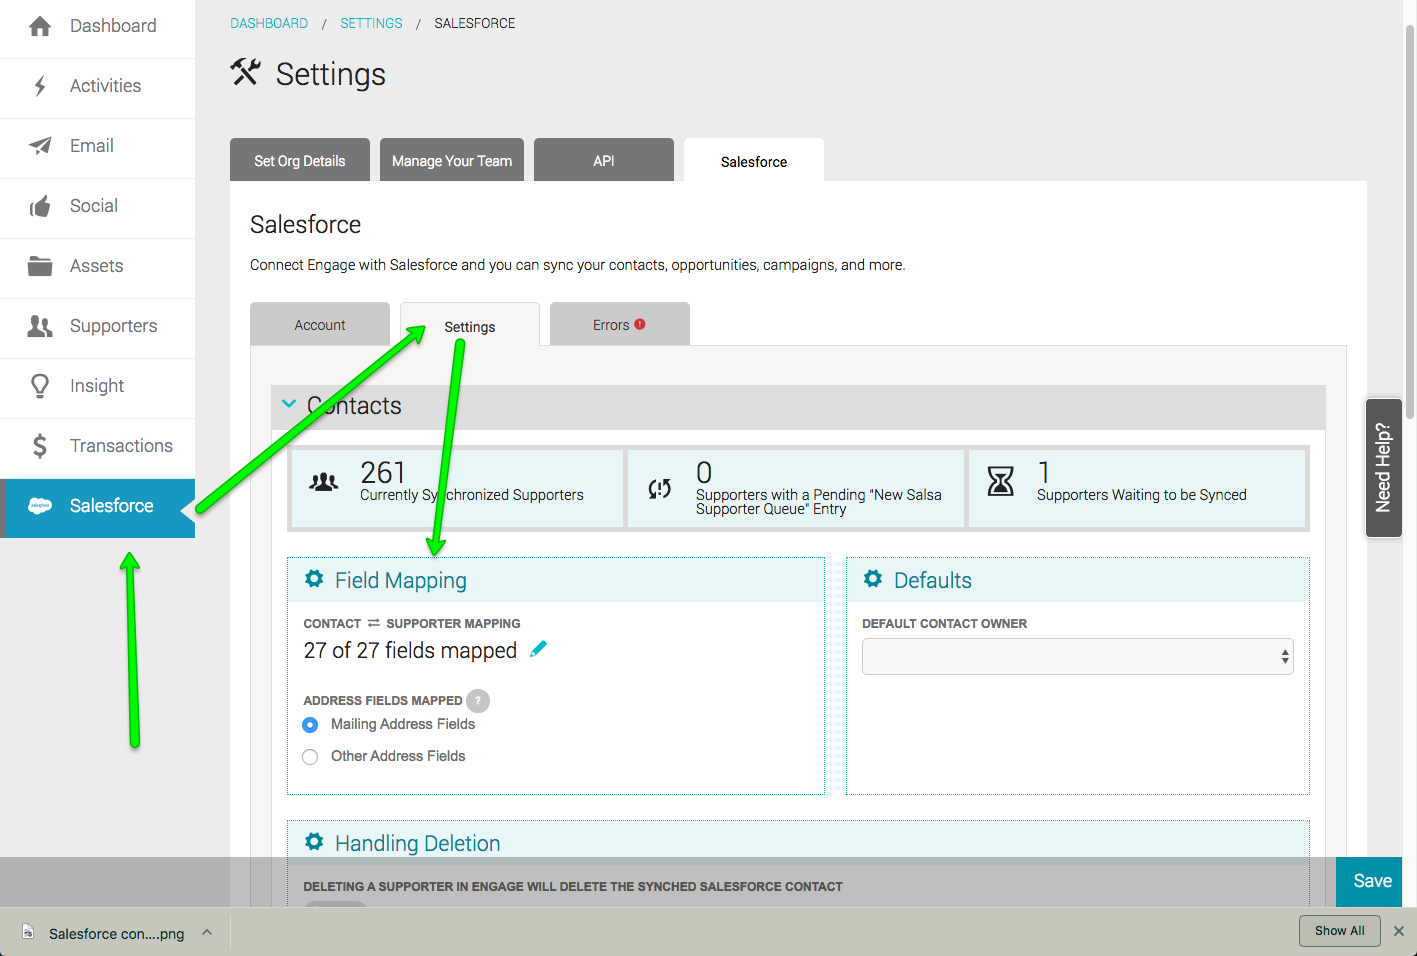
To access the Field Mapping options…
- Click the “Salesforce” menu on the left.
- Navigate to the “Settings” tab.
- Access the Field Mapping section by clicking the blue pencil icon.
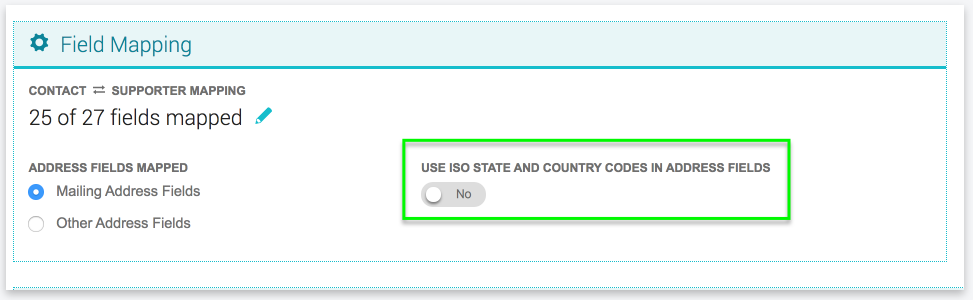
- A separate setting within the Field Mapping area controls whether mailing address fields or other address fields in Salesforce sync to Engage. Optionally, states in the Engage address can be shared to Salesforce using the ISO-3166 standard two-letter abbreviation.
Field Mapping Options
The integration allows users to map standard and custom fields on the Contact record to Supporter fields in Engage. These options define how the integration handles updates of specific data points between Salesforce Contacts and Engage Supporters.
- Standard Fields – Standard fields map automatically once the integration is connected to the Salesforce account. However, initial and ongoing sync rules may need to be adjusted, to suit your business needs, on the Field Mapping screen.
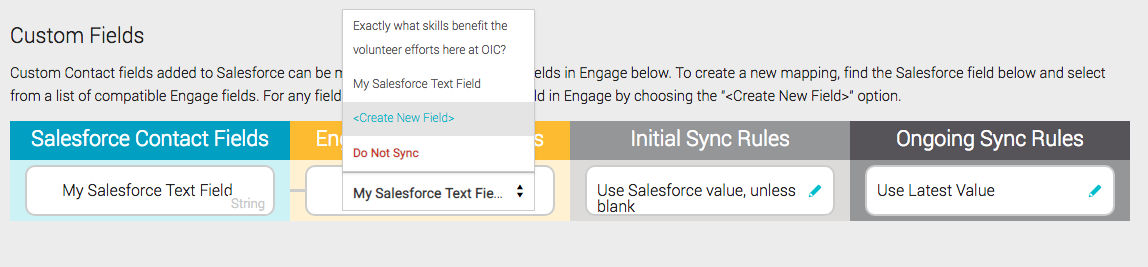
- Custom Fields – There are potentially more custom field types that can be created in Salesforce than can be created in Engage. In addition, not all custom fields should be synced. All Salesforce Contact custom fields show up in the Mapping UI, but not all Engage fields need be mapped. This allows users to create Engage custom fields on the fly without auto-mapping and polluting Salesforce with extraneous, marketing-only data.
For important, in-depth information about Field Mapping Options, Standard Fields, and Custom Fields, please click here.
Opportunities
Opportunities in Salesforce are the sales that you want to track. They are analogous to successful monetary transactions in Salsa Engage. In order to create new Opportunities in Salesforce, Salsa must know how to store successful, refunded, and canceled donations. This is done by configuring the Opportunity Stage for successful, refunded, and canceled donations. To access the Opportunity Stage configuration options…
- Click the Salesforce menu on the left.
- Click the Settings tab.
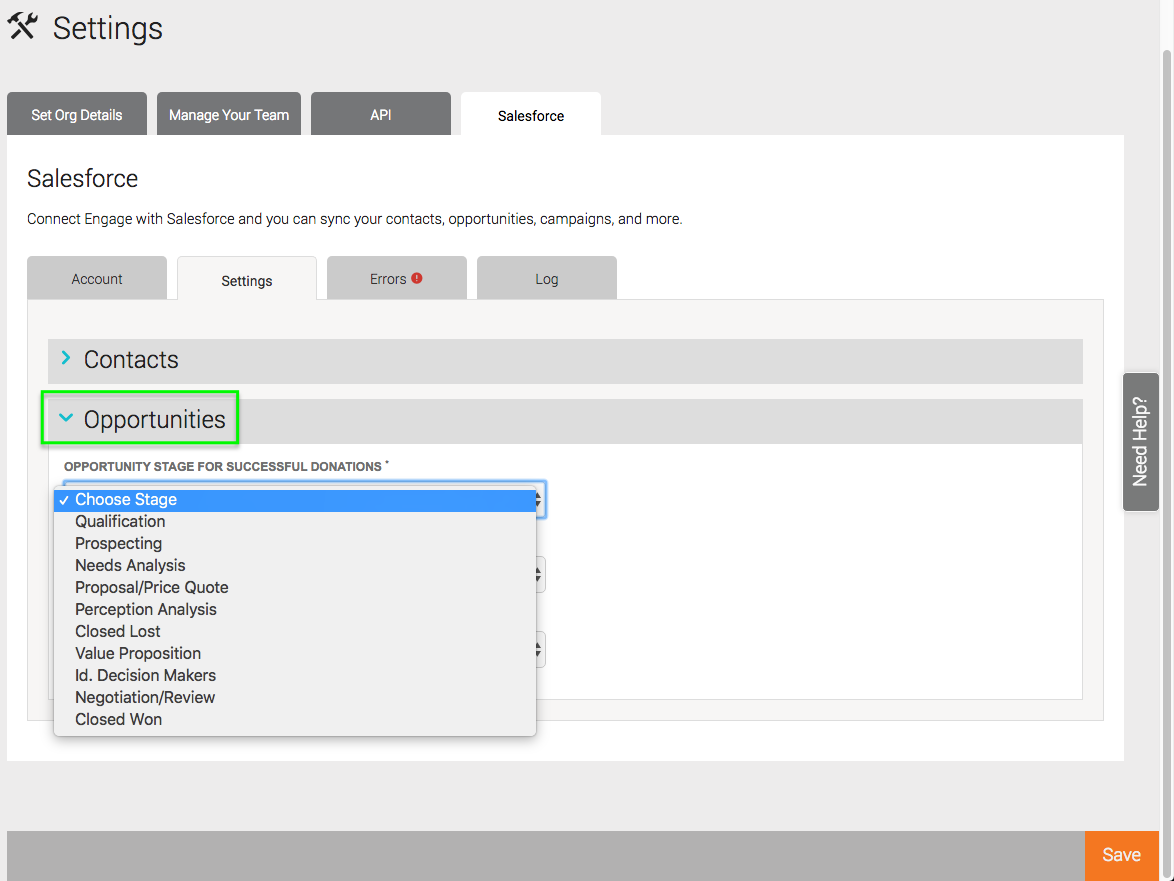
- Depending on what Stages are configured in the Salesforce account, some Opportunity Stage field adjustments may be necessary in Salesforce. Also, if record types are used, a default must be chosen in this section.
- Opportunity Stage for Successful Donations — Set the Stage field value for successful donations in Salesforce. Salsa Engage will use this value for opportunities created from successful donations.
- Opportunity Stage for Failed Donations— Set the Stage field value for failed donations in Salesforce. Salsa Engage will use this value for opportunities created that in turn are set to failure after the fact.
- Opportunity Stage for Refunded Donations— Set the Stage field value for refunded donations in Salesforce. Salsa Engage will use this value updating refunded opportunities.
- Default Opportunity Record Type (Optional) — If Opportunity Record Types are enabled in Salesforce, this option is visible and a default type may be set.
Opportunities and Nonprofit Success Pack
If your Salesforce account has Nonprofit Success Pack (NPSP) installed, there will be an additional option displayed to let NPSP set the Primary Contact Role and Account Name for any Opportunities created by the sync.
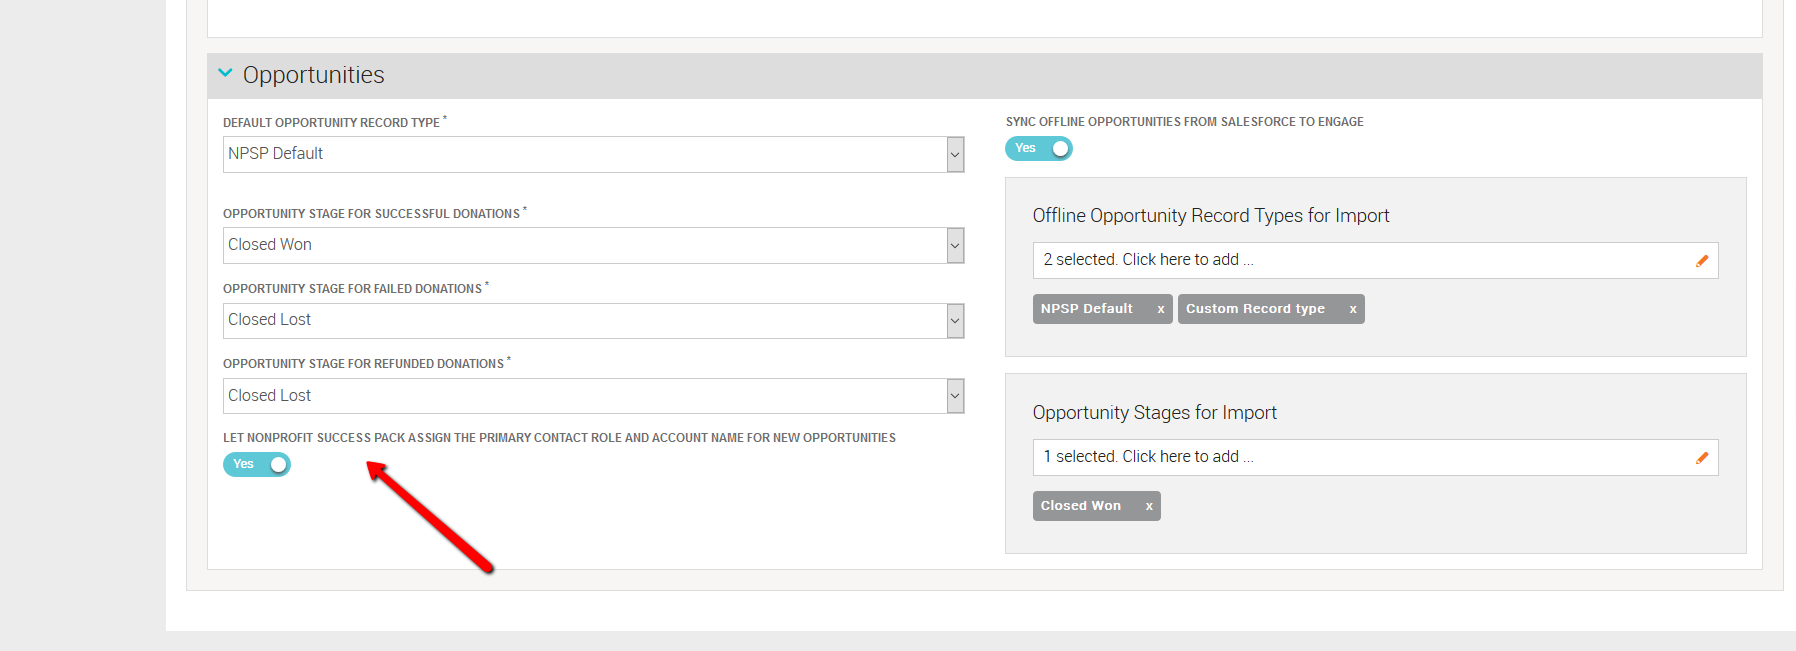
Enabling this feature allows the sync to store the Contact ID of a donor in NPSP’s Primary Contact custom field (npsp__Primary_Contact__c). NPSP then automatically assigns the Account Name and Primary Contact Role, based on the settings you have configured in Salesforce. We recommend enabling this feature.
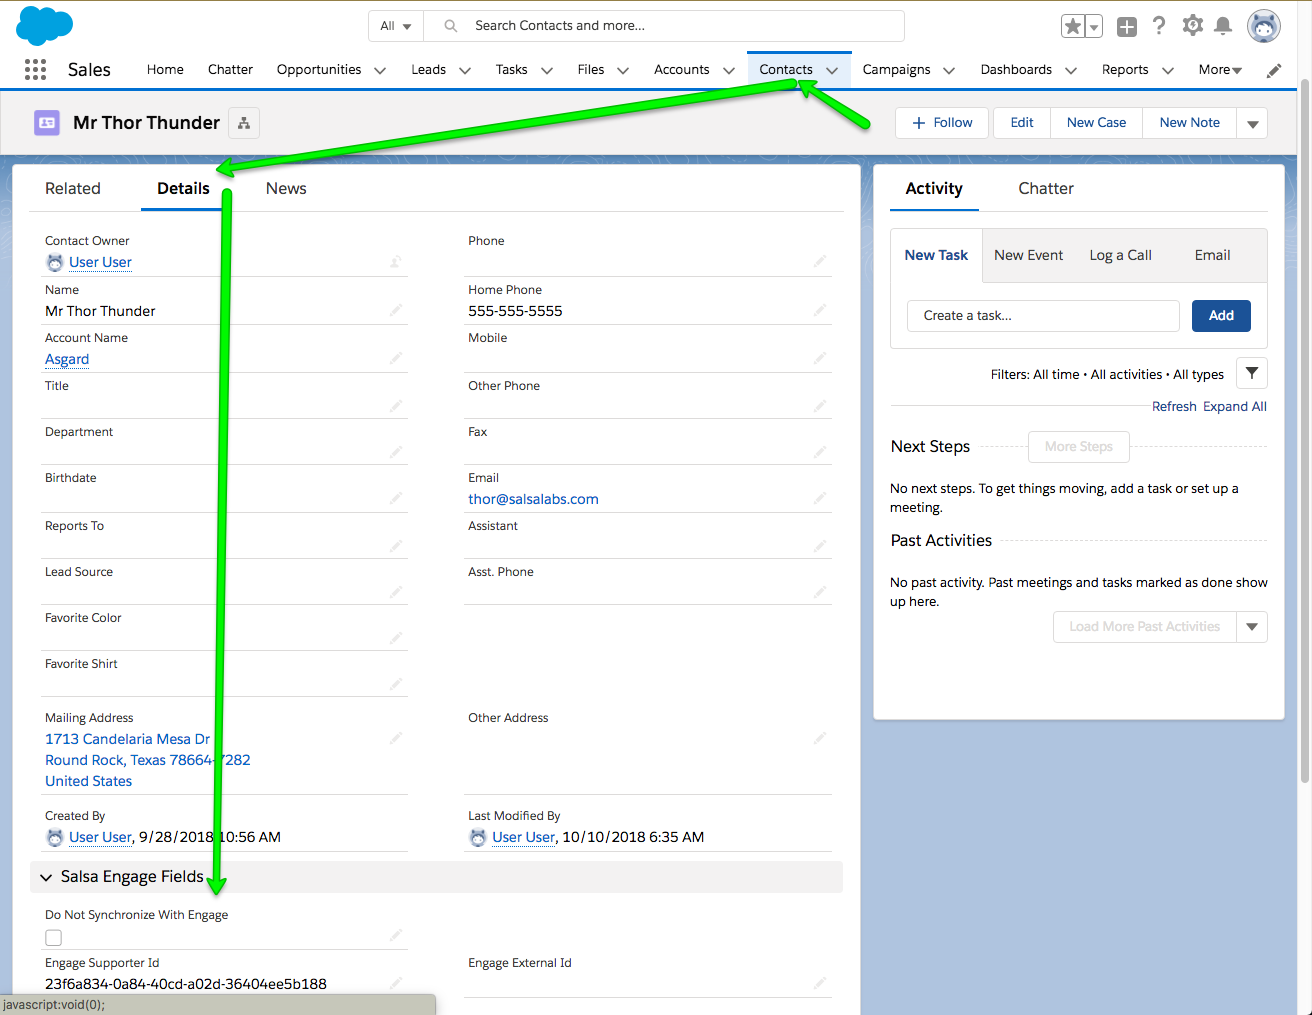
Exclude Specific Contact Records in Salesforce From The Integration
If there is a subset of records that should NOT be synchronized with Salsa Engage, Salesforce contact records need to be configured with a Do Not Synchronize With Engage value. For example, if you have an organization that helps sexual assault victims and are tracked as Salesforce contacts as well as your donors, your clients should be excluded from Syncing with Salsa Engage.
If that subset of contacts is determined by a custom field value, contact record type, or another indicator that should be made into a rule, the integration manager should create a Salesforce workflow rule or process builder that will automatically set that checkbox to be checked if the precondition applies. A Salesforce workflow rule or process builder should auto-set the Do Not Synchronize With Engage field to be checked if a Contact is given that contact record type.
To set a specific contact in Salesforce to not synchronize with Engage…
- Click “Contacts” from the menu.
- Navigate to the “Details” tab under the Contact record.
- In the “Salsa Engage Fields” section, click the checkbox for “Do Not Synchronize With Engage.”
If a whole group of Contacts needs to be marked as Do Not Synchronize With Engage, checking each individually would take a long time. Moreover, if there’s a particular record type that you always want to be marked that way, you might want to have that box checked automatically. Salesforce provides process workflows as a way to automate that process for marking many contacts as Do Not Synchronize With Engage.
Enable Salesforce Middle Name and Suffix Options (Optional)
Salesforce does not add Middle Name and Suffix fields to the contact name by default. However, Salsa supporter records have Middle Name and Suffix fields. You will need to decide how you want to handle these fields.
If you plan to sync these fields, you’ll need to enable the Middle Name and Suffix fields in Salesforce. Your Salesforce administrator can enable this in your Salesforce account under Setup -> User Interface:
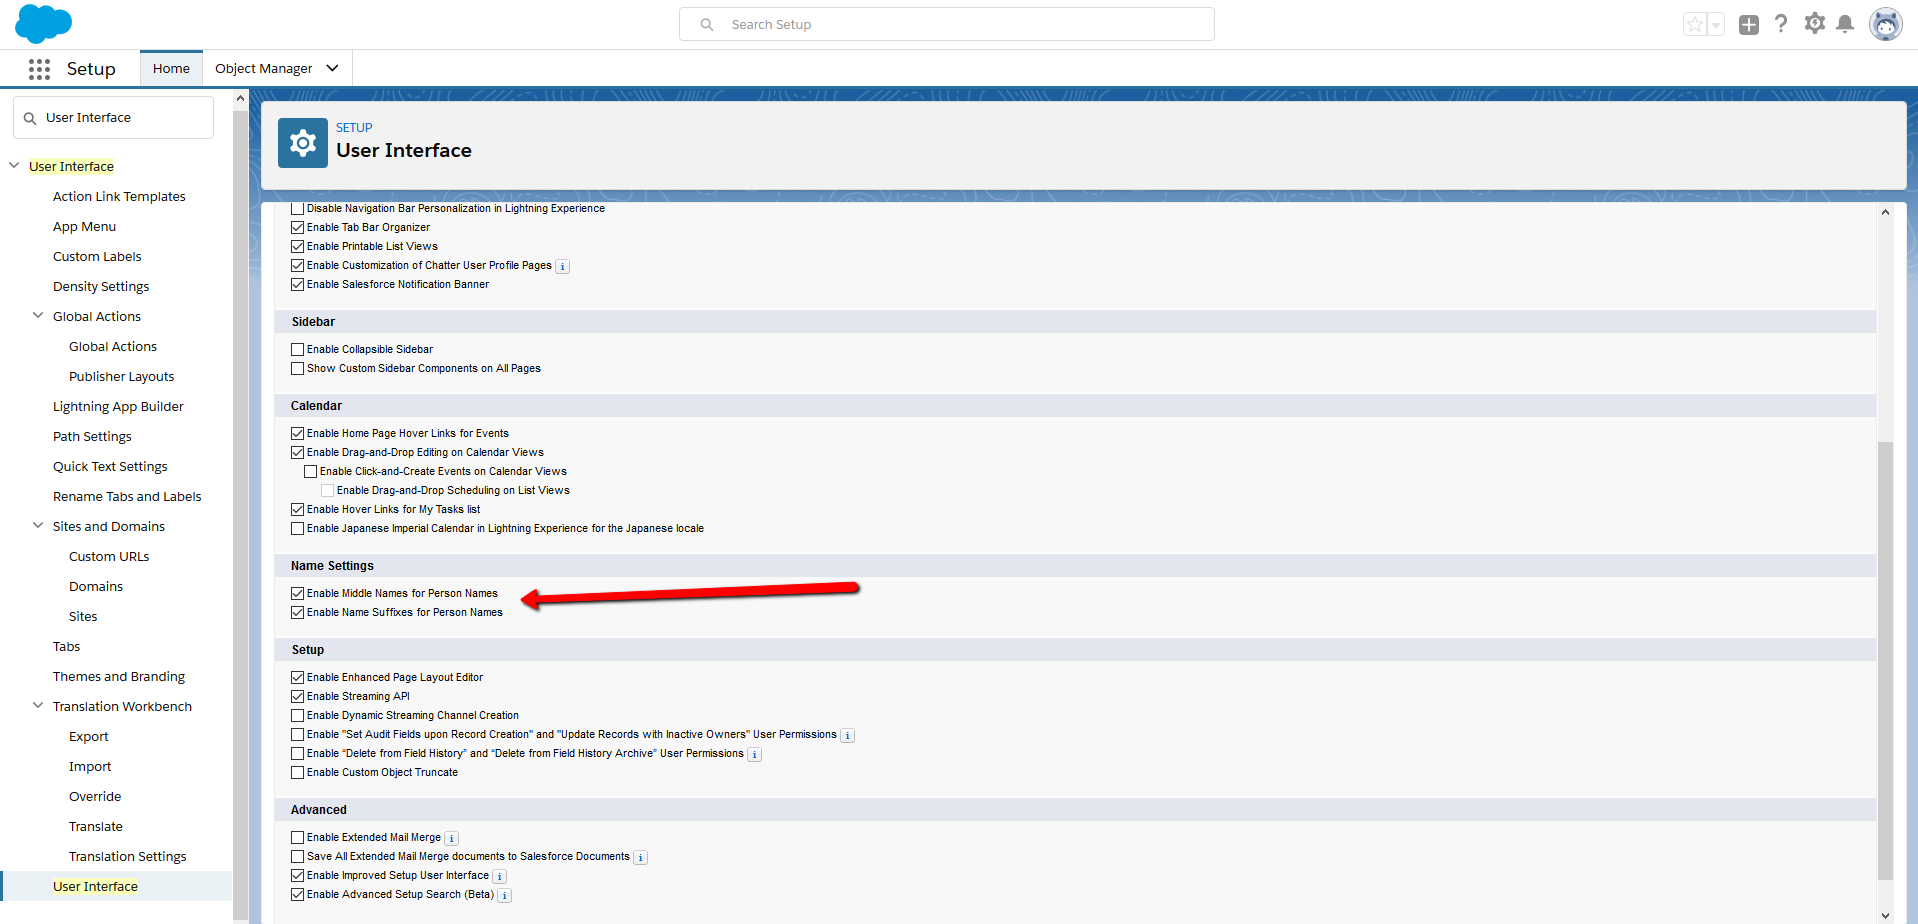
If you choose not to sync these fields, navigate to the Contact Field Mapping interface and set Middle Name and Sufifix to Disabled.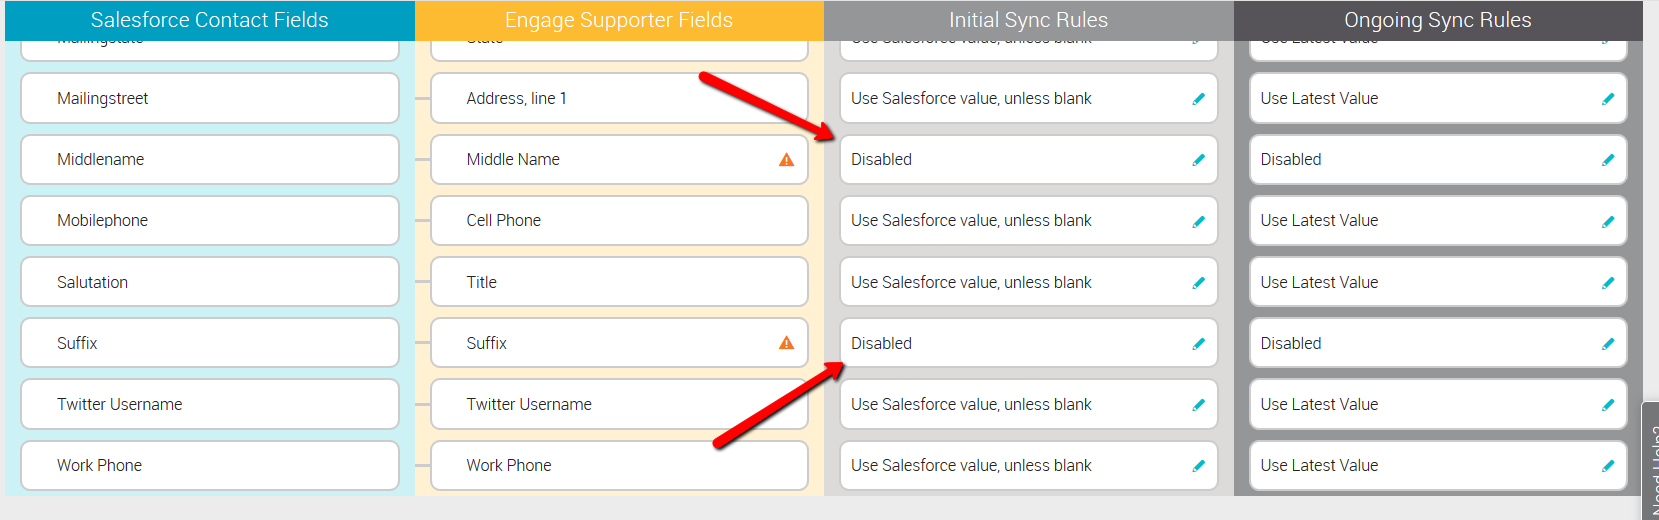
API Call Limits
The integration between Salsa Engage and Salesforce utilizes the Salesforce API to read data in Salesforce and make updates. Some of the options provided in the integration allow you to manage Salesforce API usage. Salesforce limits how many API calls may be transacted in any rolling 24-hour period for a certain cost. You can always request more and pay for more API calls from Salesforce. Bulk API allows us to send big data sets to Salesforce for bulk processing. Some elements of the integration will use this API when updating a lot of records at once.
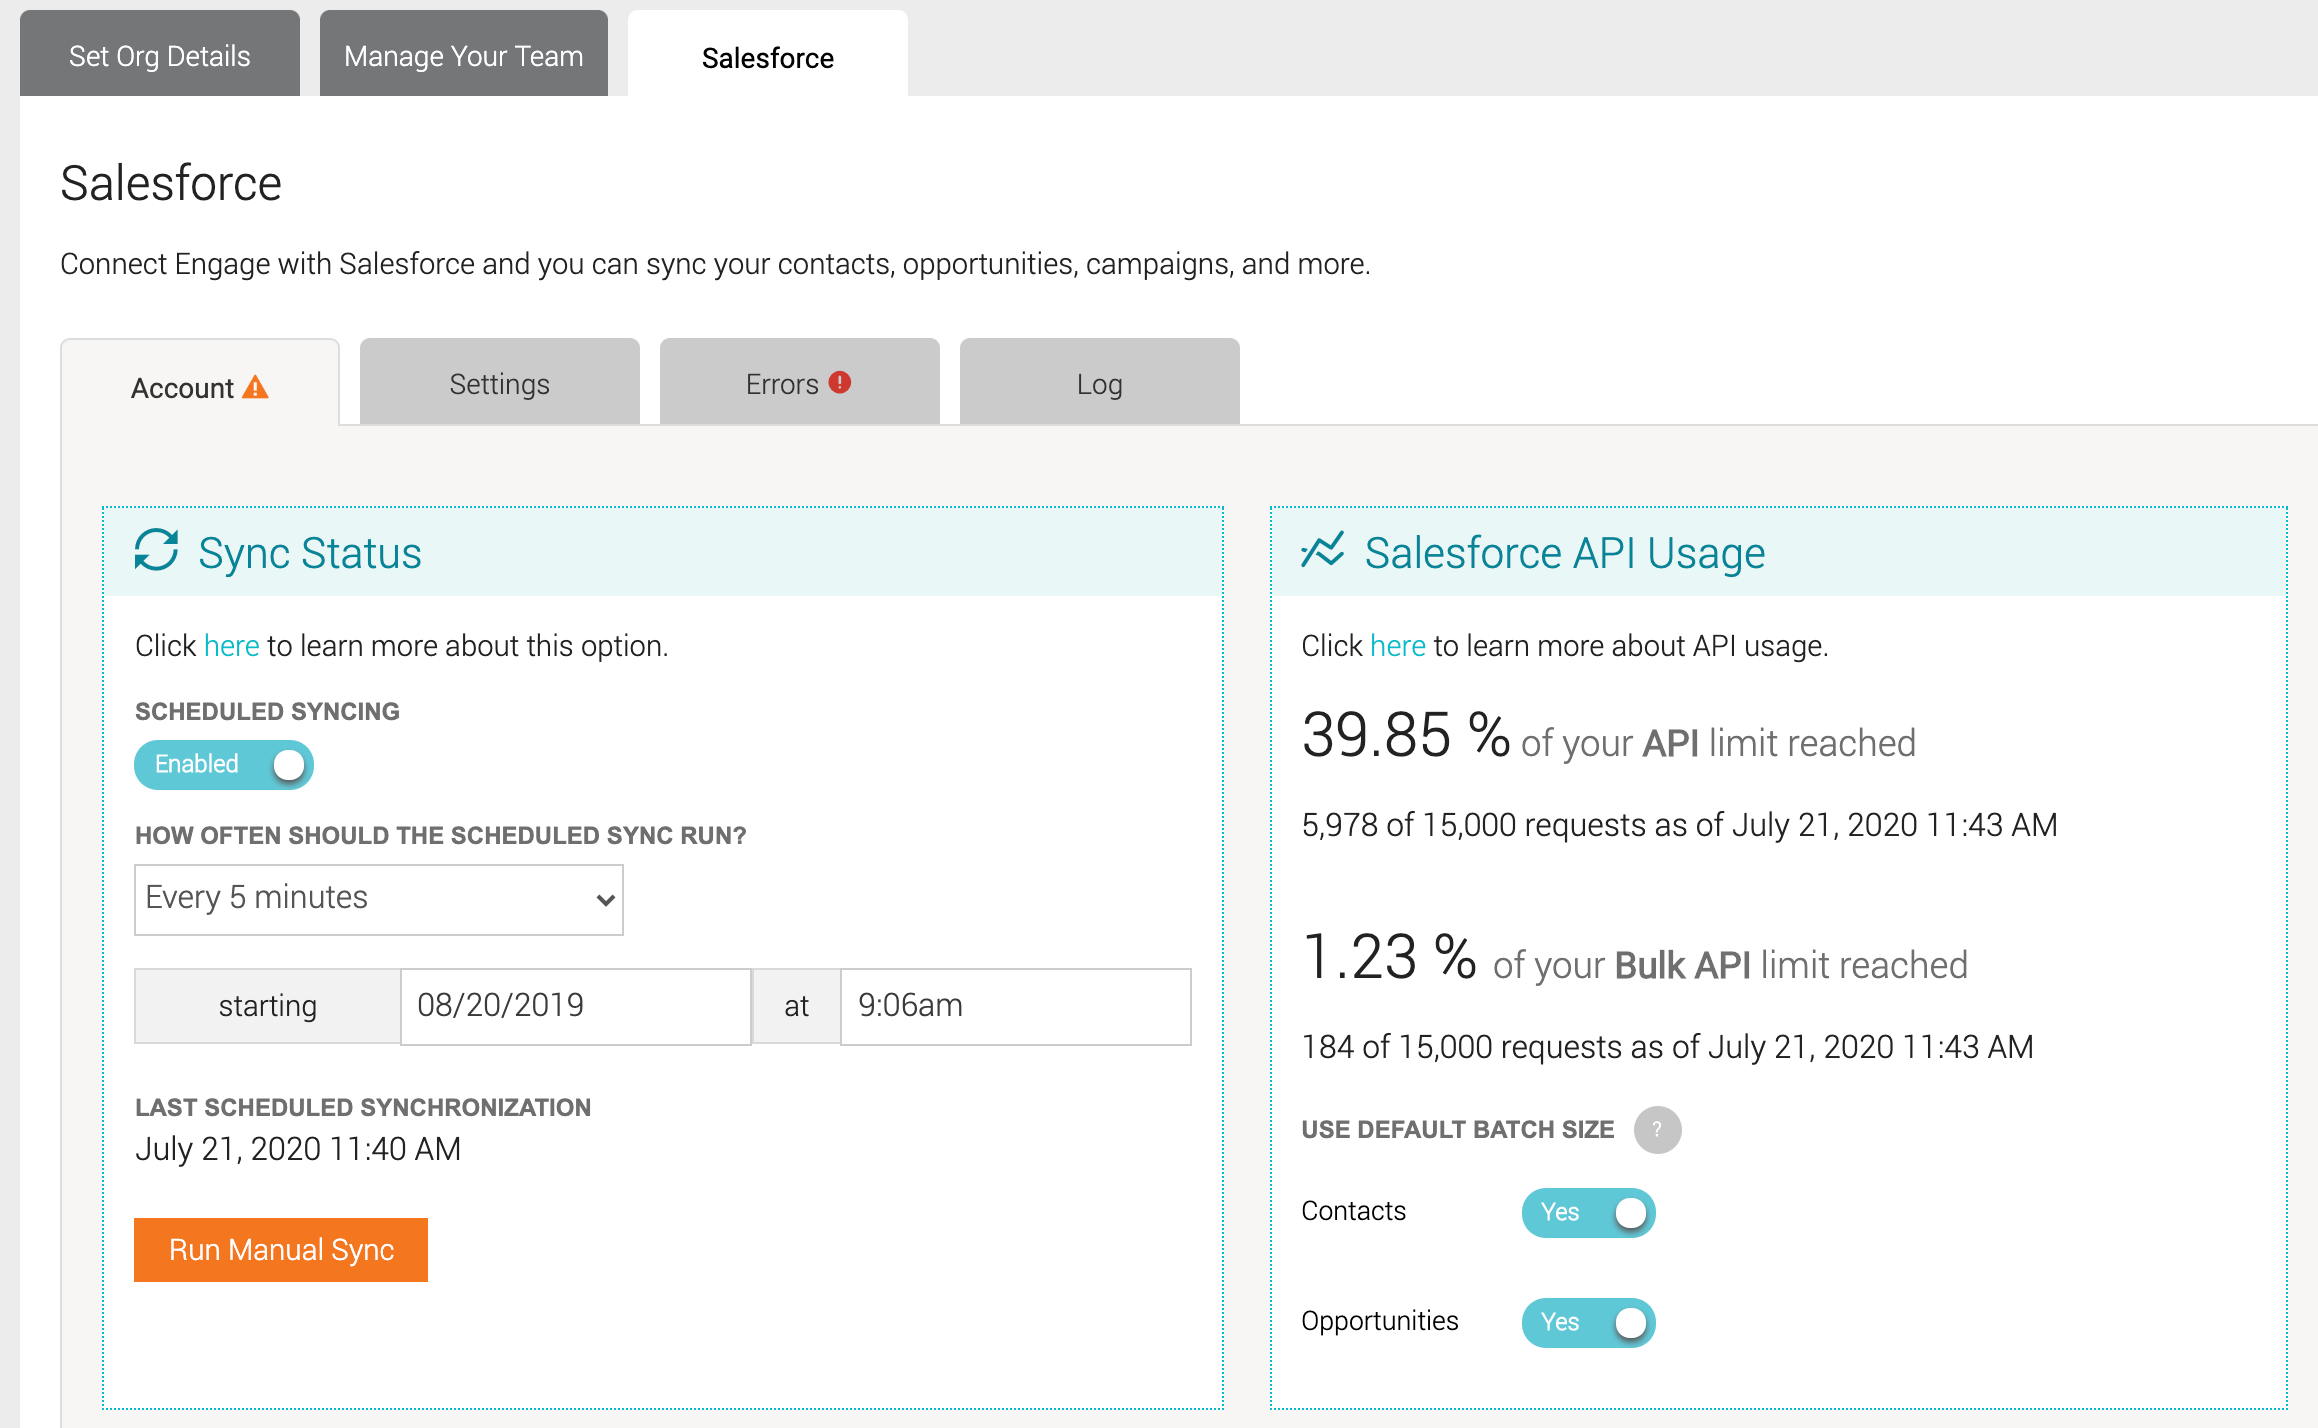
We provide a real-time usage dashboard that shows a percentage of your API request threshold that has been reached at the time the page is loaded and the percentage of the Bulk API requests processed.
Batch Size
You can control how many records Salsa Engage sends at one time to Salesforce through the Bulk API.
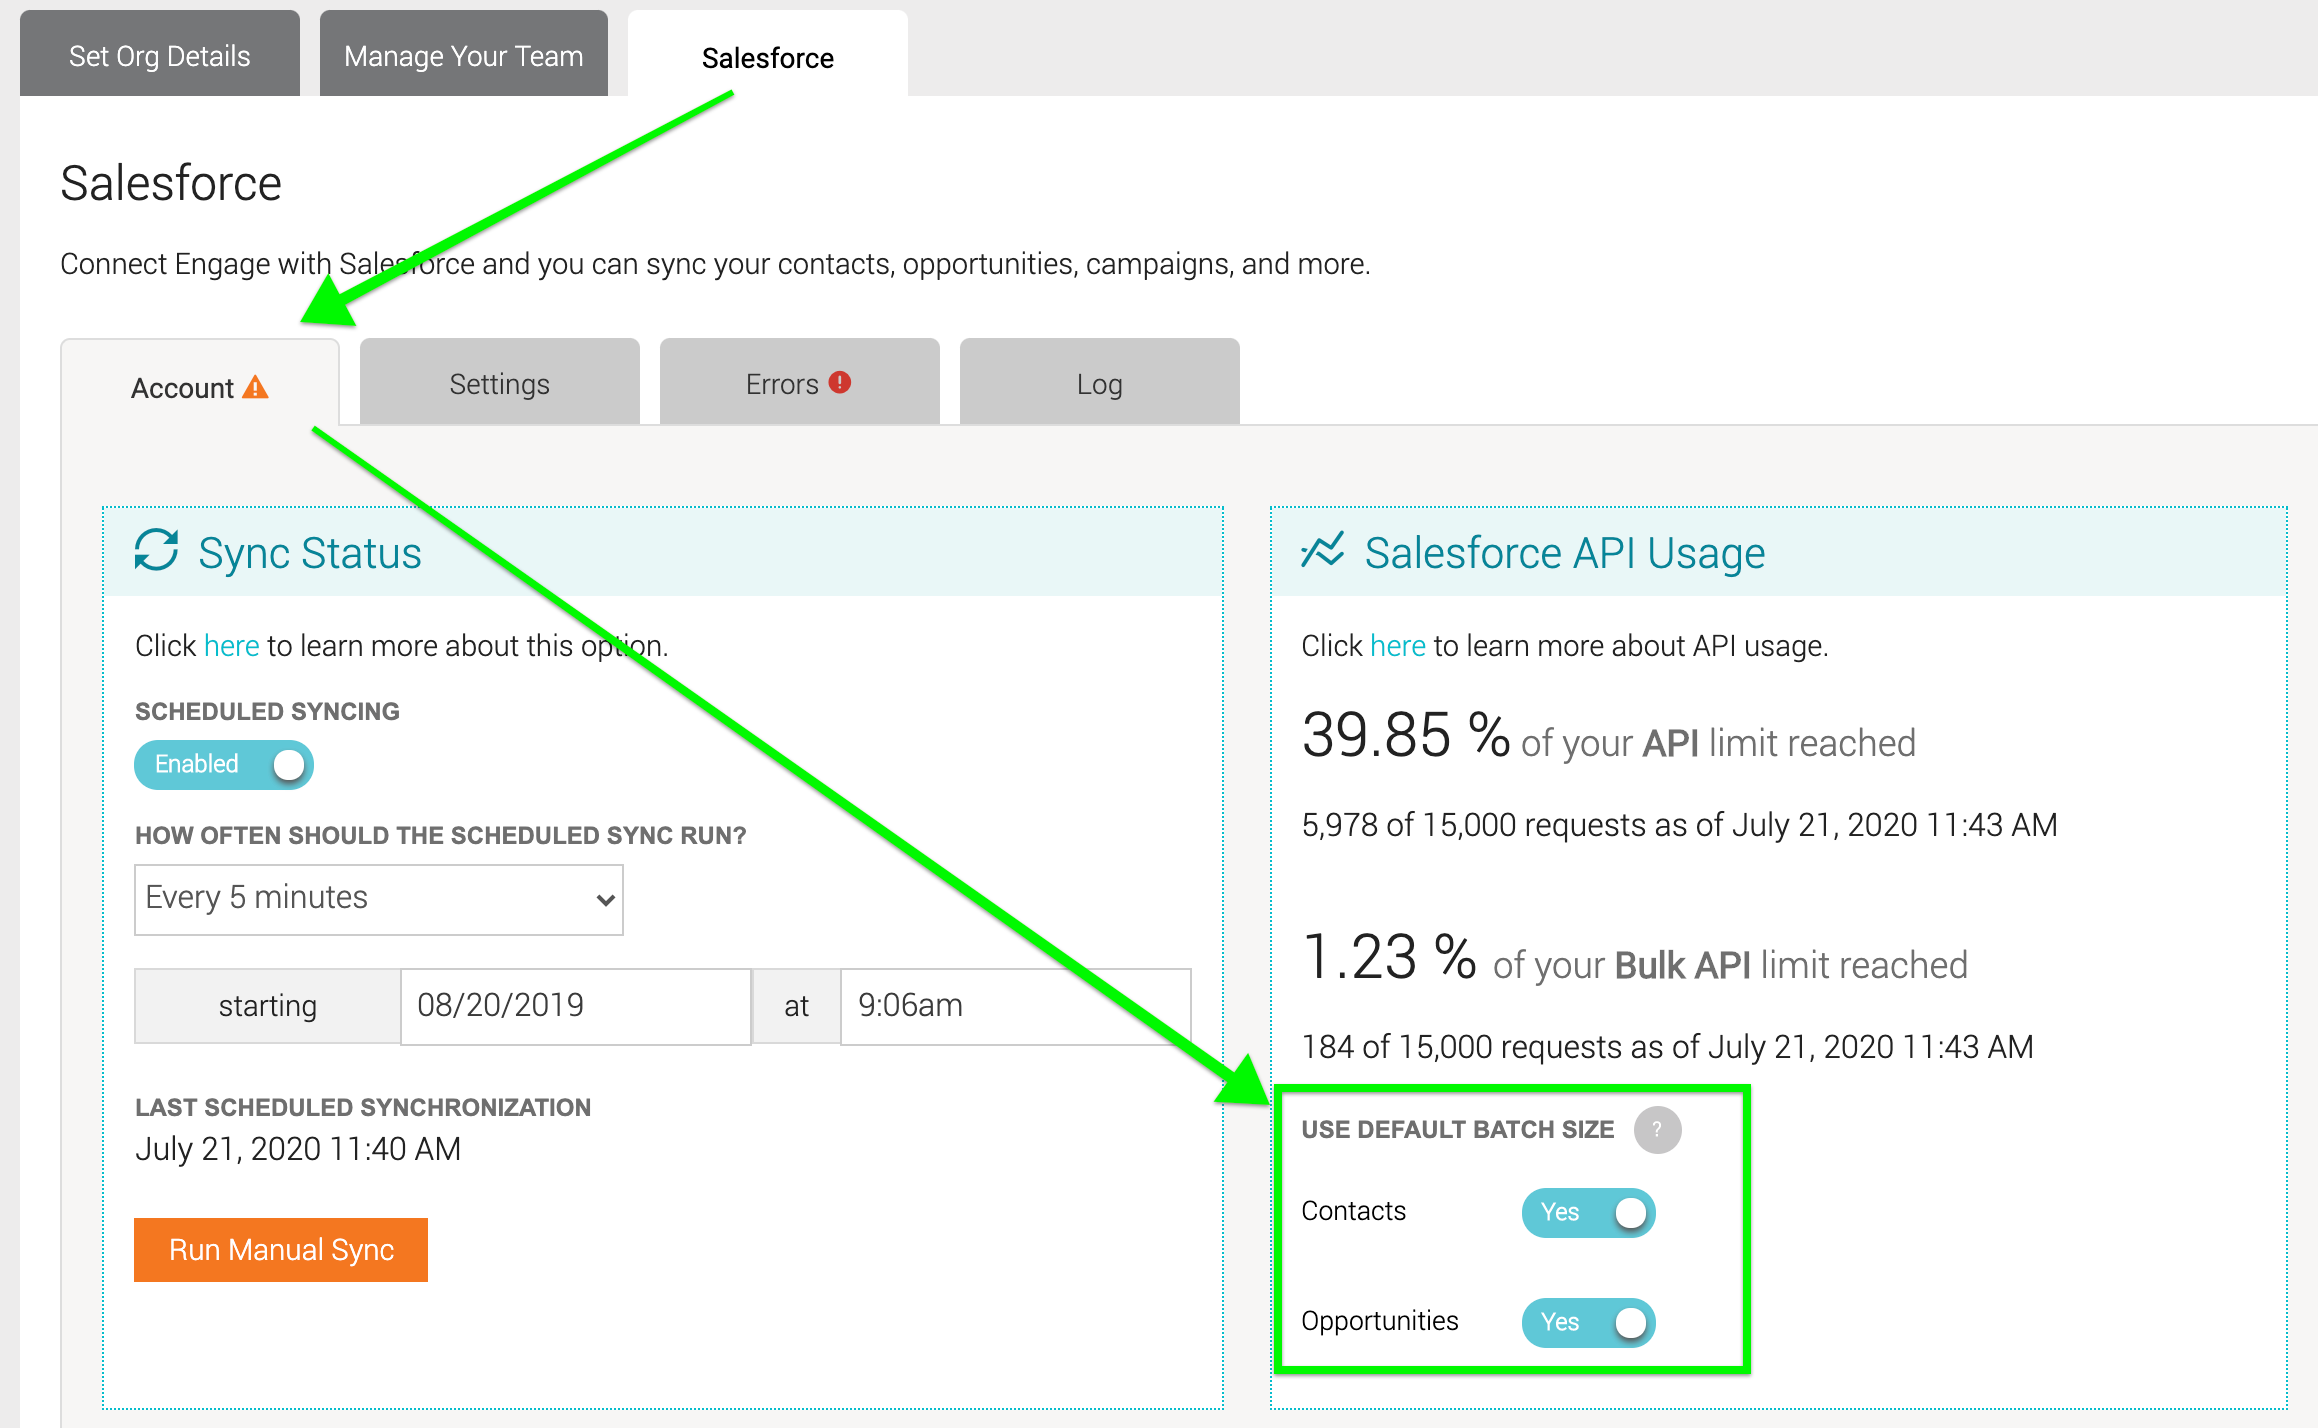
Most accounts can use the default setting of Yes without issue. However, if you have installed numerous Salesforce apps, custom process flows, or custom triggers, you may encounter resource limits that Salesforce places on processing data. Hitting these limits may prevent updates to Contacts and Opportunities.
If you do hit a limit, you may see exceptions in the Errors tab, indicating “Apex CPU time limit exceeded.” If this occurs, set a custom batch size for either Contacts or Opportunities:
- In the Salesforce API Usage section (under Use Default Batch Size) slide the Contacts or Opportunities slider button from Yes to No.
- The default batch size is 150 (Contacts or Opportunities) per Bulk API Request. Enter a new, smaller batch size (greater than zero).
- Click the orange Save button in the lower right.
NOTE: Lowering the batch size setting will result in higher Bulk API usage.
Adjusting Sync Frequency
While having updates apply on both sides can be done as frequently as every 5 minutes, you may need to adjust your settings to meet your API call limits.
1. Scheduled Syncing
Scheduled Syncing enables or disables the possibility of scheduling when your sync runs.
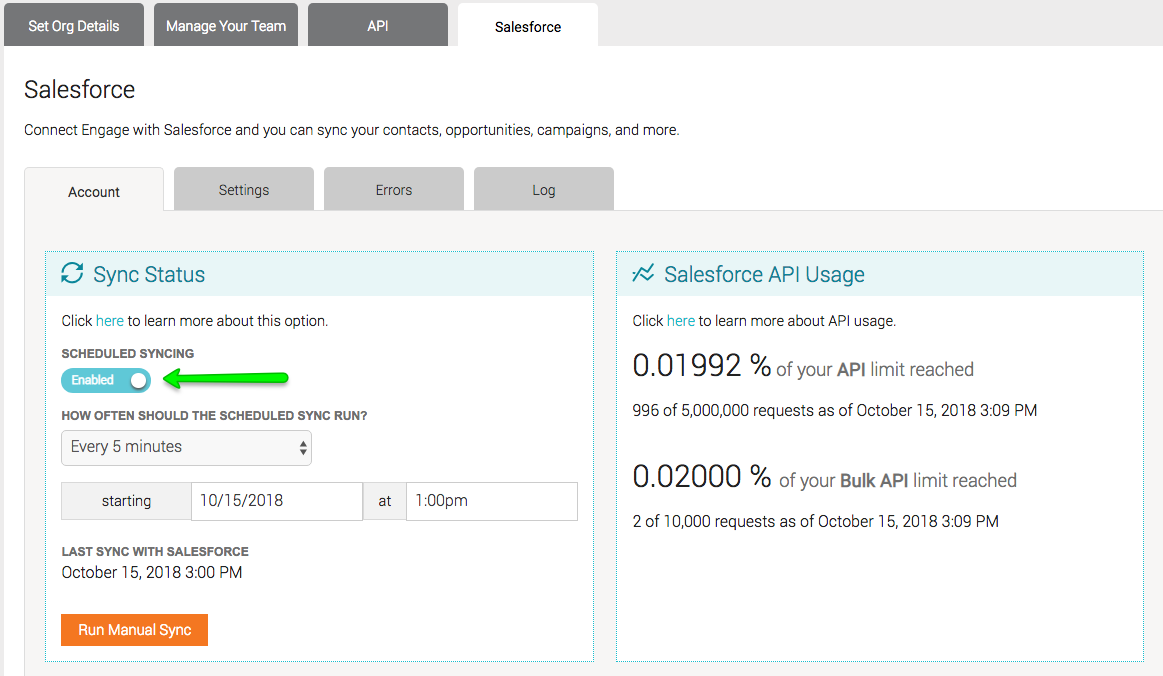
If enabled, you choose how often the integration automatically syncs. If disabled, the integration syncs only when manually selected or if you choose to resend all data.
2. Scheduled Sync Frequency
If Scheduled Syncing is enabled, the next step is setting how often the integration should be scheduled to sync. The first option defines the frequency of synchronizations, and the second option sets a start date and time to run the first automatic sync.
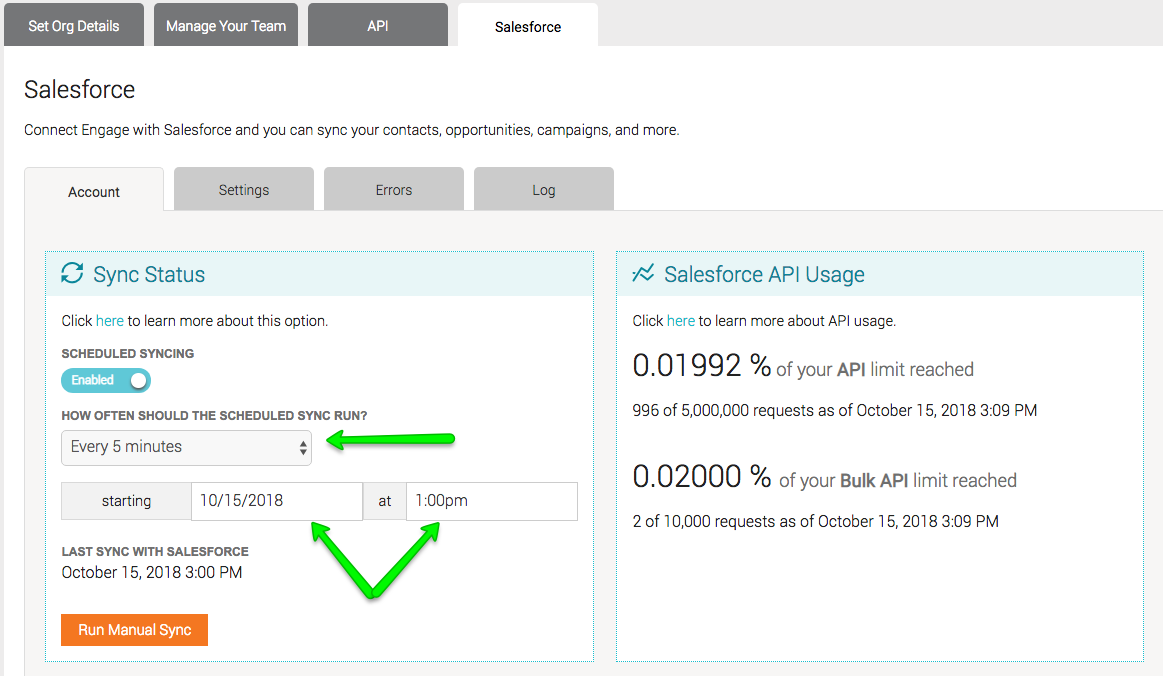
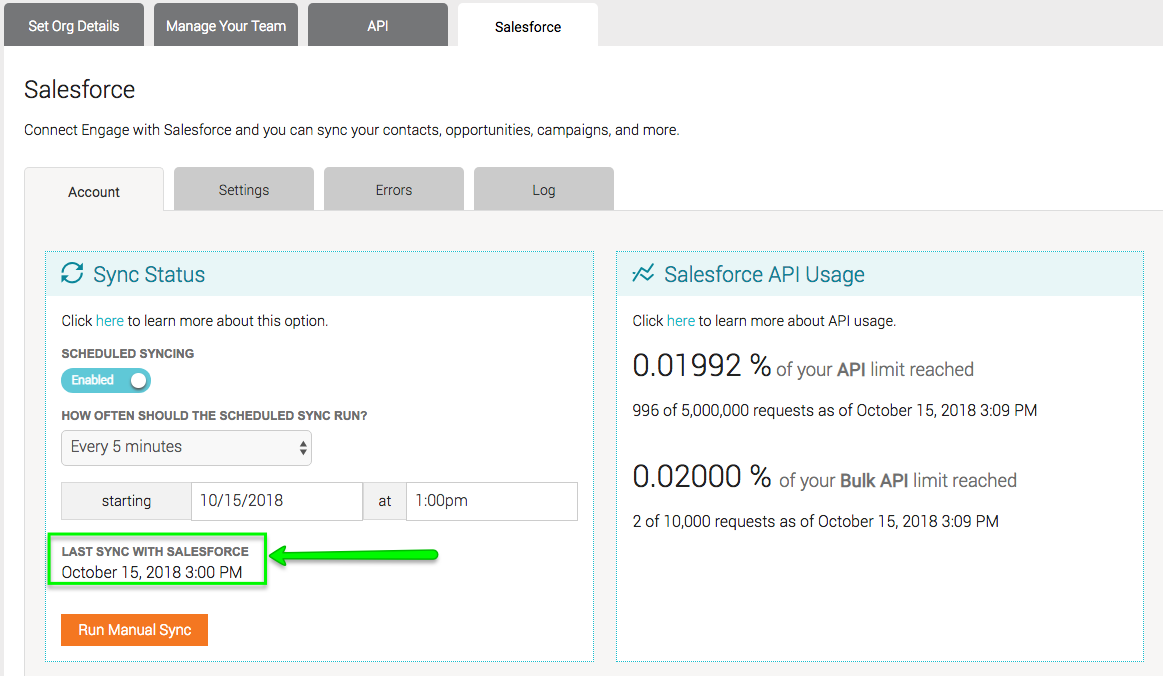
3. Last Sync Date/Time
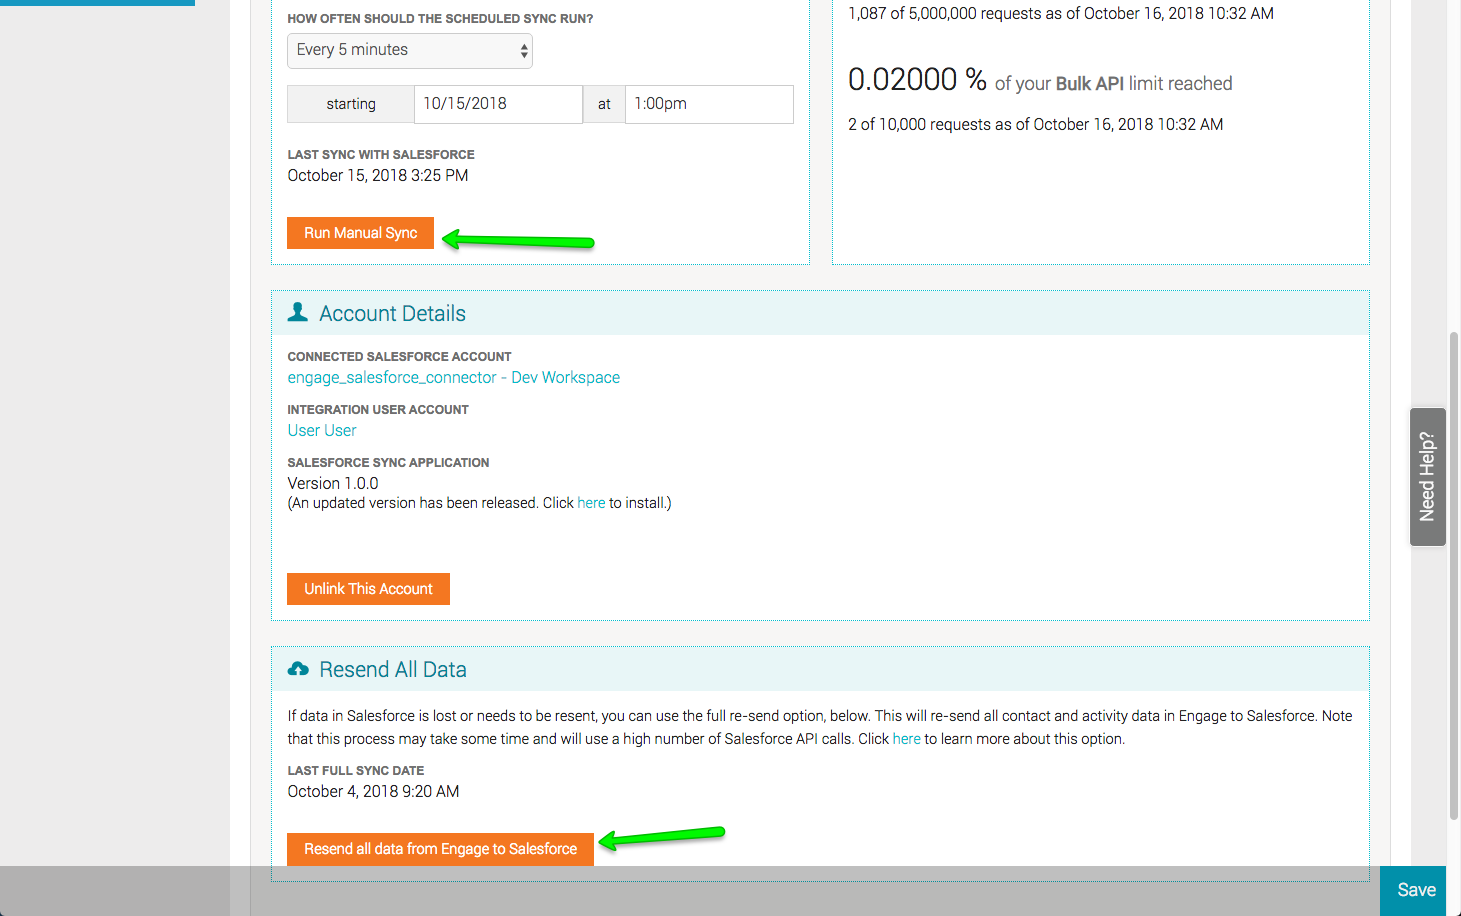
The date and time of the last instance of the Engage and Salesforce sync displays at the bottom of the Sync Status section, just above the Manual Sync button.
2. Custom Fields and Custom Objects In Your Salesforce Layouts
You may have different Salesforce layouts for different user types or other plugins that you’ve added to your Contact, Opportunity, Campaign, and Campaign Member page layouts. The Salsa Engage-Salesforce integration app adds a number of custom fields and custom objects to your Salesforce account. By default, custom fields and custom objects are not added to your standard Contact, Campaign, Campaign Member, or Opportunity layouts. If you want to add them, you can edit your existing layouts or, alternatively, use custom layouts added by the integration.
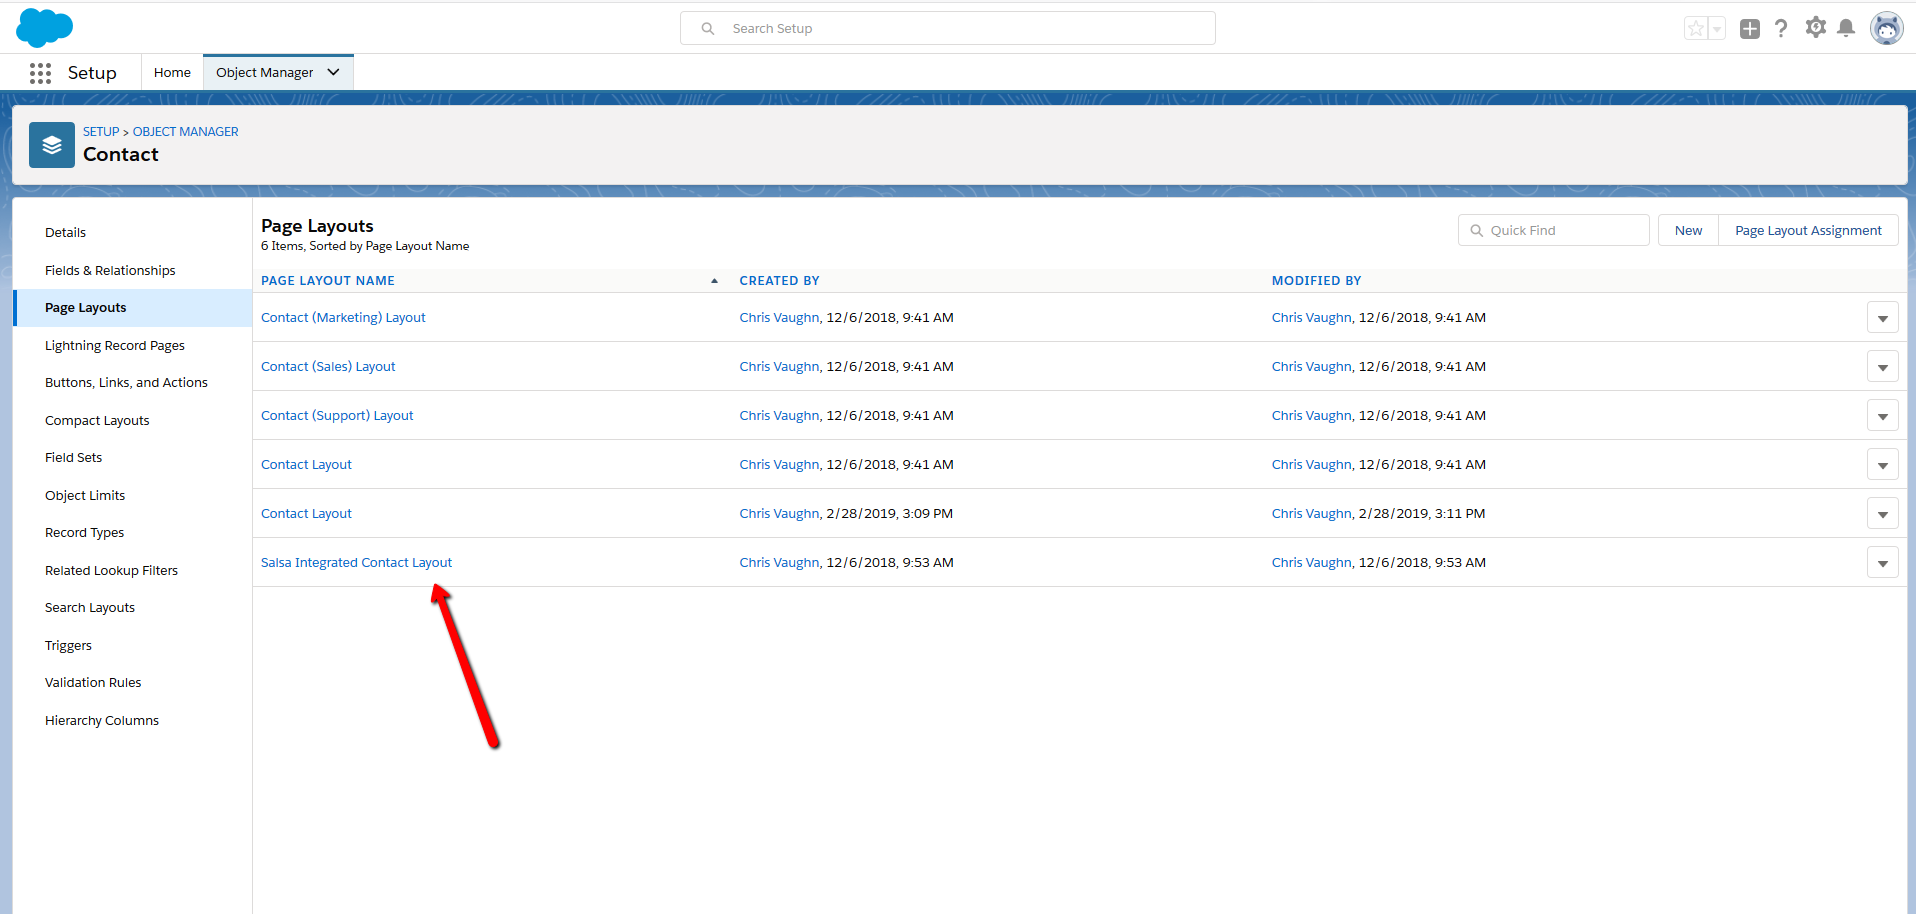
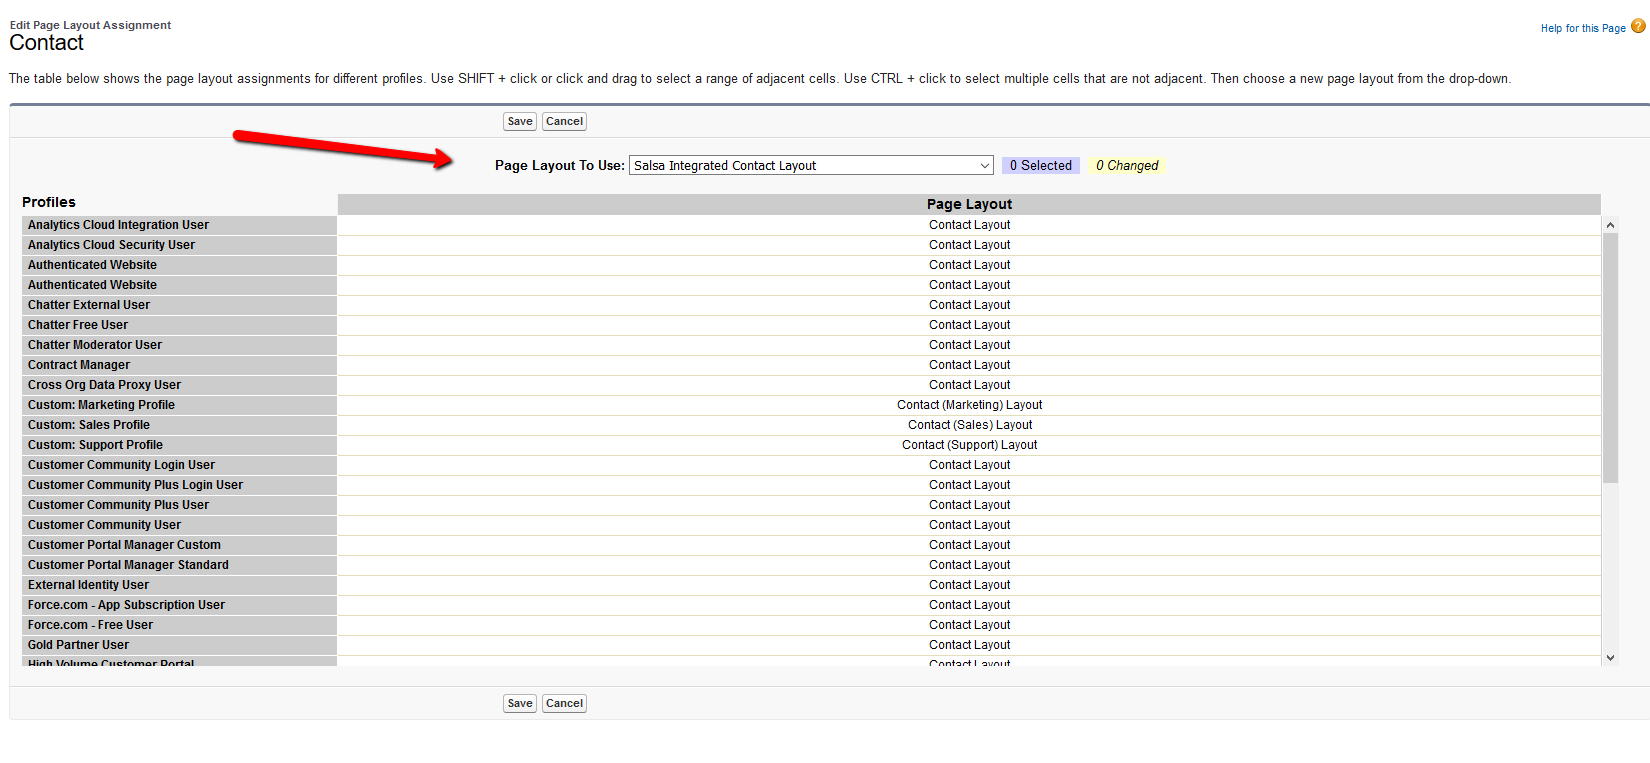
Using Layouts provided by the Integration App
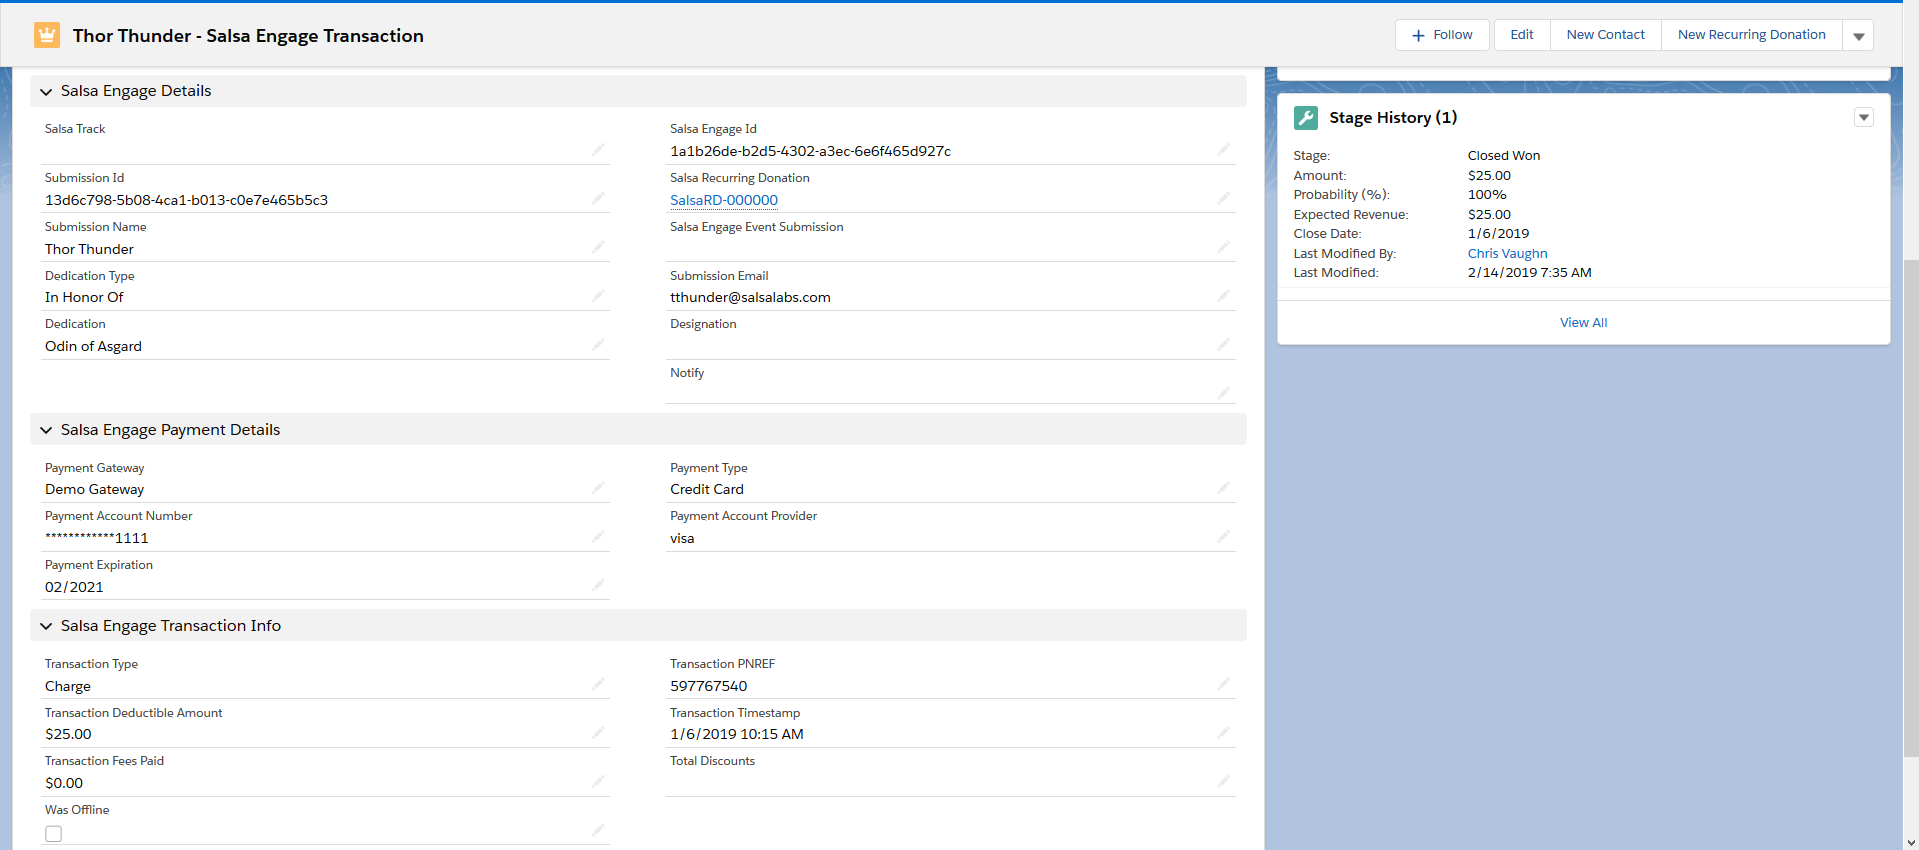
After installing the Salsa Engage Integration app in Salesforce, new custom Layouts are added for Contact, Opportunity, Campaign, and Campaign Member. These layouts include key Salsa fields and objects and organize them into useful subsections. They are prefixed with “Salsa Integrated” and can be found alongside any other custom layouts you’ve created. For example, your standard and custom Contact layouts:
Here’s an example of the Opportunity layout once it’s installed:
If you would like to use the app-installed layouts, simply change the layout assigned to the applicable Salesforce profile:
3. Synchronize a Salesforce campaign with a Salsa Engage group
The Salsa Engage connector app installed in your Salesforce account adds a custom checkbox to the Campaign object, called Sync with Salsa Engage.
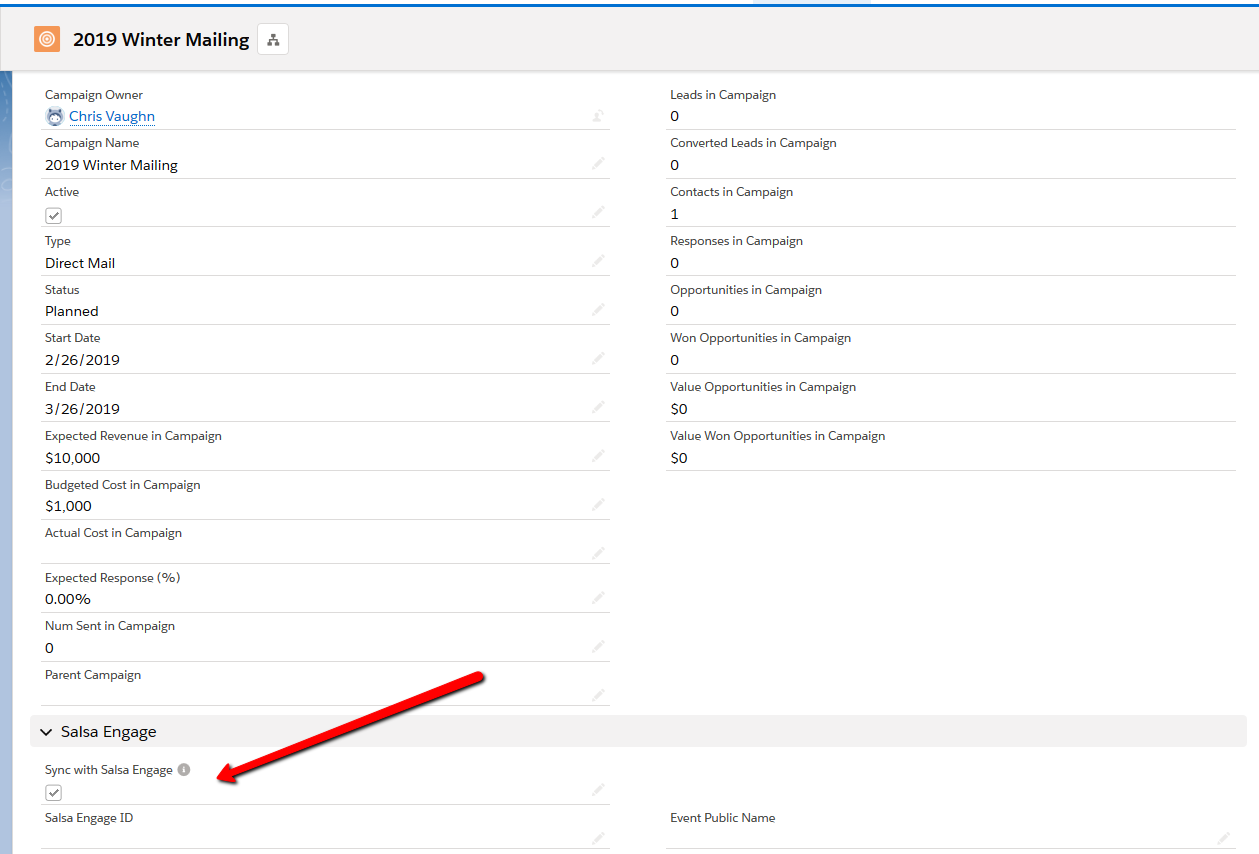
Checking this box in the Salesforce Campaign tells the integration to create a matching group in Salsa Engage for your Campaign during the next sync.
Contacts that are added to or removed from the Campaign in Salesforce by the integration will be added or removed accordingly from the Salsa Engage group each time you sync.
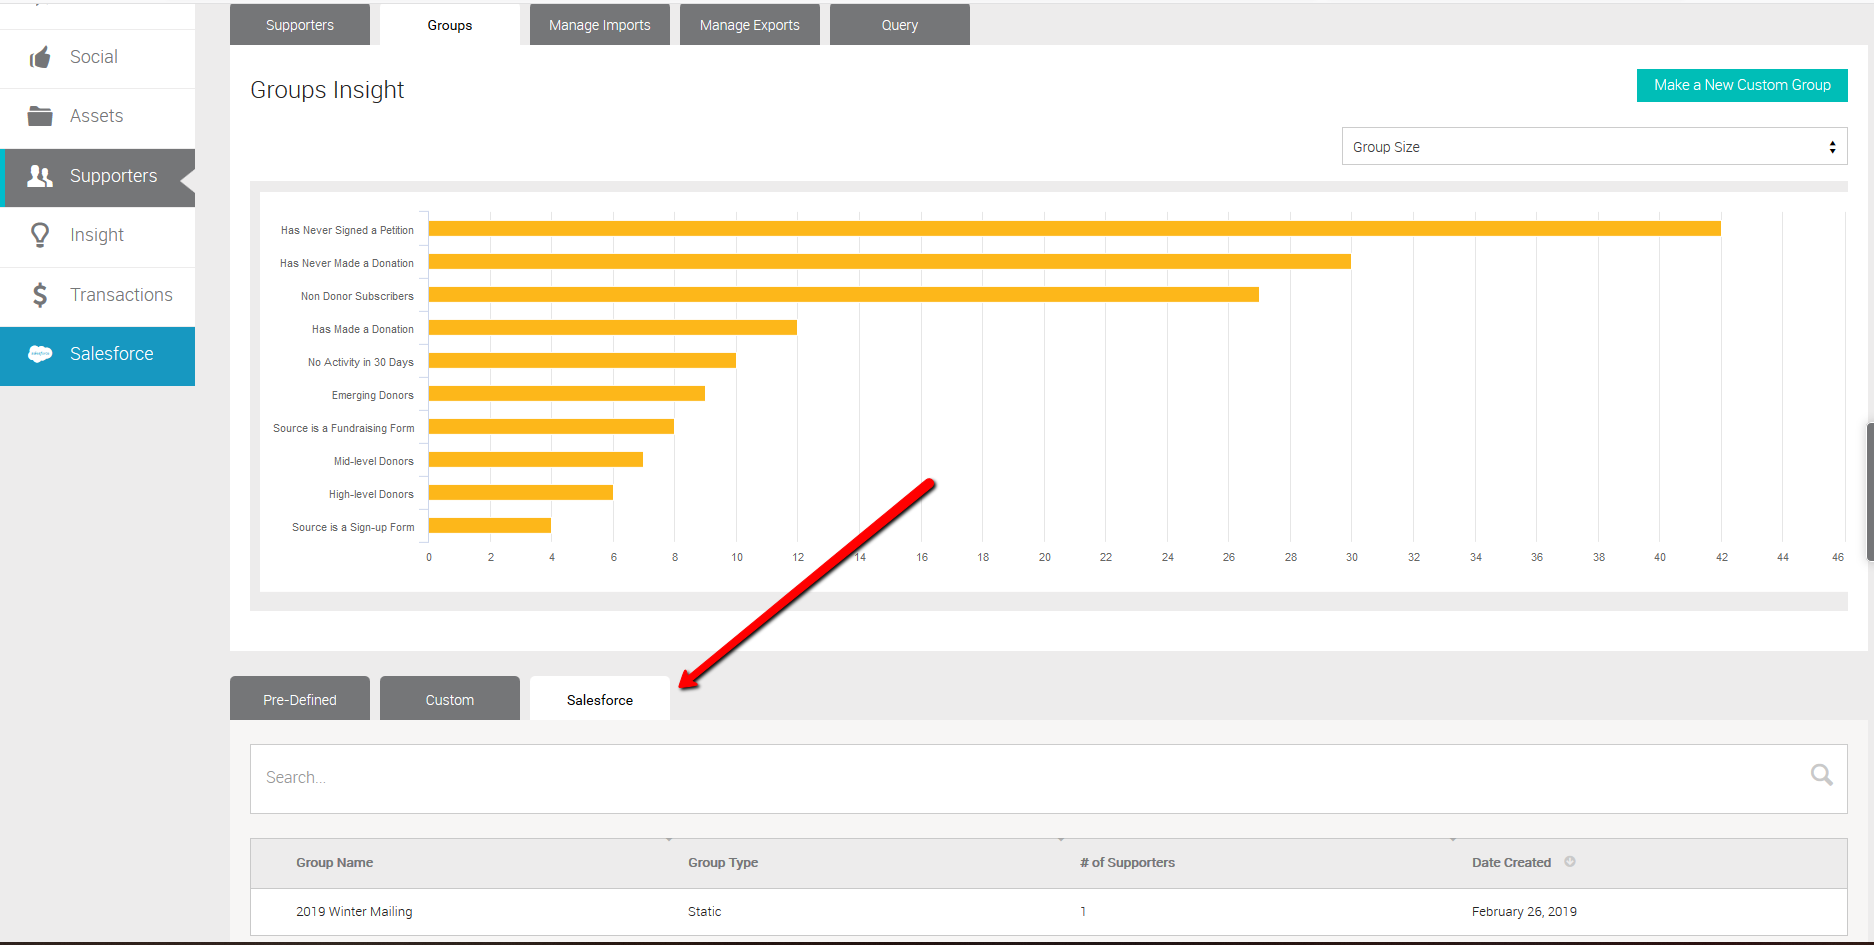
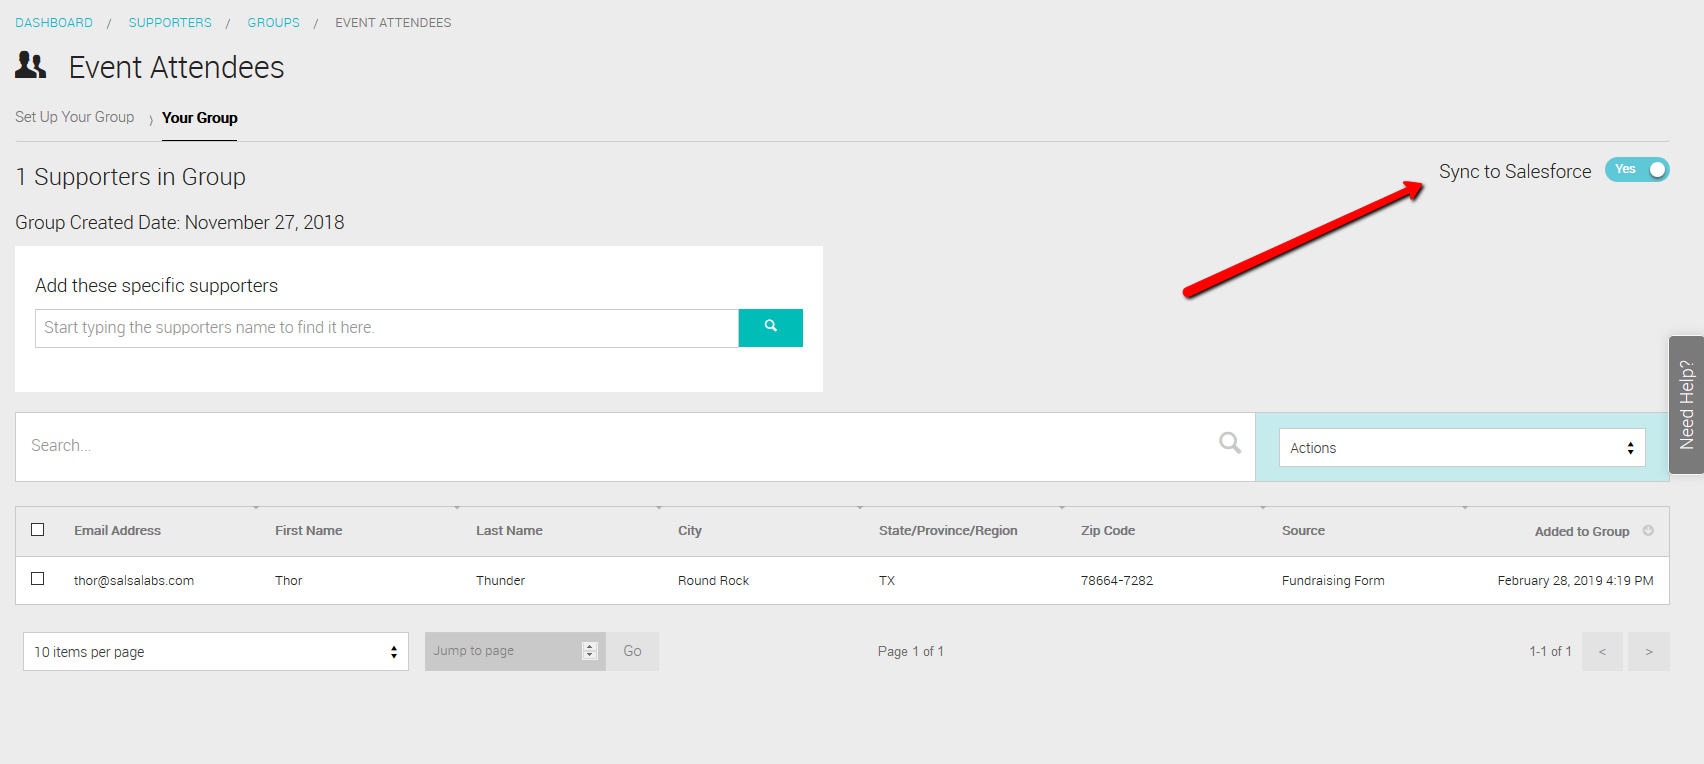
Synchronize a Salsa Engage Group to a Salesforce Campaign
After integrating with Salesforce, any Pre-defined or Custom Group created in Salsa has a Sync to Salesforce option. Find this option on the pre-defined View Group Members tab or the custom Your Group tab of the group after the group has been created.
The Campaign that the integration created in Salesforce has the same name as the matching group in Salsa. In addition, the Campaign has a type of ‘Engage Group‘ to easily identify them in relation to your other campaigns. Similarly, the associated Campaign Member records created for Contacts in the Campaign will have a status of ‘Group Member‘.
Supporters that are added to or removed from the group in Salsa will be added or removed from the matching Campaign in Salesforce upon each sync.
4. Synchronize Engage supporters with Salesforce contacts.
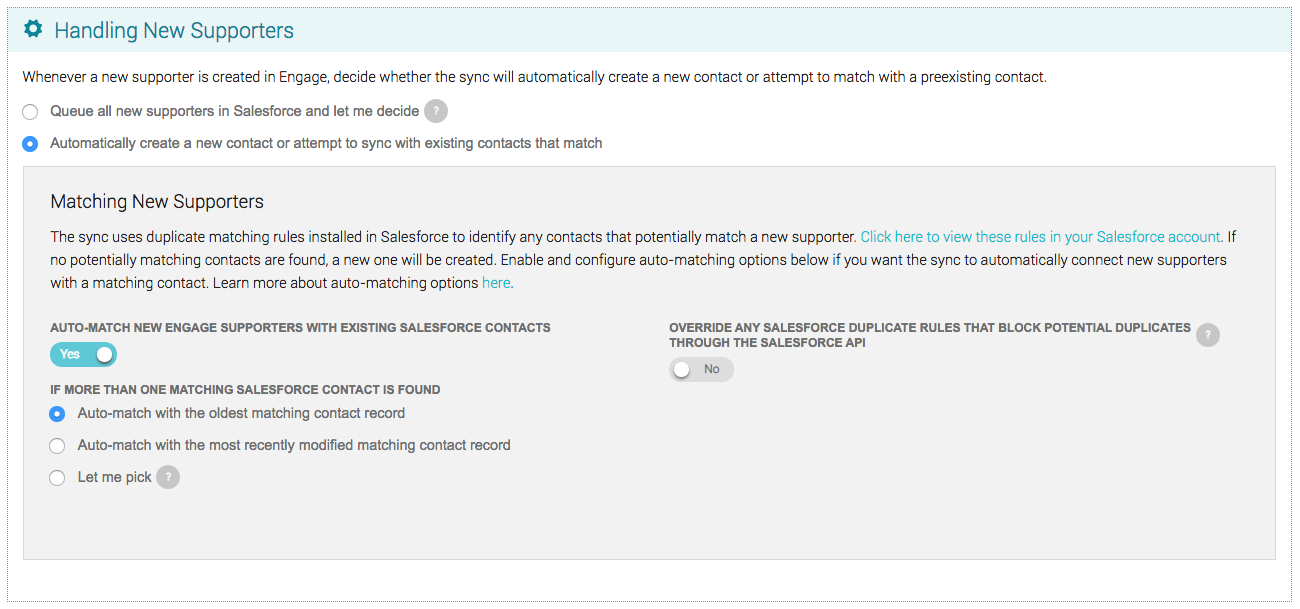
In Engage, you can opt for the integration to always create a new Contact or attempt to sync with an existing contact that matches with an existing Salesforce contact automatically, or the integration can always send those new supporters to the Salsa Engage New Supporter Queue to be resolved individually. This option is found under Handling New Supporters section in the Salesforce menu under the Settings tab.

Creating New Contacts Automatically
Click Queue All New Supporters in Salesforce and let me decide to queue all new supporters in the Salsa Engage New Supporter Queue for a Salesforce administrator to resolve. This includes new supporters that had no potential matches. While waiting for manual resolution, no activities, donations, or other records associated with that new supporter will be pushed to Salesforce. This ensures that the connected activity records are added to the correct contact in Salesforce once resolved.
Click Automatically Create a New Contact or Attempt to Sync With Existing Contacts That Match to automatically create new supporters that have no potential matches as new contacts. We provide a few additional options when you select this option that will determine what happens if there are potential matches.
Matching with Existing Contacts Automatically
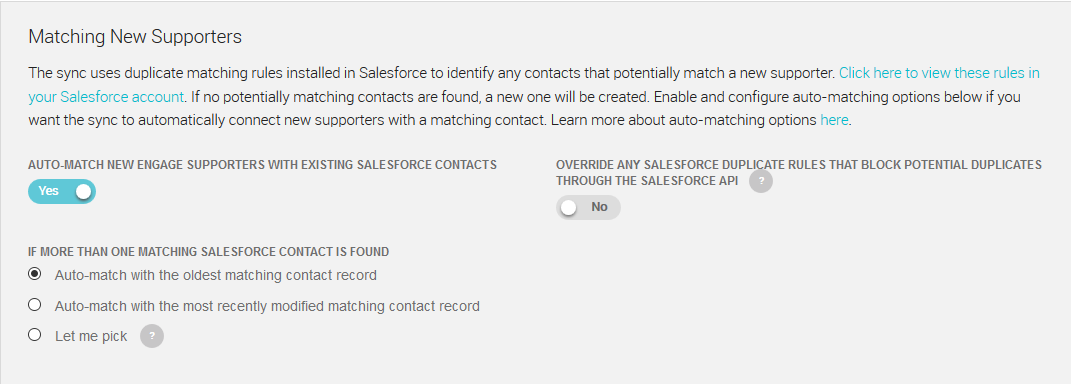
Set Auto-match new Engage Supporters with existing Salesforce Contacts to No to automatically create a new contact from new supporters without any potential matches. If any potential match is found, it will be queued in the Salsa Engage New Supporter Queue for a Salesforce administrator to resolve.
Set Auto-match new Engage Supporters with existing Salesforce Contacts to Yes to allow the integration to look at the number of potentially matching contacts before deciding whether to auto-match.
- If only one potentially matching contact exists, it will automatically connect to that contact.
If more than one potential match is found, a further setting decides whether the integration should automatically match with the oldest or the most recently modified contact. Or, you can choose Let me decide to leave it queued in the Salsa Engage New Supporter Queue for a Salesforce administrator to resolve.
Overriding other Duplicate Rules in Salesforce
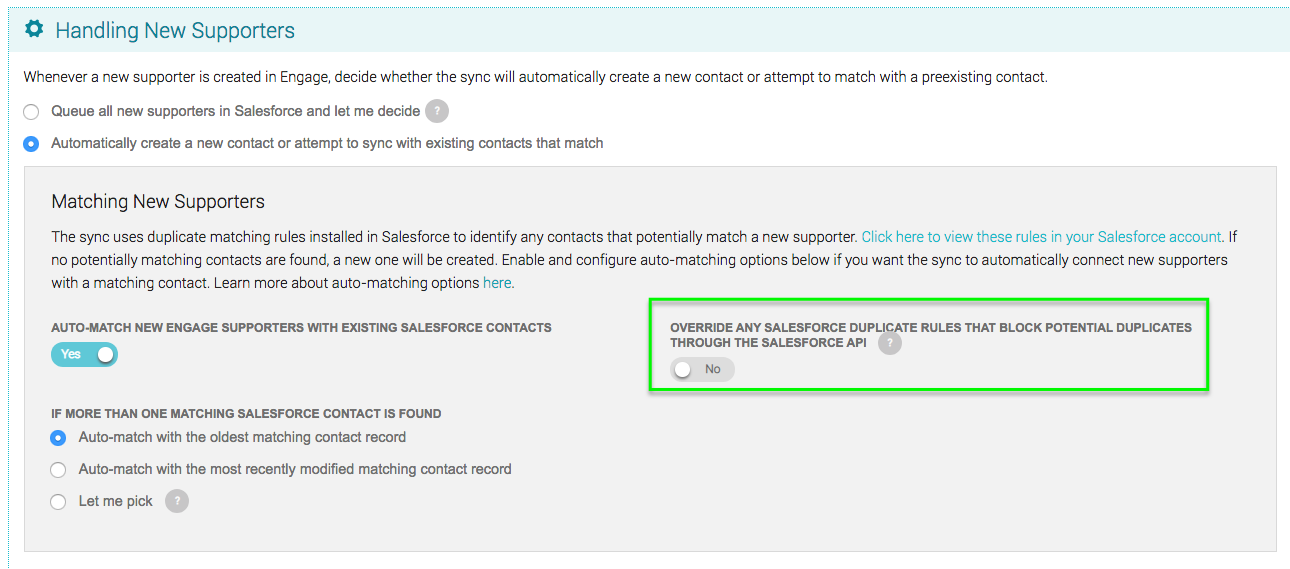
Overriding other Duplicate Rules in Salesforce may be necessary to create new contacts through the integration. The integration uses the API to manage the creation of new contacts. If, for example, your Salesforce account has a rule set to alert whenever a new contact matches an existing contact’s Last Name, it may prevent the integration from creating a new contact through the API.
Resolving Entries in the Salsa Engage New Supporter Queue
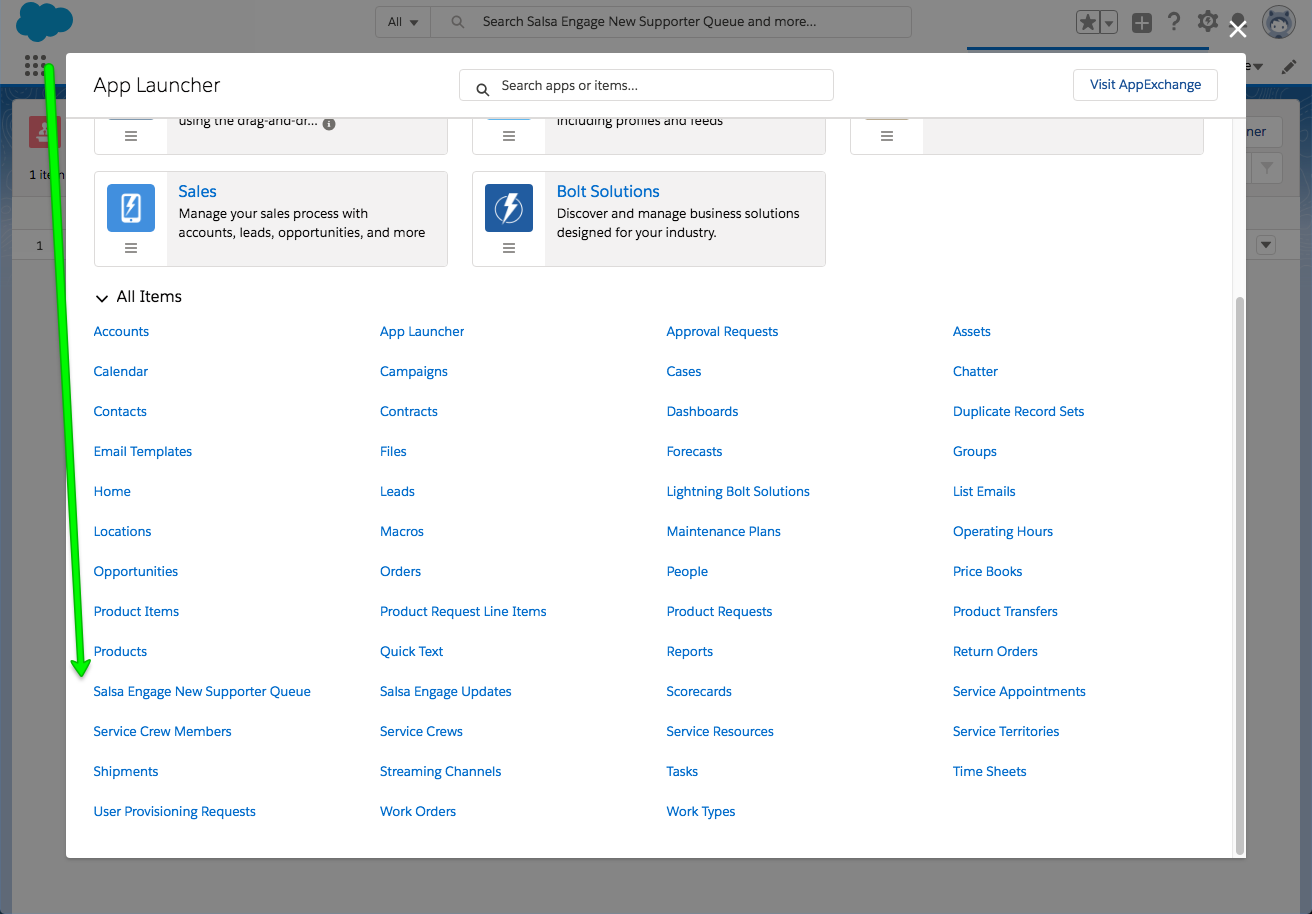
Entries made in the Salsa Engage New Supporter Queue that have not been cleared automatically by the integration must be resolved by a Salesforce administrator. You can find the queue in Salesforce under the App Launcher while using the Lightning Interface or as a tab in the Classic Interface. Search for Salsa Engage New Supporter Queue.
If there are any pending entries, they will be listed. You can click into an entry to see any potentially matching contacts. You can decide whether to create a new contact for this record or match with an existing contact by clicking the Merge link in the Action column.
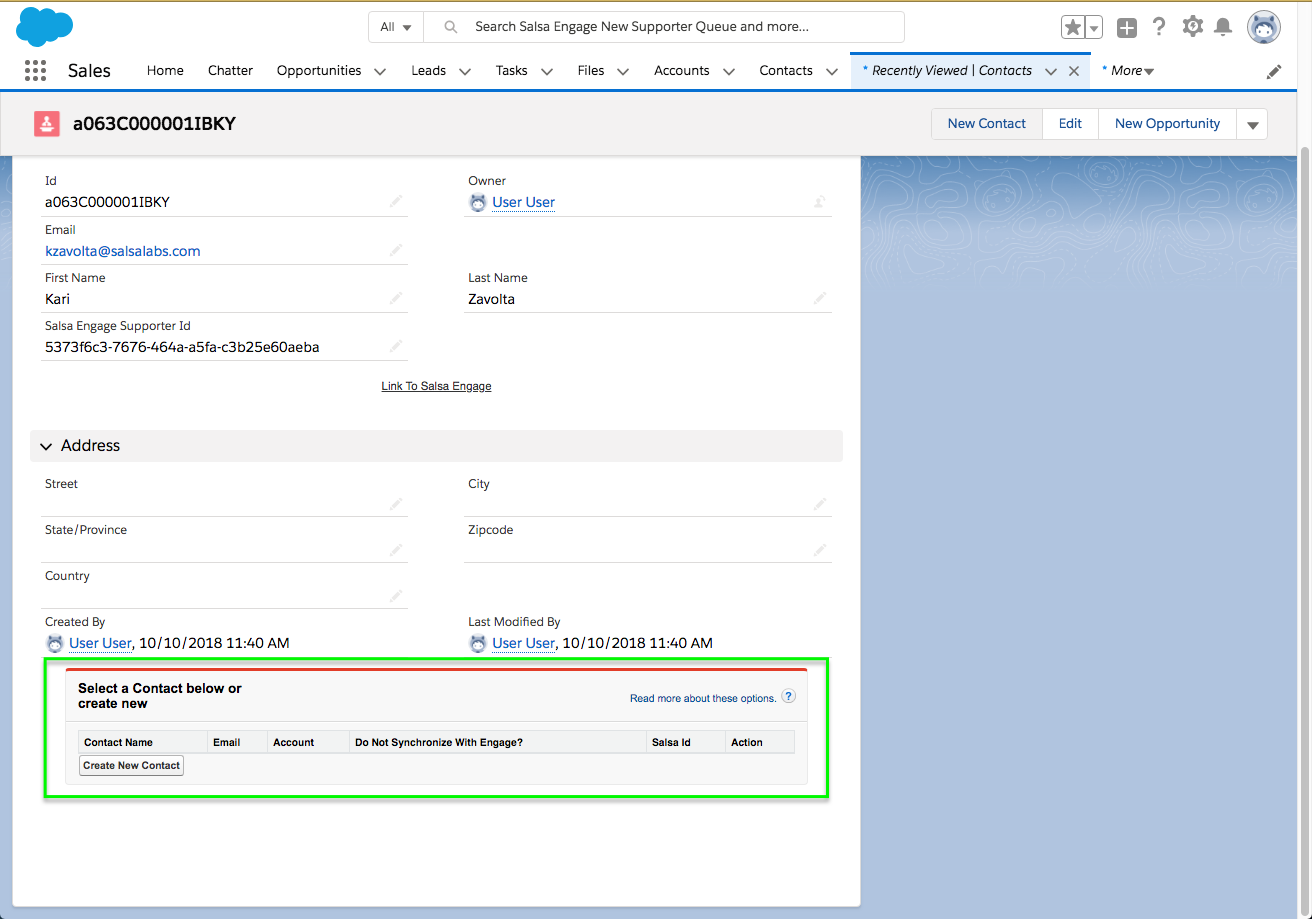
Once a decision is made, the full supporter data, donations, and other activity records tied to the pending new supporter will be sent to Salesforce and applied on the next sync.
Creating a Custom Duplicate Rule and Matching Rule in Salesforce
To add a custom rule…
- Go to Duplicate Rules in the Salesforce Setup menu. Click on the New Rule button and select Salsa Engage New Supporter Queue.
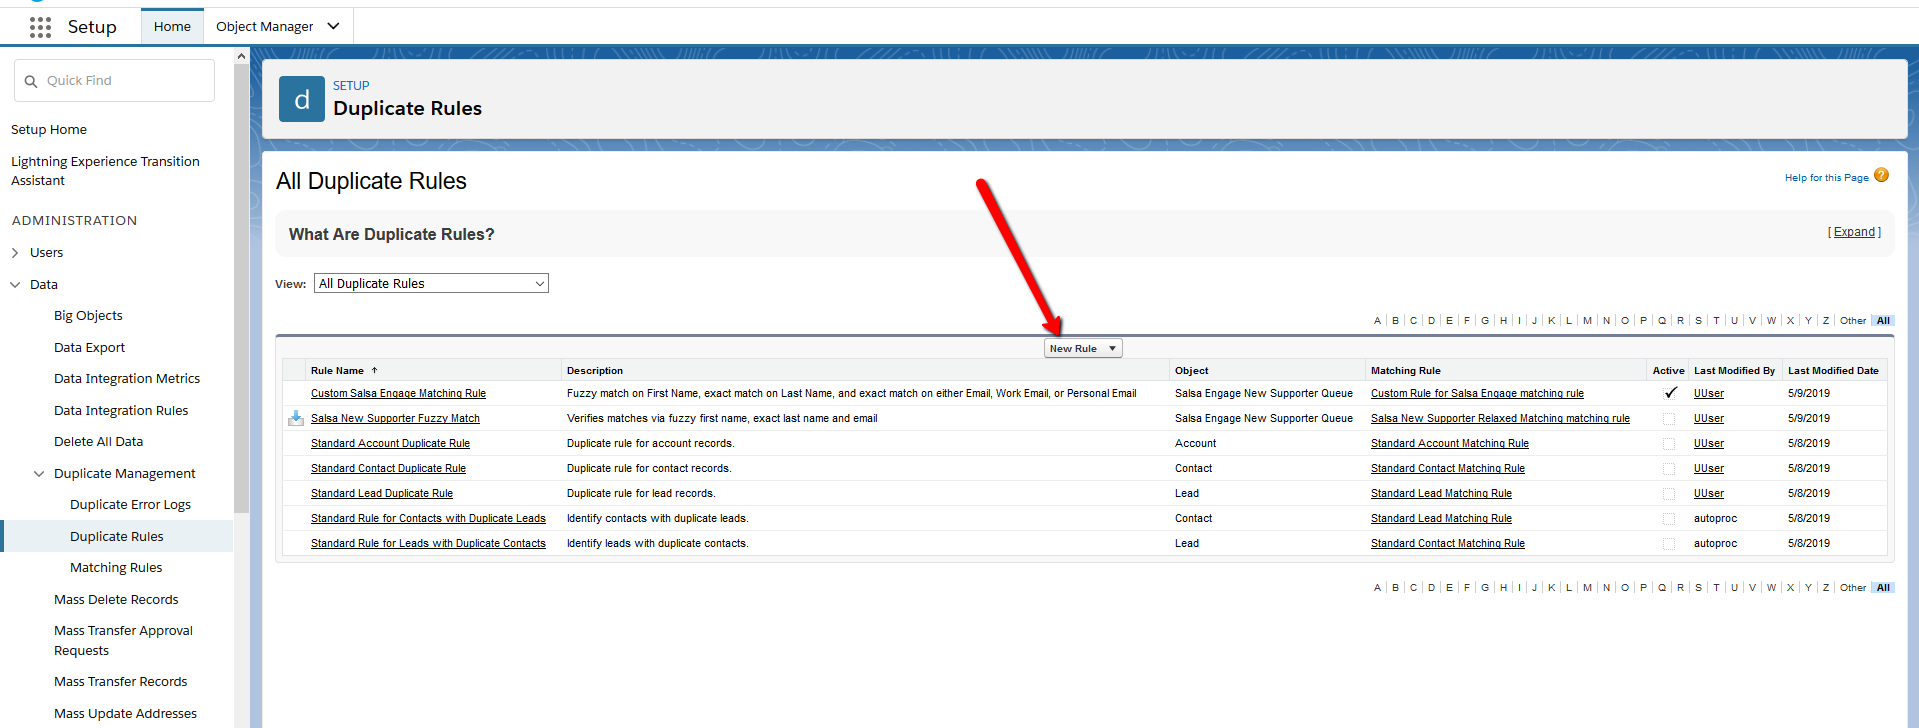
- In the resulting window, give your rule a name and description.
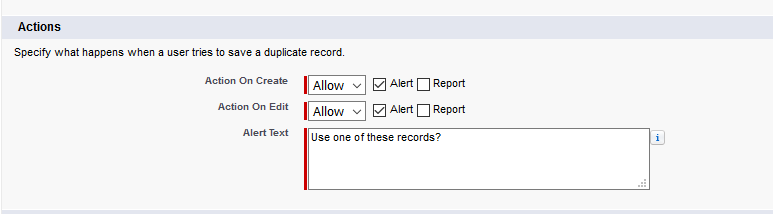
- Under Actions…
- set the options for both Actions on Create and Actions on Edit to Allow. Note: if you set either option to Block, the sync will not be able to create new contacts.
- Check Alert and uncheck Report.
- Under Matching Rules…
- select Contacts for the object to compare to the Salsa Engage New Supporter Queue.
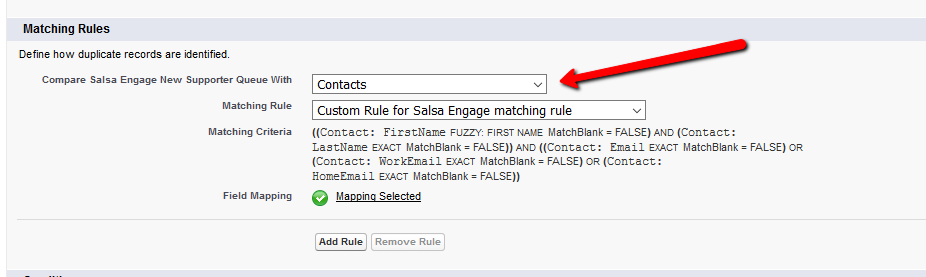
- Either –Select a Matching Rule– OR –Create New Matching Rule– option.

If you select to create a new matching rule, you will be prompted to add a new matching rule. Click here to learn how to create Matching Rules. After creating your matching rule, you’ll return to the Duplicate Rule creation screen. - Set the mapping between the two objects you’re comparing by clicking on the Field Mapping link Mapping Not Selected.
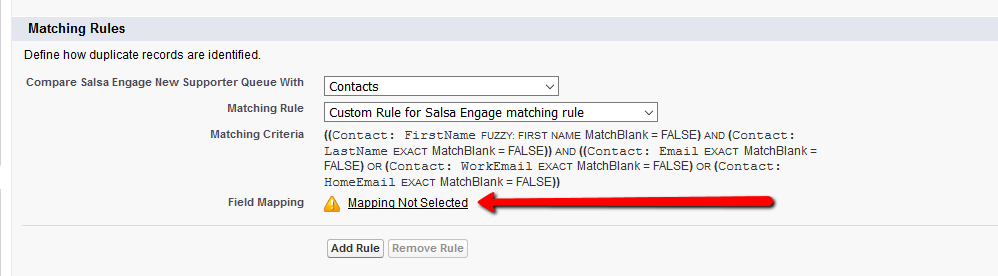
- Click Add Rule to create the new Duplicate Rule.
- select Contacts for the object to compare to the Salsa Engage New Supporter Queue.
- Once the new Duplicate Rule is created, click Activate to activate the new rule.
- Deactivate the Salsa New Supporter Fuzzy Match rule added by the integration so that it doesn’t conflict with your new custom rule.
What happens if a new supporter matches a contact that’s already synced to Engage?
Before matching a new supporter from Engage to an existing contact, the integration will verify whether the contact identified by the matching rule has already been synchronized to Salsa. This determination is based on the matching contact record having an “Engage Supporter Id.” If the matching contact is already synchronized to Engage, the new supporter will be retained in the Salsa Engage New Supporter Queue.
The queue entry will list the matching contact with options to either create a new contact or select a matching contact. However, instead of providing the option to “link” the new supporter with the existing contact, there will be an option to Merge.
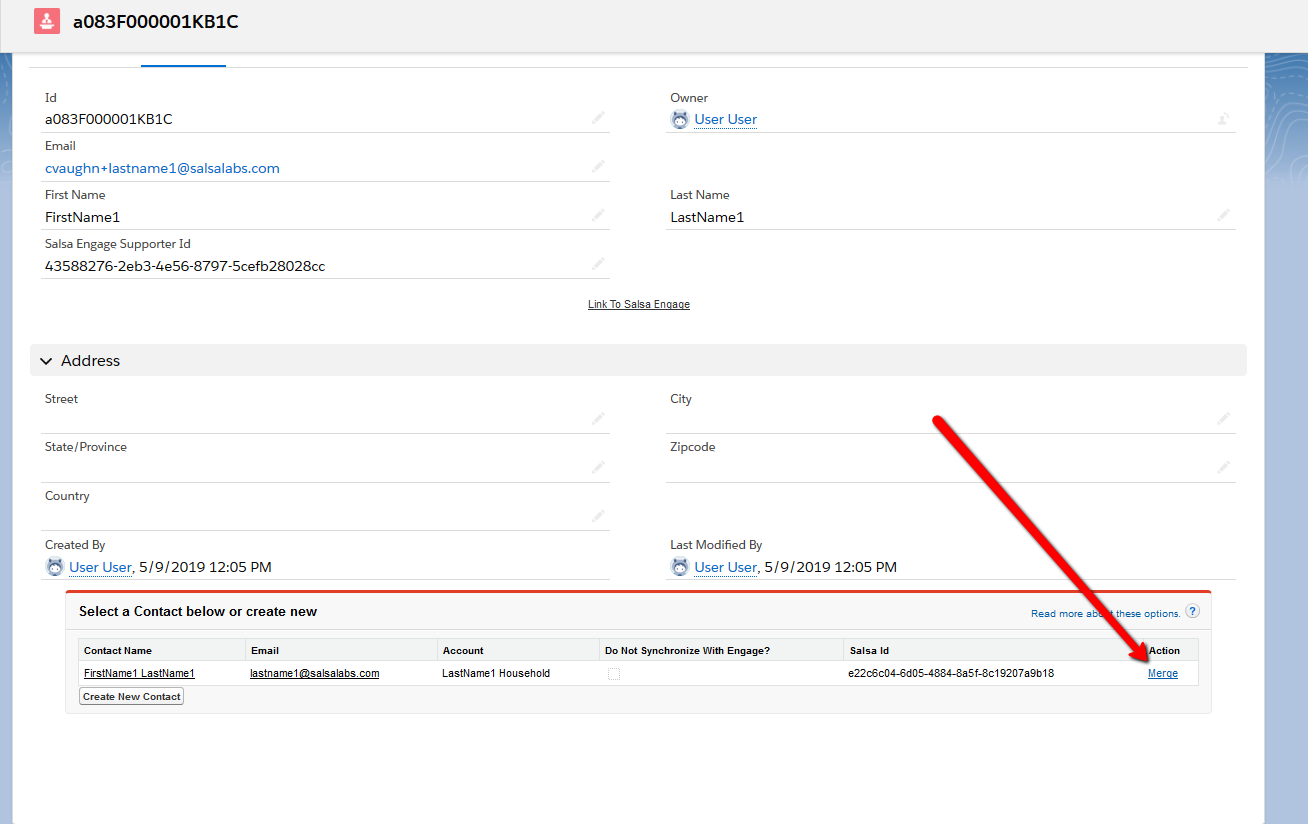
If you choose the “Merge” option, during the next scheduled sync, the pending new supporter in Engage will be merged into the existing supporter record that has already been synced to the corresponding contact. None of the new supporter’s contact information will be retained; however, all activities associated with the new supporter will be reassigned to the preexisting supporter and synchronized back to Salesforce. Additionally, the contact will be included in any campaigns the duplicate supporter had been part of, and they will be designated as the Primary Contact on any Opportunities created from subsequently synced donations.