
1. Flow Updates:-
Flow builder new updates are: –
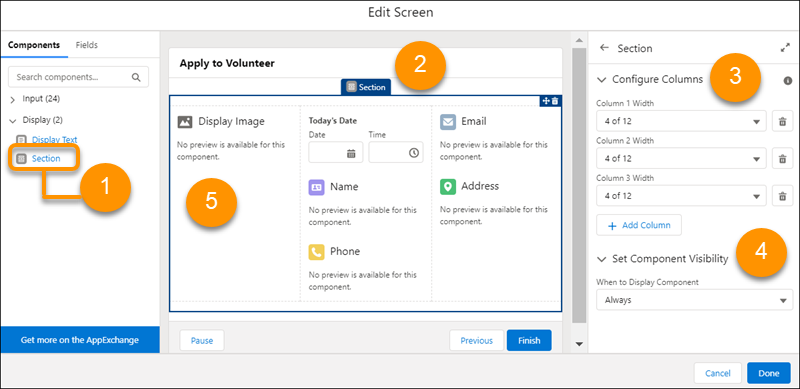
- Build Multicolumn Screens in Flow Builder:
You can divide each flow screen into multiple sections and columns to create a visually appealing and effective layout without touching a single line of code. The multicolumn screen layout is responsive, so columns stack vertically to fit on mobile phones. This feature, which is now generally available, includes changes since the beta release. The Section component is now supported in flows that get launched from Einstein Next Best Action and Actions & Recommendations components. Labels for components in sections are now supported in Translation Workbench.
- Use Is Changed in Condition Logic for Start Elements and Decision Elements:
Use the new Is Changed operator in your condition logic for Start elements and Decision elements in record-triggered flows.
- Use ISCHANGED, ISNEW, and PRIORVALUE in Record-Triggered Flow Formulas
Record-triggered flows for new and updated records now support the ISCHANGED, ISNEW, and PRIORVALUE formula functions. Copy your Process Builder or workflow rules formulas containing these functions into record-triggered flows. None of these formula functions are available in flows triggered when a record is deleted.
- Place Fields from Your Salesforce Objects Directly on Flow Screens
Now you can build screen flows faster by directly adding your existing Salesforce record fields. When you add a record field to a flow screen, the field’s name, data type, help text, requiredness, and existing values are automatically configured for you.
- Directly Update Fields in Record-Triggered Flows
With a new option in the Update Records element for record-triggered flows, you can directly update the record that triggered the flow. Previously you set filter criteria for the triggering record with a Decision element, but now you can use the Update Records element. The Update Records element only displays fields you can update, and the new option is available in all record-triggered and schedule-triggered flows. These changes mean you can now easily switch between record-triggered flows that run before or after the record is saved. Existing before-save record-triggered flows that use an Assignment element to set values for the record that triggered the flow are unaffected by this change.
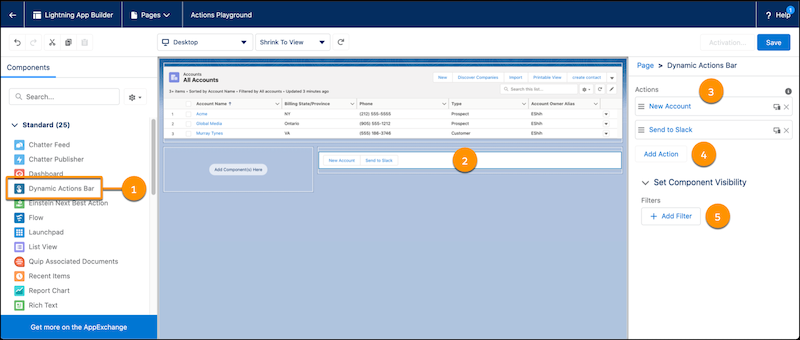
2. Dynamic Actions bar
Access all your most important actions in one convenient bar. Easily add, drag, and configure the Dynamic Actions Bar component on your app page with the Lightning App Builder. Customize your bar with standard and custom global actions.
To add a Dynamic Actions Bar to your Lightning app page, first create or edit a Lightning app page in the Lightning App Builder.
For more information, click here.
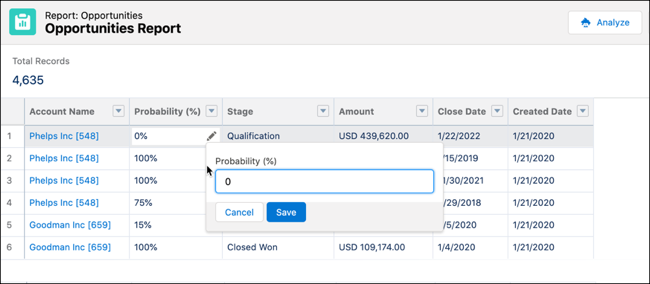
3. Inline editing in salesforce reports
Keep the data in your reports and object records up to date while saving time and clicks. When the source data for a report gets out of date, it’s not necessary to go back to the original object record to update the information. With inline editing, you can update certain types of text, numeric, and checkbox fields without leaving the Report Run page. For example, Sales reps can run an opportunity report and review and update the opportunity amounts in one place.
Steps: – contact Salesforce Customer Support and request to have inline editing turned on. Then in Setup, from Reports and Dashboards Settings, select Enable Inline Editing in Reports (Lightning Experience only), and save your changes.
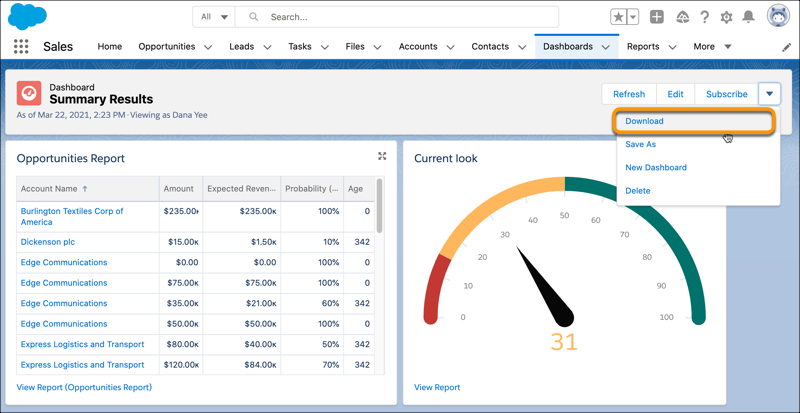
4. Download a dashboard image to a file
For an image of your dashboard that you can embed in presentations or refer to wherever you are, download the dashboard to a PNG file. Previously, you could only obtain a dashboard image by using a screen capture app. These changes apply to Lightning Experience only.
Steps: – From the dashboard, click Show More | Download. The dashboard is saved to your selected location in PNG format.
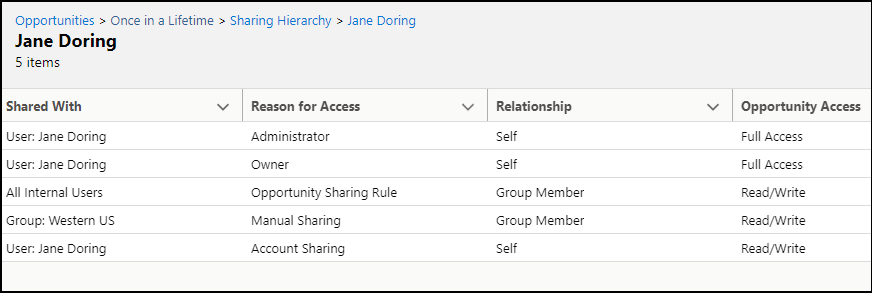
5. See record access reasons in lightning experience
A user has access to a record, but why? Is it because of their role? Their territory? From a sharing rule? Now you can see why a user has the access they do, right from Record Sharing Hierarchy in Lightning Experience. Previously, you switched to Salesforce Classic to see this information. Sharing Hierarchy is now available on the action menu, not just in the Share window.
How: Select Sharing Hierarchy from the action menu on the record. Click View next to a user’s name. You see the record access the user has, and the reason for the access in the displayed table.

6. Improve page performance with custom lightning component analysis
Get insights on custom Lightning components on your Lightning record pages. Updates to the Lightning page analysis tool in the Lightning App Builder give you more performance predictions for your Lightning page.
How: To view the assessment of your record page’s performance, click Analyze from the Lightning App Builder toolbar. Custom Lightning components on your Lightning record pages are now analyzed and incorporated into the desktop performance analysis card results.
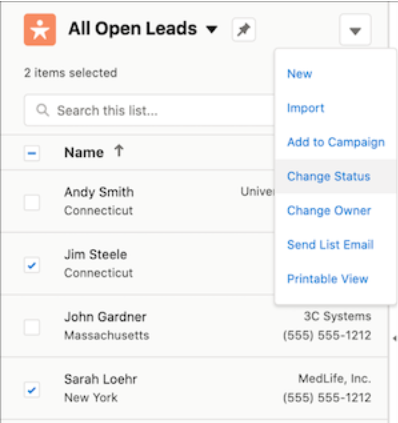
7. Save time with mass actions in split view
In split view, no need to open a separate list page & act on multiple records at once. Select items in the split view list and apply an action to all of them in standard or console view.
How: A split view automatically has checkboxes if there’s a quick action available for all the items in the list, and you can apply a quick action to the selected records in the actions dropdown menu. The items automatically deselect after you apply the action. Mass actions in split view follow the same logic as mass actions in table view. Inline edit isn’t supported in split view, so you see checkboxes only if the object has mass actions available.
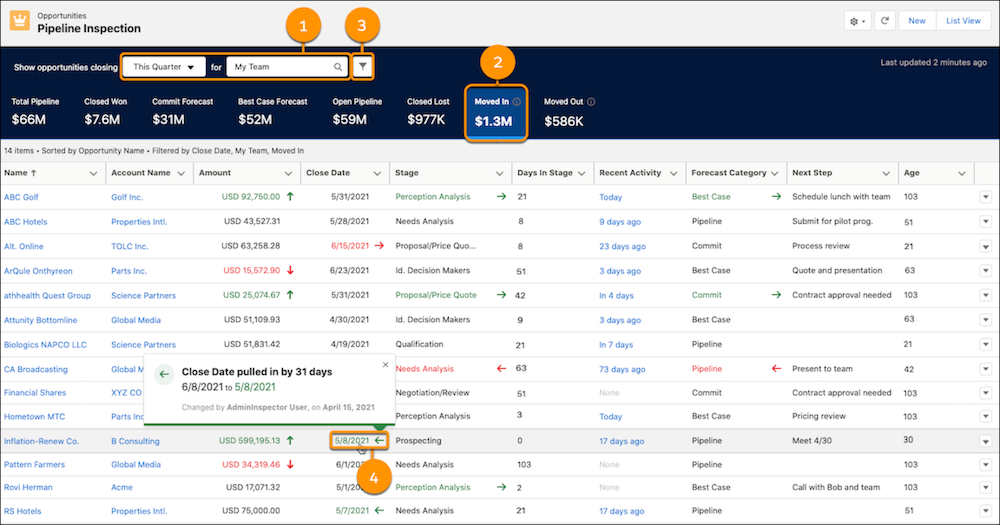
8. Drive sales team accountability with pipeline inspection
Pipeline Inspection gives sales teams a single view of their pipelines with key metrics, opportunities, and weekly changes in close dates, amounts, stages, and forecast categories. With these insights, sales teams can focus on the most important opportunities, and sales managers can spend more time coaching reps to close more deals.
Steps: – From Setup, in the Quick Find box, enter Pipeline Inspection, and then select Pipeline Inspection Setup. Turn on Pipeline Inspection and verify that you have Historical Trending enabled and configured for opportunities. Add the Pipeline Inspection button and assign the Pipeline Inspection permission set to the users who you want to have access to Pipeline Inspection.
When enabled, users access Pipeline Inspection from the Opportunities tab.
9. Native sales navigator integration for LinkedIn
Your sales reps can connect with customers in more ways with more information using the LinkedIn Sales Navigator native integration. With native components, sales reps can see LinkedIn profiles on lead, contact, opportunity, and account pages. And they can send In Mails and connection requests with native Lightning actions. Sales managers can add LinkedIn In Mail and connection request steps to High Velocity Sales cadences.
In Lightning App Builder, add the LinkedIn Sales Navigator (Native) components to lead, contact, opportunity, and account pages. Add the In Mail and Connection Request Lightning actions to the same pages.
10. Three free in-app guidance walkthroughs
Now you can create as many walkthroughs as you want, showing your users up to three at a time. If you want to show them more, subscribe to myTrailhead. Previously, activating custom walkthroughs for your users required a myTrailhead subscription or a free trial.
For more information click here.