Introduction
In today’s data-driven landscape, organizations are inundated with vast amounts of information from myriad sources. Effectively managing and harnessing this data is paramount for businesses aiming to maintain a competitive edge. Snowflake and Salesforce Data Cloud are two titans in the realm of cloud data management, each offering robust capabilities to handle complex data needs.
Consider this: A recent survey revealed that 60% of Salesforce administrators faced challenges related to data integration and real-time analytics. The integration of Snowflake with Salesforce Data Cloud addresses these challenges head-on, providing a seamless environment for data management and analysis.
In this guide, we’ll delve deep into the intricacies of Snowflake and Salesforce Data Cloud, exploring their core components, integration methodologies, architectural frameworks, and the tangible benefits they bring to organizations.
What is Salesforce Data Cloud?
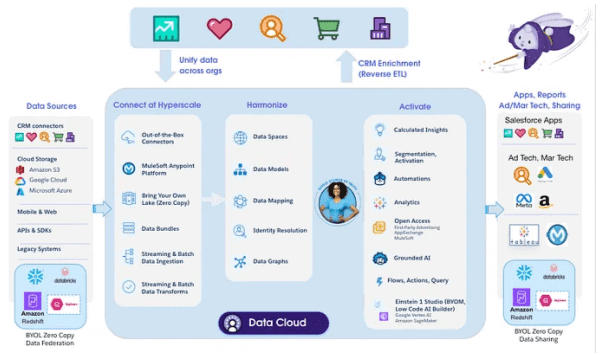
Salesforce Data Cloud revolutionizes how businesses harness their disconnected and trapped data, both structured and unstructured, to provide a comprehensive, actionable 360-degree view of their customers. Serving as a foundational element of the Einstein 1 Platform, Data Cloud facilitates connected experiences for businesses and consumers, leveraging insights and AI powered by metadata and unified data harmonization.
Data Cloud has built-in connectors that bring in data, in batch or streaming mode, from many sources, including Salesforce apps, mobile, web, connected devices, and legacy systems. With an open and extensible architecture, Data Cloud brings together a unified view of data to help your Sales, Service, and Marketing teams build personalized customer experiences, trigger data-driven actions and workflows, and safely drive AI across all of your Salesforce apps.
Key Features of Salesforce Data Cloud
Key features of Salesforce Data Cloud include:
- Unified Customer Profiles: Consolidates data from multiple sources into a single profile.
- Advanced Analytics: Offers powerful tools for analyzing customer behavior and trends.
- Integration with Salesforce Ecosystem: Enhances functionality by integrating with Salesforce CRM and other services.
What is Snowflake?
Snowflake is an advanced data platform that enables data storage, processing, and analytic solutions. It runs completely on cloud infrastructure, with the exception of its optional command-line clients, drivers, and connectors. Snowflake sits on public clouds like Amazon Web Services (AWS), Google Cloud Platform (GCP), and Azure, and it offers native support to many types of data, such as structured and semi-structured.
Developers can move data to Snowflake using any ETL tool supported by the platform. Data analysts and data scientists can also report on data from Snowflake using the many reporting tools that can connect to Snowflake, like Tableau, for example.

Let’s now take a look at how to connect the two platforms and share data from Salesforce Data Cloud to Snowflake.
Share Your Data from Salesforce Data Cloud to Snowflake
To get started, you’ll need either Account Admin, Sys Admin, or Security Admin permissions to perform these steps.
Step 1: Create the integration user
Start by creating a worksheet in Snowflake by navigating to Projects > Worksheets, and click the + icon to create a new SQL worksheet.

Note: Account Admin, Org Admin, and Security Admin are on the blocked roles list by default for new security integrations. If you want to use one of these roles as your integration user, you will need to reach out to Snowflake support. Otherwise, you will need to use a different role. You can also create a custom role.
For the purposes of this demo, we are using the Public role.
On the SQL code worksheet, replace < Data Cloud Admin or Data Aware Specialist > with a name for the user. You’ll then need to enter information for each field to create the user.

Here is an example of what the SQL should look like to create a user:

Then, press the play button in the top right-hand corner of the worksheet to run the worksheet.

Step 2: Set up OAuth and grant access to the PUBLIC role
Next, create a second SQL worksheet and paste the code block below into your worksheet.
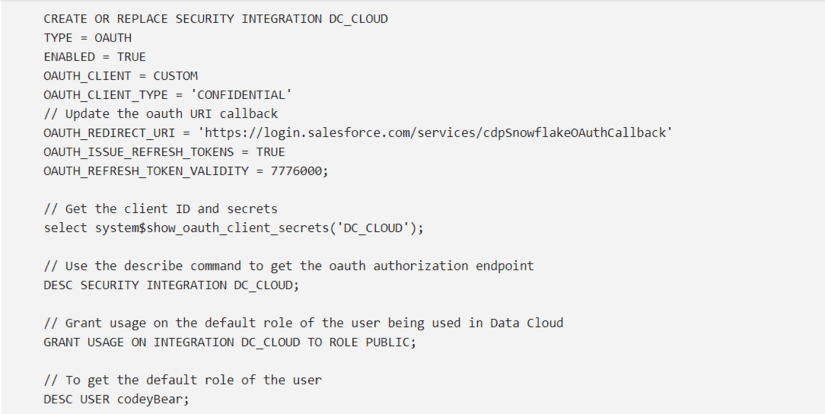
Then, run lines 1-9 to create the security integration by pressing command + return on a Mac or ctrl + enter on a Windows machine.
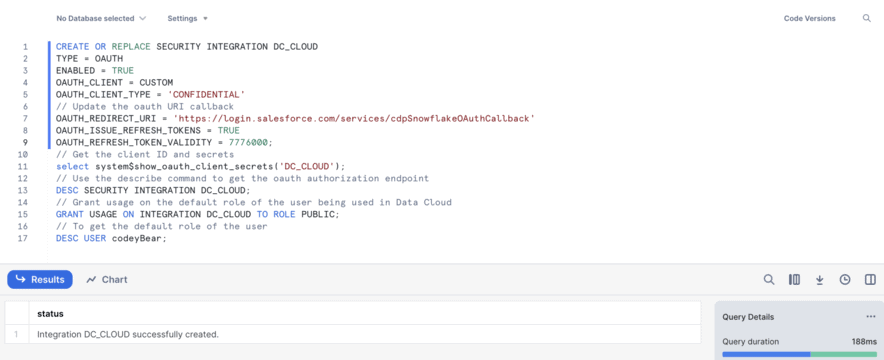
Next, run line 11 to generate the client ID and secret by pressing command +return on a Mac or ctrl + enter on a Windows machine. Take note of the client ID and secret as you will need them later.
![]()
![]()
Then, run line 13 to get the OAuth endpoint. You should see this in the table in row 9. Note down the endpoint as this is needed later.
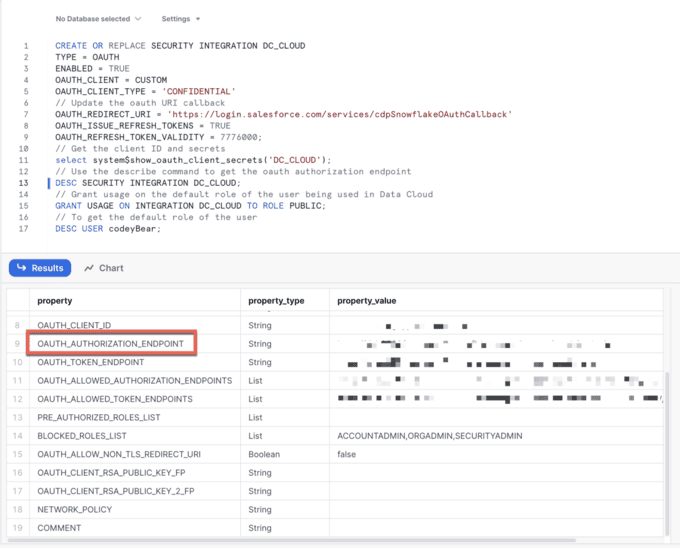
Finally, run line 15 to grant the role access to the security integration.
Step 3: Create the data share target
In Salesforce Data Cloud, navigate to Data Share Targets and click New. Then select the Snowflake tile.

Next, enter a label or name for your connection. For account URL, use your OAuth endpoint and remove everything after “.com.”

Next, enter your client ID and secret.

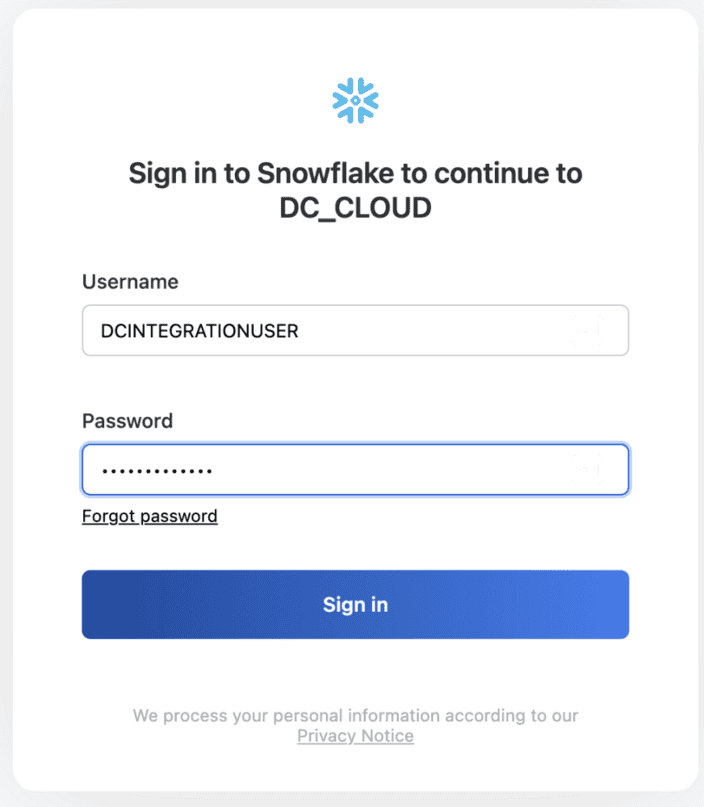
You should be redirected to a login page to enter a username and password.
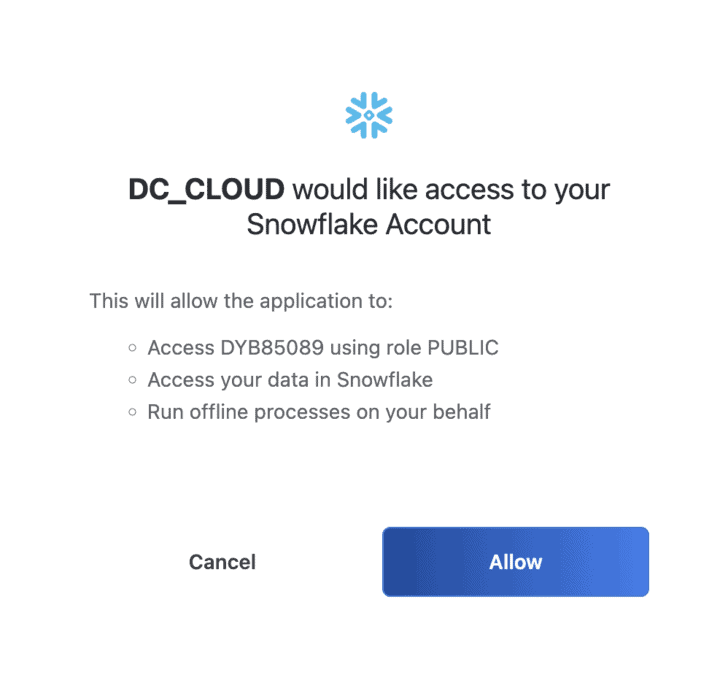
You are then redirected to another page, where you’ll need to click Allow to allow Salesforce Data Cloud to access your Snowflake account.
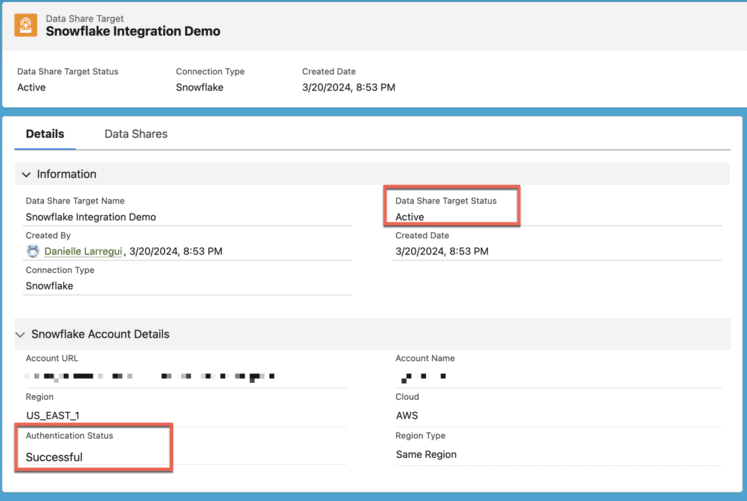
You can verify that your data share target was connected successfully by checking that your status is showing as “Active,” and that your authentication status is showing “Successful.”
Step 4: Share your Data Cloud data with Snowflake
Now, let’s share our Salesforce Data Cloud data with Snowflake.
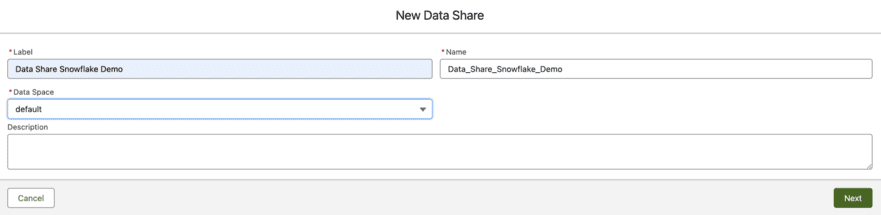
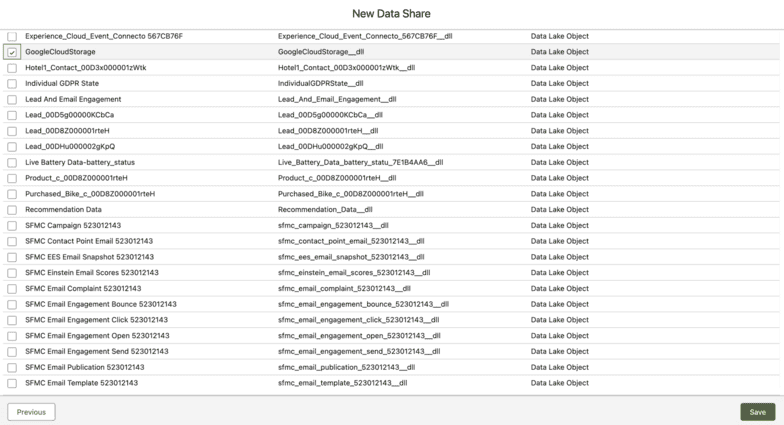
First, navigate to Data Shares and click New. Enter a label and choose a data space to associate your data share to. In this case, you’ll just use your default data space.
Next, choose a data lake object or data model object to share. In this case, you’ll choose to share a data lake object that is ingesting data from Google Cloud Storage. Finally, click Save.
Next, choose your data share target by clicking the Link/Unlink Data Share Target button.

Then, choose your data share target and click Save.

Step 5: Get the data in Snowflake
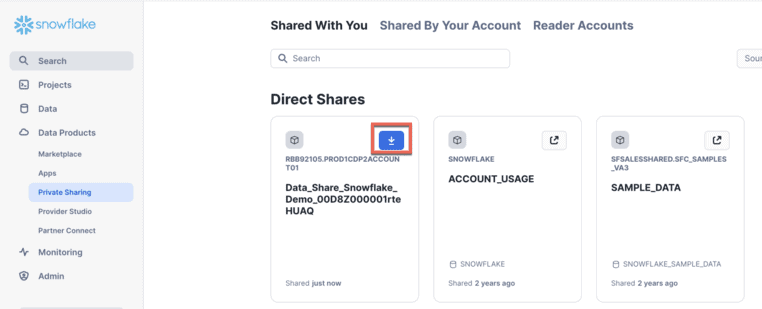
In Snowflake, navigate to Data Products, then Private Sharing. Under Direct Shares, you’ll see the data share from Salesforce Data Cloud. Click the down arrow button to get the data.
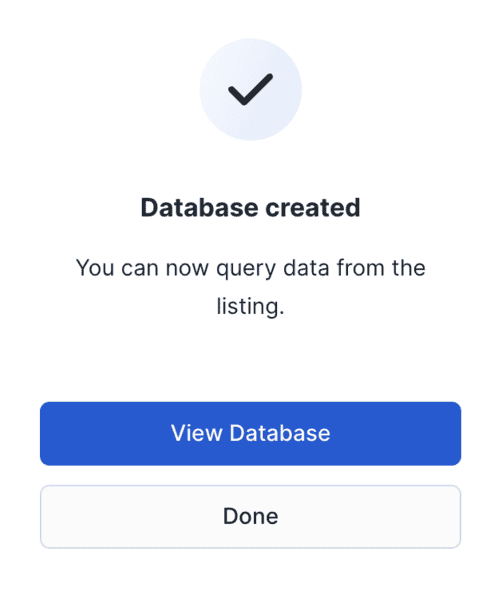
You can rename the database and choose which roles can access the database.

Click Done or View Database to view the database. Please note that your data might be brought over under a different container.
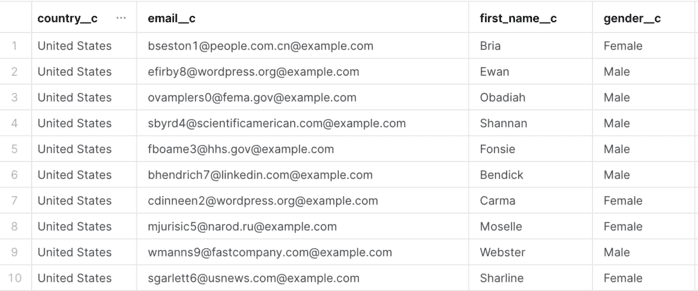
You are then able to see your database under schema and views. You can view your metadata, such as field names and types.
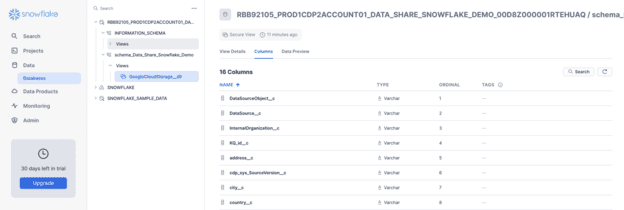
You can also preview your data in the database.
Key Features of Snowflake
Snowflake offers several compelling features, including:
- Elastic Scalability: The ability to scale compute and storage independently.
- Concurrency Handling: Support for multiple users and workloads without performance degradation.
- Integrated Data Sharing: Facilitates easy data sharing across organizations with no additional infrastructure.
Key Benefits of Using Snowflake with Salesforce Data Cloud
Integrating Snowflake with Salesforce Data Cloud offers numerous advantages:
Seamless Data Integration
Technical Insight: Zero-copy data sharing eliminates the need for data replication, reducing storage overhead and ensuring data consistency.
Business Impact: Streamlined data workflows lead to faster decision-making and operational efficiency.
Real-World Example: A manufacturing company reduced data processing times by 40% after implementing zero-copy data sharing between Snowflake and Salesforce Data Cloud.
Cost Efficiency
Technical Insight: Snowflake’s separation of storage and compute allows organizations to optimize resource allocation based on specific needs.
Business Impact: Reduced infrastructure costs and improved budget management.
Real-World Example: A marketing agency cut its data warehousing expenses by 30% by leveraging Snowflake’s scalable architecture.
Improved Performance
Technical Insight: Virtual warehouses enable parallel processing of queries, enhancing system responsiveness.
Business Impact: Faster data retrieval leads to improved user experience and productivity.
Real-World Example: An e-commerce platform saw a 50% reduction in query response times after integrating Snowflake with Salesforce Data Cloud.
Advanced Analytics Capabilities
Technical Insight: The integration facilitates complex data analyses, including predictive modeling and machine learning, by leveraging Snowflake’s AI-ready infrastructure alongside Salesforce’s real-time customer data insights.
Comparing Snowflake and Salesforce Data Cloud
Data Management Capabilities
While Snowflake focuses on scalable data warehousing and processing, Salesforce Data Cloud excels in customer data management and integration within the Salesforce ecosystem. Snowflake is ideal for handling large volumes of data with high-speed analytics, whereas Salesforce Data Cloud is geared towards managing customer relationships and enhancing customer insights.
Performance and Scalability
Snowflake’s architecture is designed for elasticity, enabling it to handle large-scale data operations efficiently. Salesforce Data Cloud, on the other hand, is optimized for integrating and analyzing customer data but may not match Snowflake’s scalability in terms of raw data processing.
Security Features
Both platforms offer robust security features. Snowflake provides encryption at rest and in transit, as well as advanced access controls. Salesforce Data Cloud offers comprehensive security measures, including data encryption and compliance with various industry standards. The choice between the two often depends on specific security requirements and use cases.
Integration of Snowflake and Salesforce Data Cloud
Why Integrate Snowflake with Salesforce Data Cloud?
Integrating Snowflake with Salesforce Data Cloud can enhance data management capabilities by combining Snowflake’s powerful data warehousing features with Salesforce’s comprehensive customer data management. This integration allows for more efficient data analysis, improved customer insights, and streamlined data operations.
Integration Strategies and Best Practices
To integrate Snowflake with Salesforce Data Cloud effectively, businesses should:
- Define Clear Objectives: Understand what you aim to achieve with the integration.
- Use API Integrations: Leverage APIs and middleware to connect the two platforms seamlessly.
- Ensure Data Consistency: Implement data synchronization processes to maintain data accuracy.
Tools and Technologies for Integration
Several tools and technologies facilitate the integration of Snowflake and Salesforce Data Cloud, including ETL (Extract, Transform, Load) tools like Talend and Informatica, and middleware solutions such as MuleSoft. These tools help bridge the gap between the two platforms and ensure smooth data flow.
Strategies to Overcome Integration Issues
To overcome integration challenges, consider the following strategies:
- Conduct Thorough Planning: Develop a detailed integration plan addressing potential issues.
- Test Thoroughly: Perform extensive testing to identify and resolve integration problems before going live.
- Utilize Expert Support: Engage with experts or consultants who have experience in integrating these platforms.
Summary
Integrating Snowflake with Salesforce Data Cloud unlocks unprecedented opportunities for real-time data analytics, AI-driven insights, and enhanced customer engagement. By leveraging best practices, optimizing performance, and preparing for future trends, businesses can maximize the value of their data ecosystem.
As organizations continue their digital transformation journeys, the synergy between Snowflake and Salesforce Data Cloud will remain a game-changer in the world of data-driven decision-making. Now is the time to harness this powerful integration to propel your business into the future.
